
Tag: Desserts
Cashew Butter Oatmeal Cookies
Cashew butter puts a unique spin on the expected in these chewy Cashew Butter Oatmeal Cookies.

Not too long ago, I received an assignment from one of the publications I write for about the nutrition of cashew butter. Having limited experience with this particular nut butter, I was basically starting at square one. I’m your typical American when it comes to nut butters–as in, peanut butter is my gold standard. When our family lived in Germany a few years ago, the lack of this grocery staple in stores led to much weeping and gnashing of teeth (until my mom arrived from the States bearing some precious PB).
Doing a bit of research for my article led to some interesting revelations about cashew butter. Even though it has a teeny bit more calories than peanut butter, its fats are 80% unsaturated (aka the healthy kind). Plus–how weird is this?–certain antioxidant compounds in cashews have been associated with improved vision and eye health. You can read my full article with all cashew butter’s health benefits here.
Coincidentally, I happened to receive a few samples of cashew butter shortly after writing my article. One of which was this intriguing salted caramel variety.

Up until now, I’ve been noshing it slathered on graham crackers and as a dip for green apples. (Not sure if it’s giving me superhuman vision yet, but it sure is tasty.) With its creamy texture and comparable flavor to peanut butter, I figured I could put it to work in some of the other vehicles I’d normally use PB for…like cookies!

These Cashew Butter Oatmeal Cookies are a twist on the usual peanut butter oatmeal cookies. They’ve got the craveable crispy-on-the-outside, tender-on-the-inside you know and love in the best peanut butter oatmeal cookies, with a slightly different taste. I especially enjoyed the hint of salted caramel in the variety I used, but you can easily use any kind of cashew butter here.

I guess I’ve come full circle on my cashew butter journey. Now that I know a bit more about it and have used it in several ways, I’m all aboard on the nut train. And I’m pretty sure if you try these cookies, you will be, too.

Cashew Butter Oatmeal Cookies
Put a unique spin on the usual oatmeal cookies with cashew butter! These cookies have the crispy-on-the-outside, soft-on-the-inside texture you crave.
Prep Time10 mins
Cook Time12 mins
Servings: 2 dozen
Ingredients
- 1/2 c. butter, softened
- 1/2 c. cashew butter
- 1/3 c. brown sugar
- 1/2 c. white sugar
- 1 tsp. vanilla extract
- 1 egg
- 1 1/2 c. old fashioned oats
- 1/2 c. all-purpose flour
- 1/2 tsp. baking soda
- generous 1/4 tsp. salt
- 1/2 tsp. cinnamon
Instructions
- Preheat oven to 350 degrees and grease a large baking sheet with cooking spray.
- In a large bowl, combine butter, cashew butter, brown sugar, white sugar, vanilla, and egg. Blend with a hand mixer until well mixed, 1-2 minutes.
- Add oats, flour, baking soda, salt, and cinnamon. Mix by hand until combined.
- Form into balls and drop onto greased baking sheet. Bake about 12 minutes until tops of cookies are set. Cool 10 minutes and store in an airtight container.
Notes
Adapted from Two Peas and Their Pod.
Yellow Grapefruit Bars
Yellow grapefruit bars are lemon bars’ mellow yellow cousin! Try this refreshing baked dessert with fresh-squeezed juice!

My husband calls these yellow grapefruit bars a “sleeper dessert.” You know the kind: the food you don’t think you’re gonna like that much or doesn’t seem that tasty at first…and then it grows on you. And I have to say, I think he’s right.

When I first whipped them up as a last-minute Easter dessert, I wasn’t sure what to expect of them, either. They were mainly an excuse to use up some of the many yellow grapefruits I’d been gifted from my mom’s over-producing citrus tree. Besides, with the coronavirus situation, I really don’t want to go to the store any more than I have to right now…so using up ingredients I have on hand sounded like a solid plan.
I’d made Ina Garten’s lemon bar recipe recently, with delicious results, and was thrilled to have finally found one that didn’t end up runny on top, squishy on bottom. (If you’ve ever made an unsuccessful attempt at lemon bars, you know what a miracle it is to find a great recipe.) Could this tried-and-true recipe hold steady with a substitution of grapefruit juice–and a few other tweaks?

Why, yes, it could–and it did!
These grapefruit bars turned out yummy at first, but as their flavor deepened over 24 hours or so, they got even tastier. (Hence their “sleeper dessert” status.) Their flavor isn’t as tart as lemon, but if you’re not a fan of pucker-up acidity, that may be just fine for you. The shortbread crust holds together beautifully with the help of a splash of milk, since I always find shortbread needs a bit of extra moisture to keep from crumbling. And their fruity, gooey filling? Perfectly smooth AND doesn’t stick to the knife when you’re trying to haul them out of the pan.

If you need a springy sweet fix (and who couldn’t use a little something sweet in these tough times?) a pan of these will do the trick.
(P.S. Did you know there are at least five different types of grapefruit?) I can’t say if this recipe would work with any of the other interesting varieties, but it’s certainly worth a try!)

Grapefruit bars
Grapefruit bars are lemon bars' mellow yellow cousin! Try these with fresh-squeezed juice.
Prep Time15 mins
Cook Time1 hr
Servings: 16
Ingredients
For the crust:
- 1 c. butter
- 1/2 c. sugar
- 2 c. all-purpose flour
- 1/8 tsp. salt
- 1/2 Tbsp. milk or half and half
For the filling:
- 6 large or extra-large eggs
- 2 3/4 c. sugar
- 2 Tbsp. grated yellow grapefruit zest
- 1 c. fresh yellow grapefruit juice
- 1 c. all-purpose flour
- powdered sugar, for topping
Instructions
- Preheat oven to 350 degrees and grease a 9 x 13 inch baking dish.
Make the crust:
- In a large bowl, cream the butter and sugar. Add flour and salt and mix. Add milk and stir until dough holds together. Press into the bottom of prepared pan evenly. Bake 25-28 minutes or until lightly browned.
Make the filling:
- Wipe out the bowl you used to make the crust. Whisk together the eggs, sugar, grapefruit zest, grapefruit juice, and flour. When the crust is done, pour this mixture over it and return to the oven for another 30 to 35 minutes.
- Cool and dust with powdered sugar. Cut into squares.
Notes
Adapted from The Food Network.
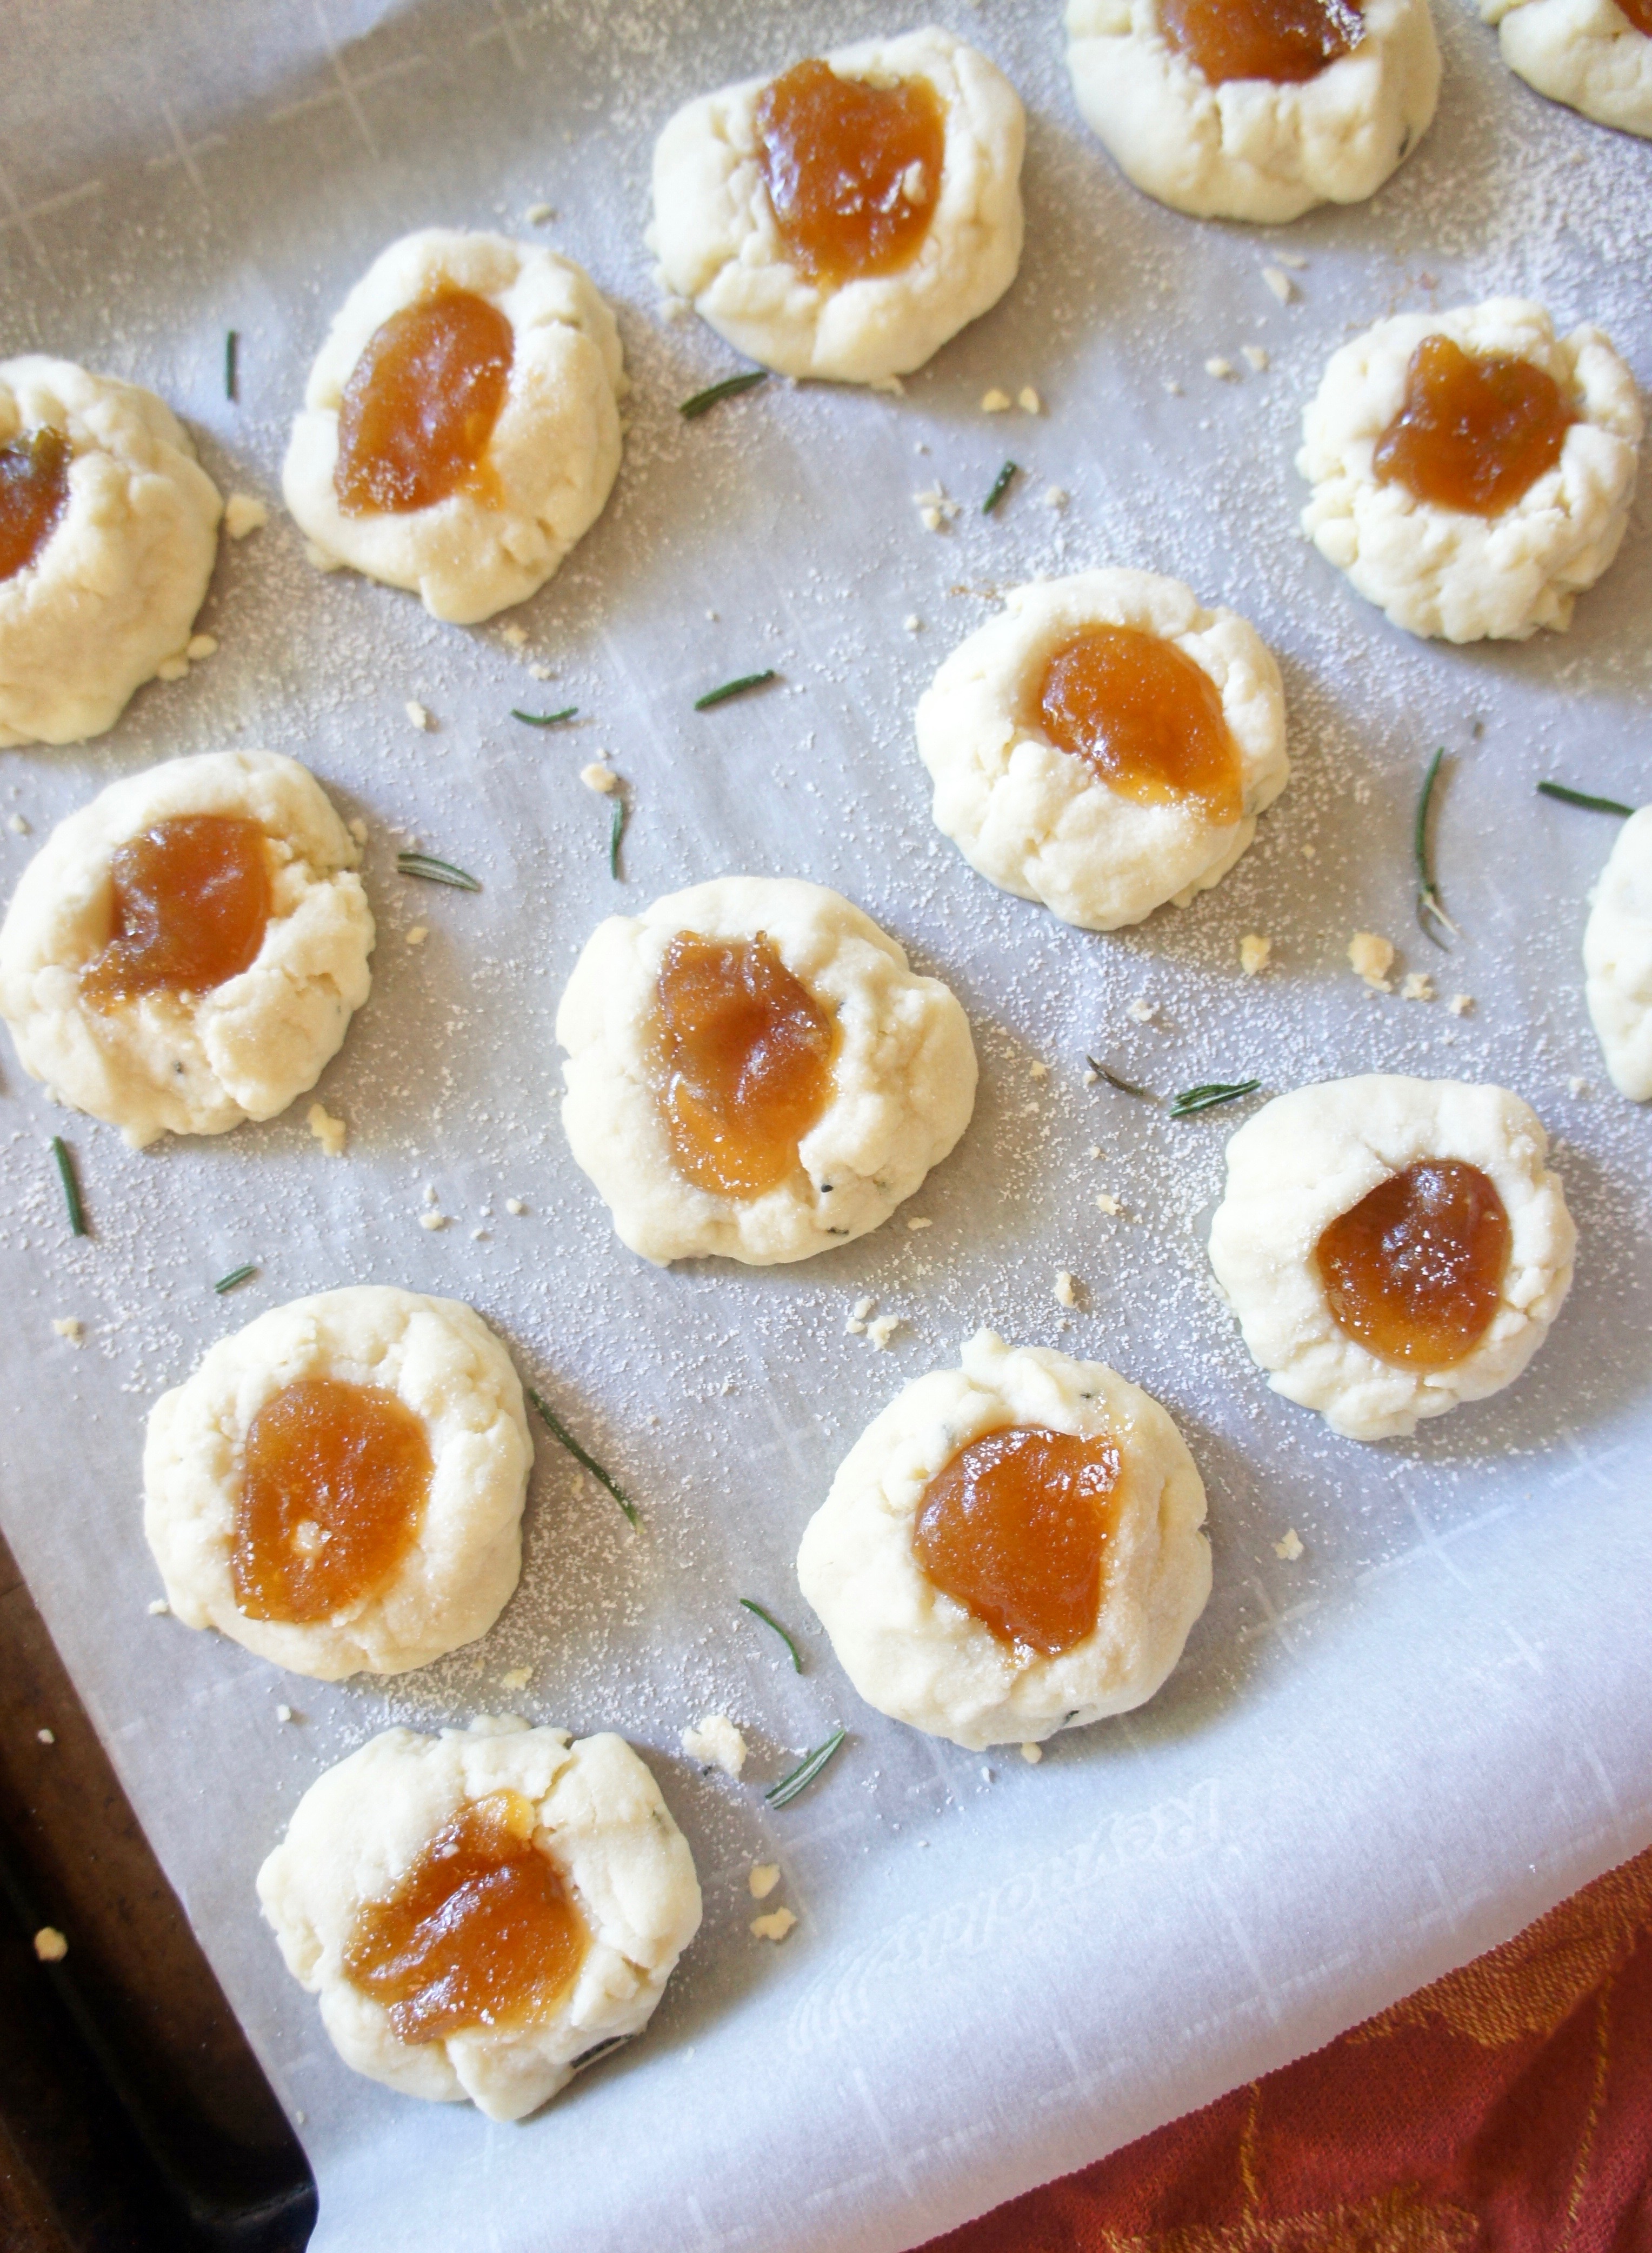
Apricot-Rosemary Thumbprint Cookies

It may only be October, but it’s definitely NOT too early to start thinking about Christmas cookies. In fact, in my house, it’s apparently not too early to think about anything Christmas-related, especially presents. All of my kids have already made their Christmas lists, all of which basically read like Target ads. My middle son actually wrote “all items sold at Target” in large font at the top of his list. Got it, thanks, buddy.

As for me, though I thoroughly enjoy all things fall, I’m also excited about Christmastime. One of my favorite things to look forward to is our annual white elephant Christmas party, celebrating its 15th year this year! I love putting together a vibrant, eclectic menu to serve our guests, and I’d like to think it’s partly the food (and not just the terrible sci-fi DVDs, clown paintings, and poo-scented candles) that keeps people coming back year after year.

Probably my favorite portion of the menu to plan is the dessert spread–for which I believe these Apricot-Rosemary Thumbprint Cookies are a strong contender. I usually like to plan a mix of bars, candies, cookies, possibly a pie or trifle, and at least one show-stopping cheesecake for the event. Past favorite cookies have included mint chocolate candy cane cookies and pumpkin chocolate chip. But the unique hint of savoriness is where I think these apricot-rosemary thumbprints really shine, either on their own or as part of my larger holiday cookie combo.
These don’t take many ingredients, but fresh rosemary is essential. (I’m fortunate enough to have some in my garden, but if you don’t, you can always freeze it if you end up with too much from another recipe!) Also, as you’re making these, you may think, “Holy saturated fat, that’s a lot of butter for such a small batch.” And you’re right. But these come out sooooo perfectly rich and fluffy, I’d say they’re worth the hefty dose of butter. Combine that richness with the earthiness of the rosemary and the fruity sweetness of the apricot jam and you’ve got a Christmas cookie that will disappear fast.
Got a party coming up this holiday season? I’d love to hear if you try these thumbprints!


Apricot-Rosemary Thumbprint Cookies
Sweet and savory, these buttery thumbprints disappear fast!
Prep Time15 mins
Cook Time14 mins
Total Time1 hr 29 mins
Ingredients
- 1 c. all-purpose flour
- 1/2 c. cornstarch
- 2 tsp. snipped fresh rosemary
- 1/4 tsp. salt
- 3/4 c. butter, softened
- 1/3 c. powdered sugar
- 1/8 tsp. almond extract
- 1/3 c. apricot jam
- extra powdered sugar for dusting
Instructions
- In a small bowl stir together flour, cornstarch, rosemary, and salt. Set aside.
- In a large bowl, beat butter with a hand mixer for 30 seconds or until fluffy. Add the powdered sugar and almond extract and beat again.
- Beat in as much of the flower mixture into the butter mixture as you can with the mixer. Work the rest in with a wooden spoon.
- Collect the dough into a disc and wrap in plastic wrap. Refrigerate one hour.
- Preheat oven to 325 degrees and line a baking sheet with parchment paper. Remove dough from fridge and form into about 16 balls, placing them 2 inches apart on the baking sheet. Press a divot into each cookie with your thumb or a spoon and fill in with a little apricot jam.
- Bake about 14 minutes. Cool, then sprinkle with additional powdered sugar.
Notes
Adapted from Better Homes and Gardens.
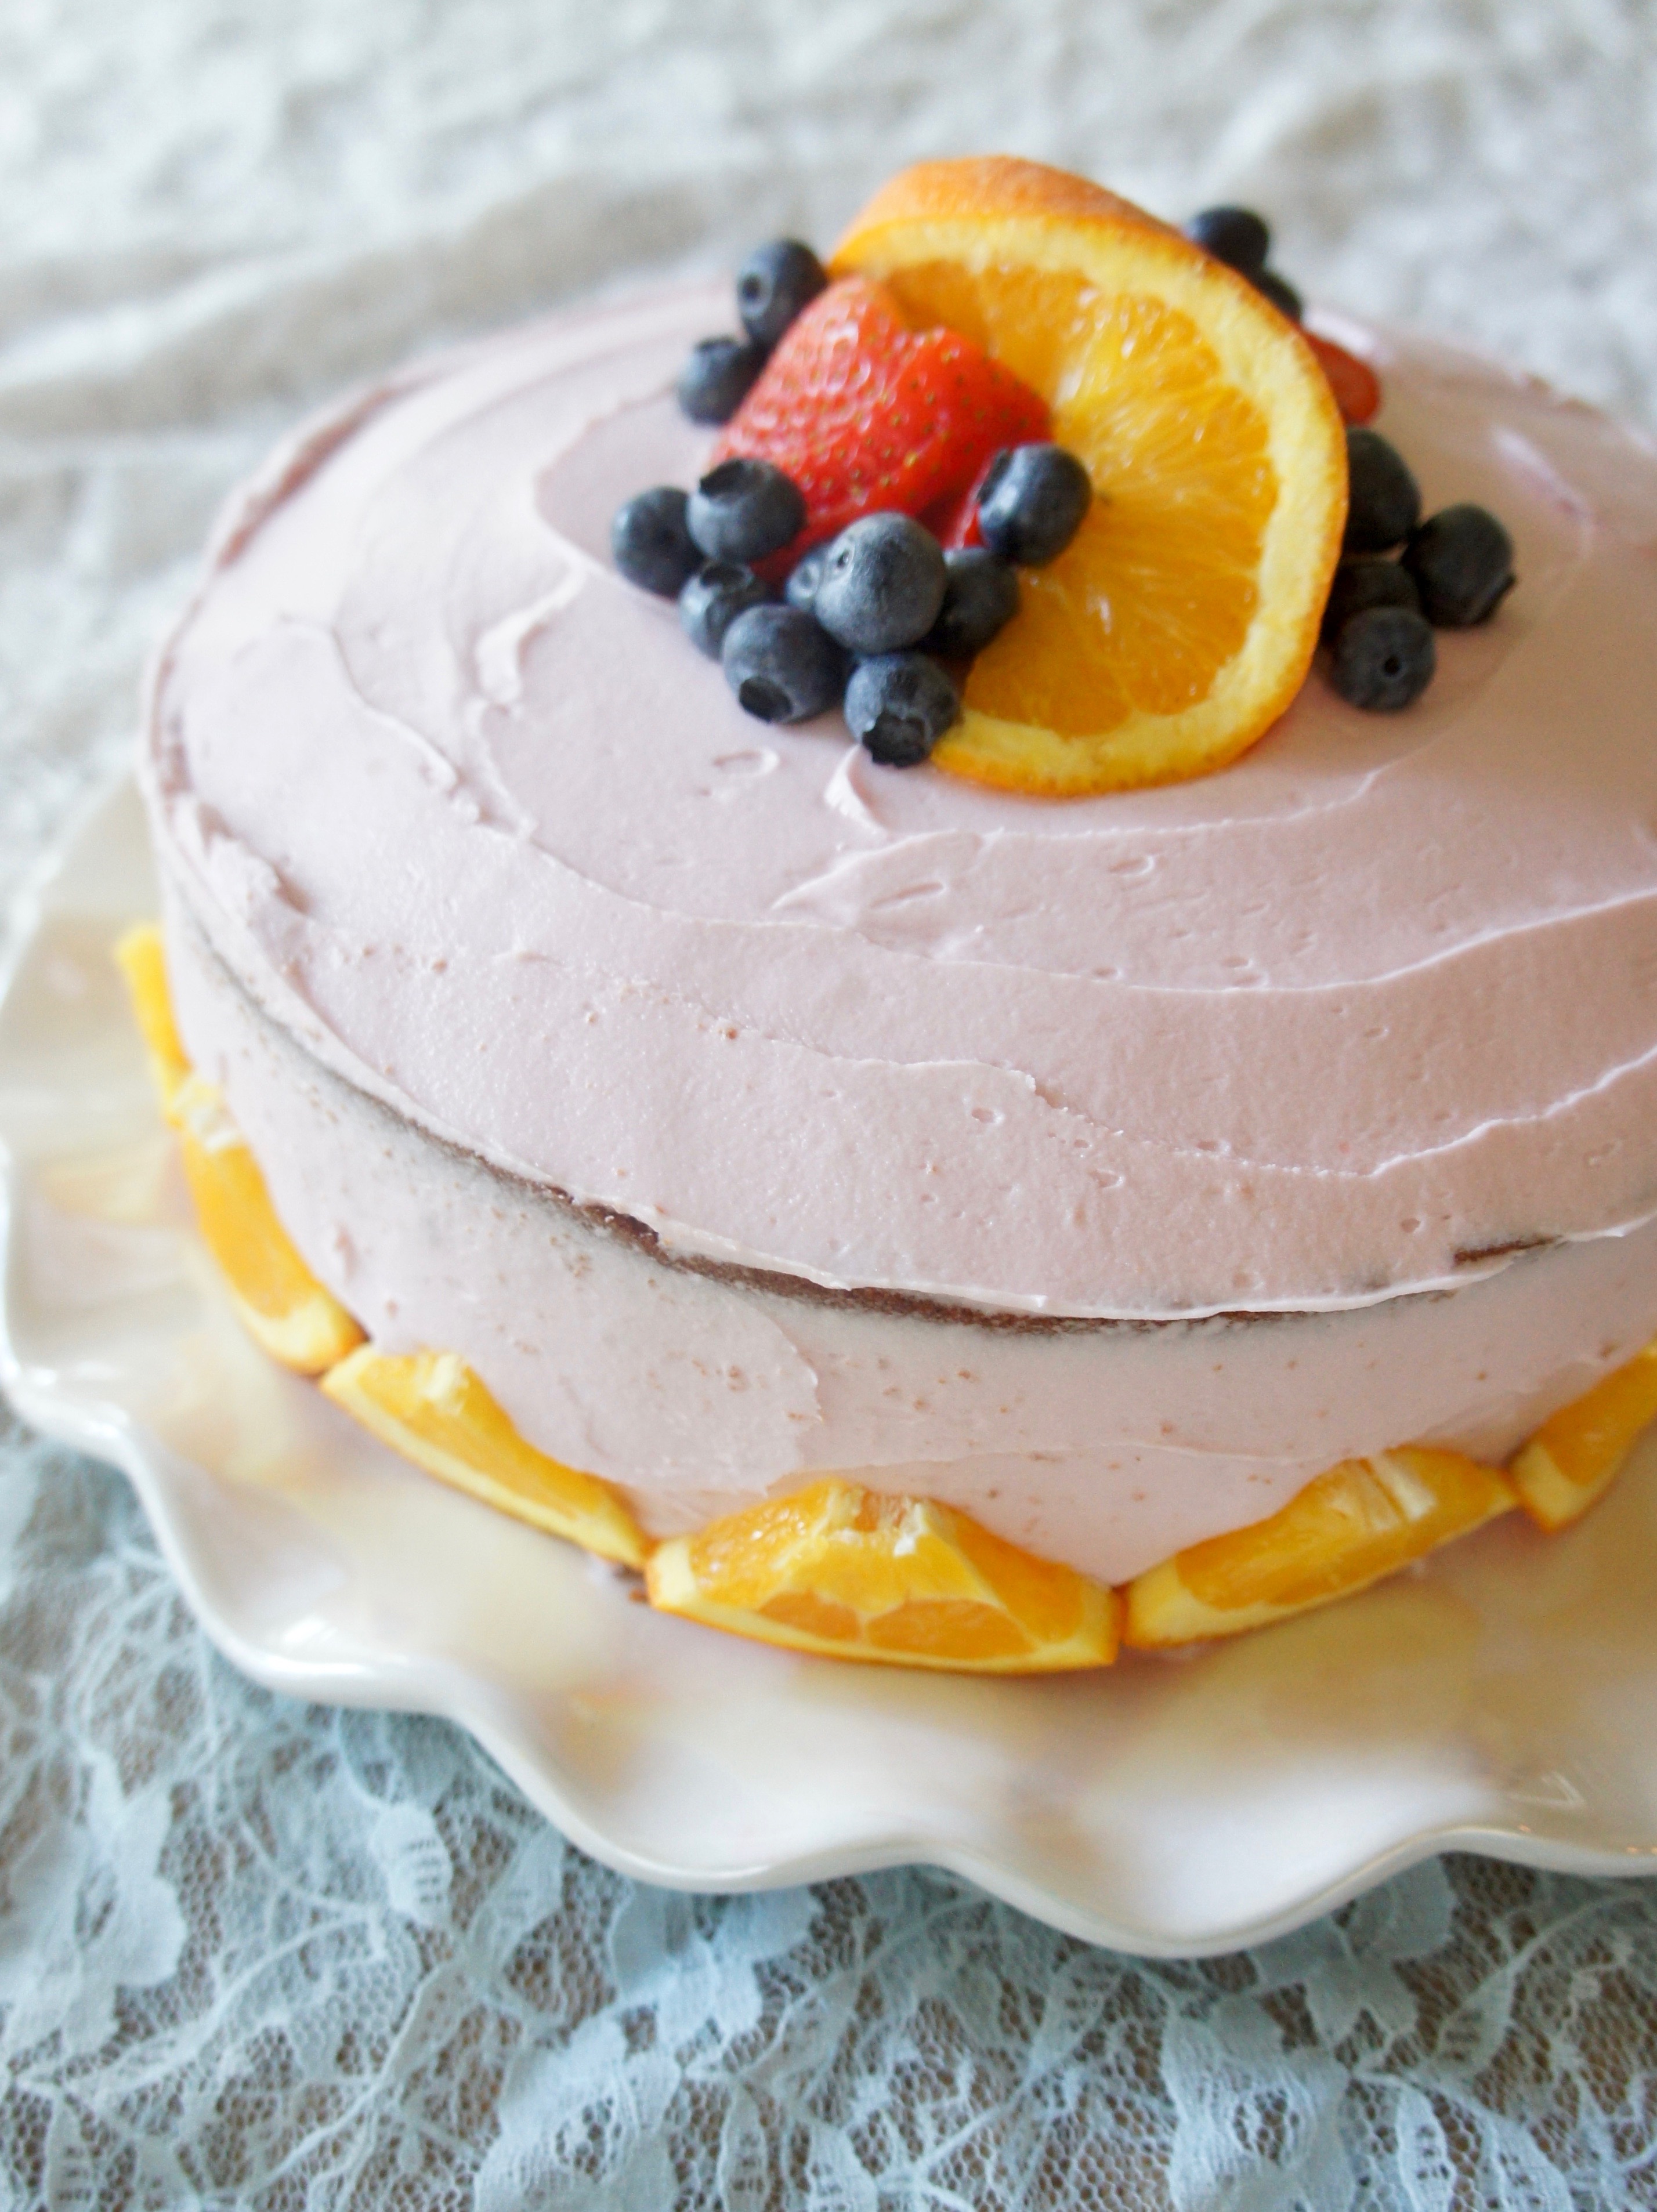
Sangria Cake
A delicious, fruity Sangria Cake for any summer special occasion!

Did you know that August and September are the months with the most birthdays? It’s probably the result of couples getting cozy around Christmastime nine months earlier–or some science even suggests the body is biologically predisposed to procreate in the winter months. Whatever the reason, in my own family of origin, it rings true: Both my parents have August birthdays, and I’m right behind in September.
Every year I bake my mom’s birthday cake. It’s a super fun exercise in creativity because she gives me free reign to make whatever I like, from this Chocolate Mint Layer Cake to this Apple Cream Cheese Bundt Cake.

This year, inspired by some gorgeous cupcakes I saw awhile back, I thought a sangria cake sounded perfect. Fruity, colorful, and a little different, it seemed just right for a summer birthday.
Once made, the flavors in this cake were actually rather subtle–not overpowering, but definitely with a fruity depth and a hint of orange. I especially loved the frosting, which was pretty in pink and just the right level of sweet. And I must confess I geeked out over decorating the exterior with an arrangement of fresh fruit. With the alcohol baked into the cake and just two tablespoons in the frosting, even my kids were free to partake. (And I think my mom liked it, too!)
So, for a special celebration, give this sangria cake a try! (My birthday is next week, hint, hint…)

Sangria Cake
Happy summer! This Sangria Cake makes the perfect pretty, fruity celebration for a summer birthday or other special occasion.
Cook Time35 mins
Total Time35 mins
Servings: 16
Ingredients
For the cake:
- 2 1/2 c. all-purpose flour
- 2 tsp. baking powder
- 3/4 tsp. salt
- 3/4 c. butter, softened
- 1 1/2 c. white sugar
- zest of 1 orange
- 3 eggs
- 2 Tbsp. orange juice
- 1 1/2 tsp. vanilla
- 1 c. room-temperature sangria
- 6 drops pink or red food coloring
For the frosting:
- 1/2 c. butter, softened
- 4 1/2 c. powdered sugar
- 2 1/2 Tbsp. orange juice
- 2 1/2 Tbsp. sangria
- 4 drops pink or red food coloring
Instructions
- Preheat oven to 350 degrees. Grease two 8-inch cake pans. In a medium bowl, whisk together flour, baking powder, and salt. Set aside.
- In a large bowl, cream together butter and sugar until light and fluffy. Mix in orange zest, then add eggs one at a time. Mix in orange juice and vanilla.
- Mix in dry ingredients and sangria, alternating between the two, until fully incorporated. Stir in food coloring until well mixed. Divide between cake pans and bake 30-35 minutes.
- Meanwhile, make frosting: In a large bowl combine butter and powdered sugar. Add orange juice and sangria and mix until smooth. Refrigerate until ready to use.
- Once cake is done, let cool at least two hours. When cake has cooled, frost to your liking.
Notes
Cake adapted from Liv for Cake, recipe A Love Letter to Food Original.
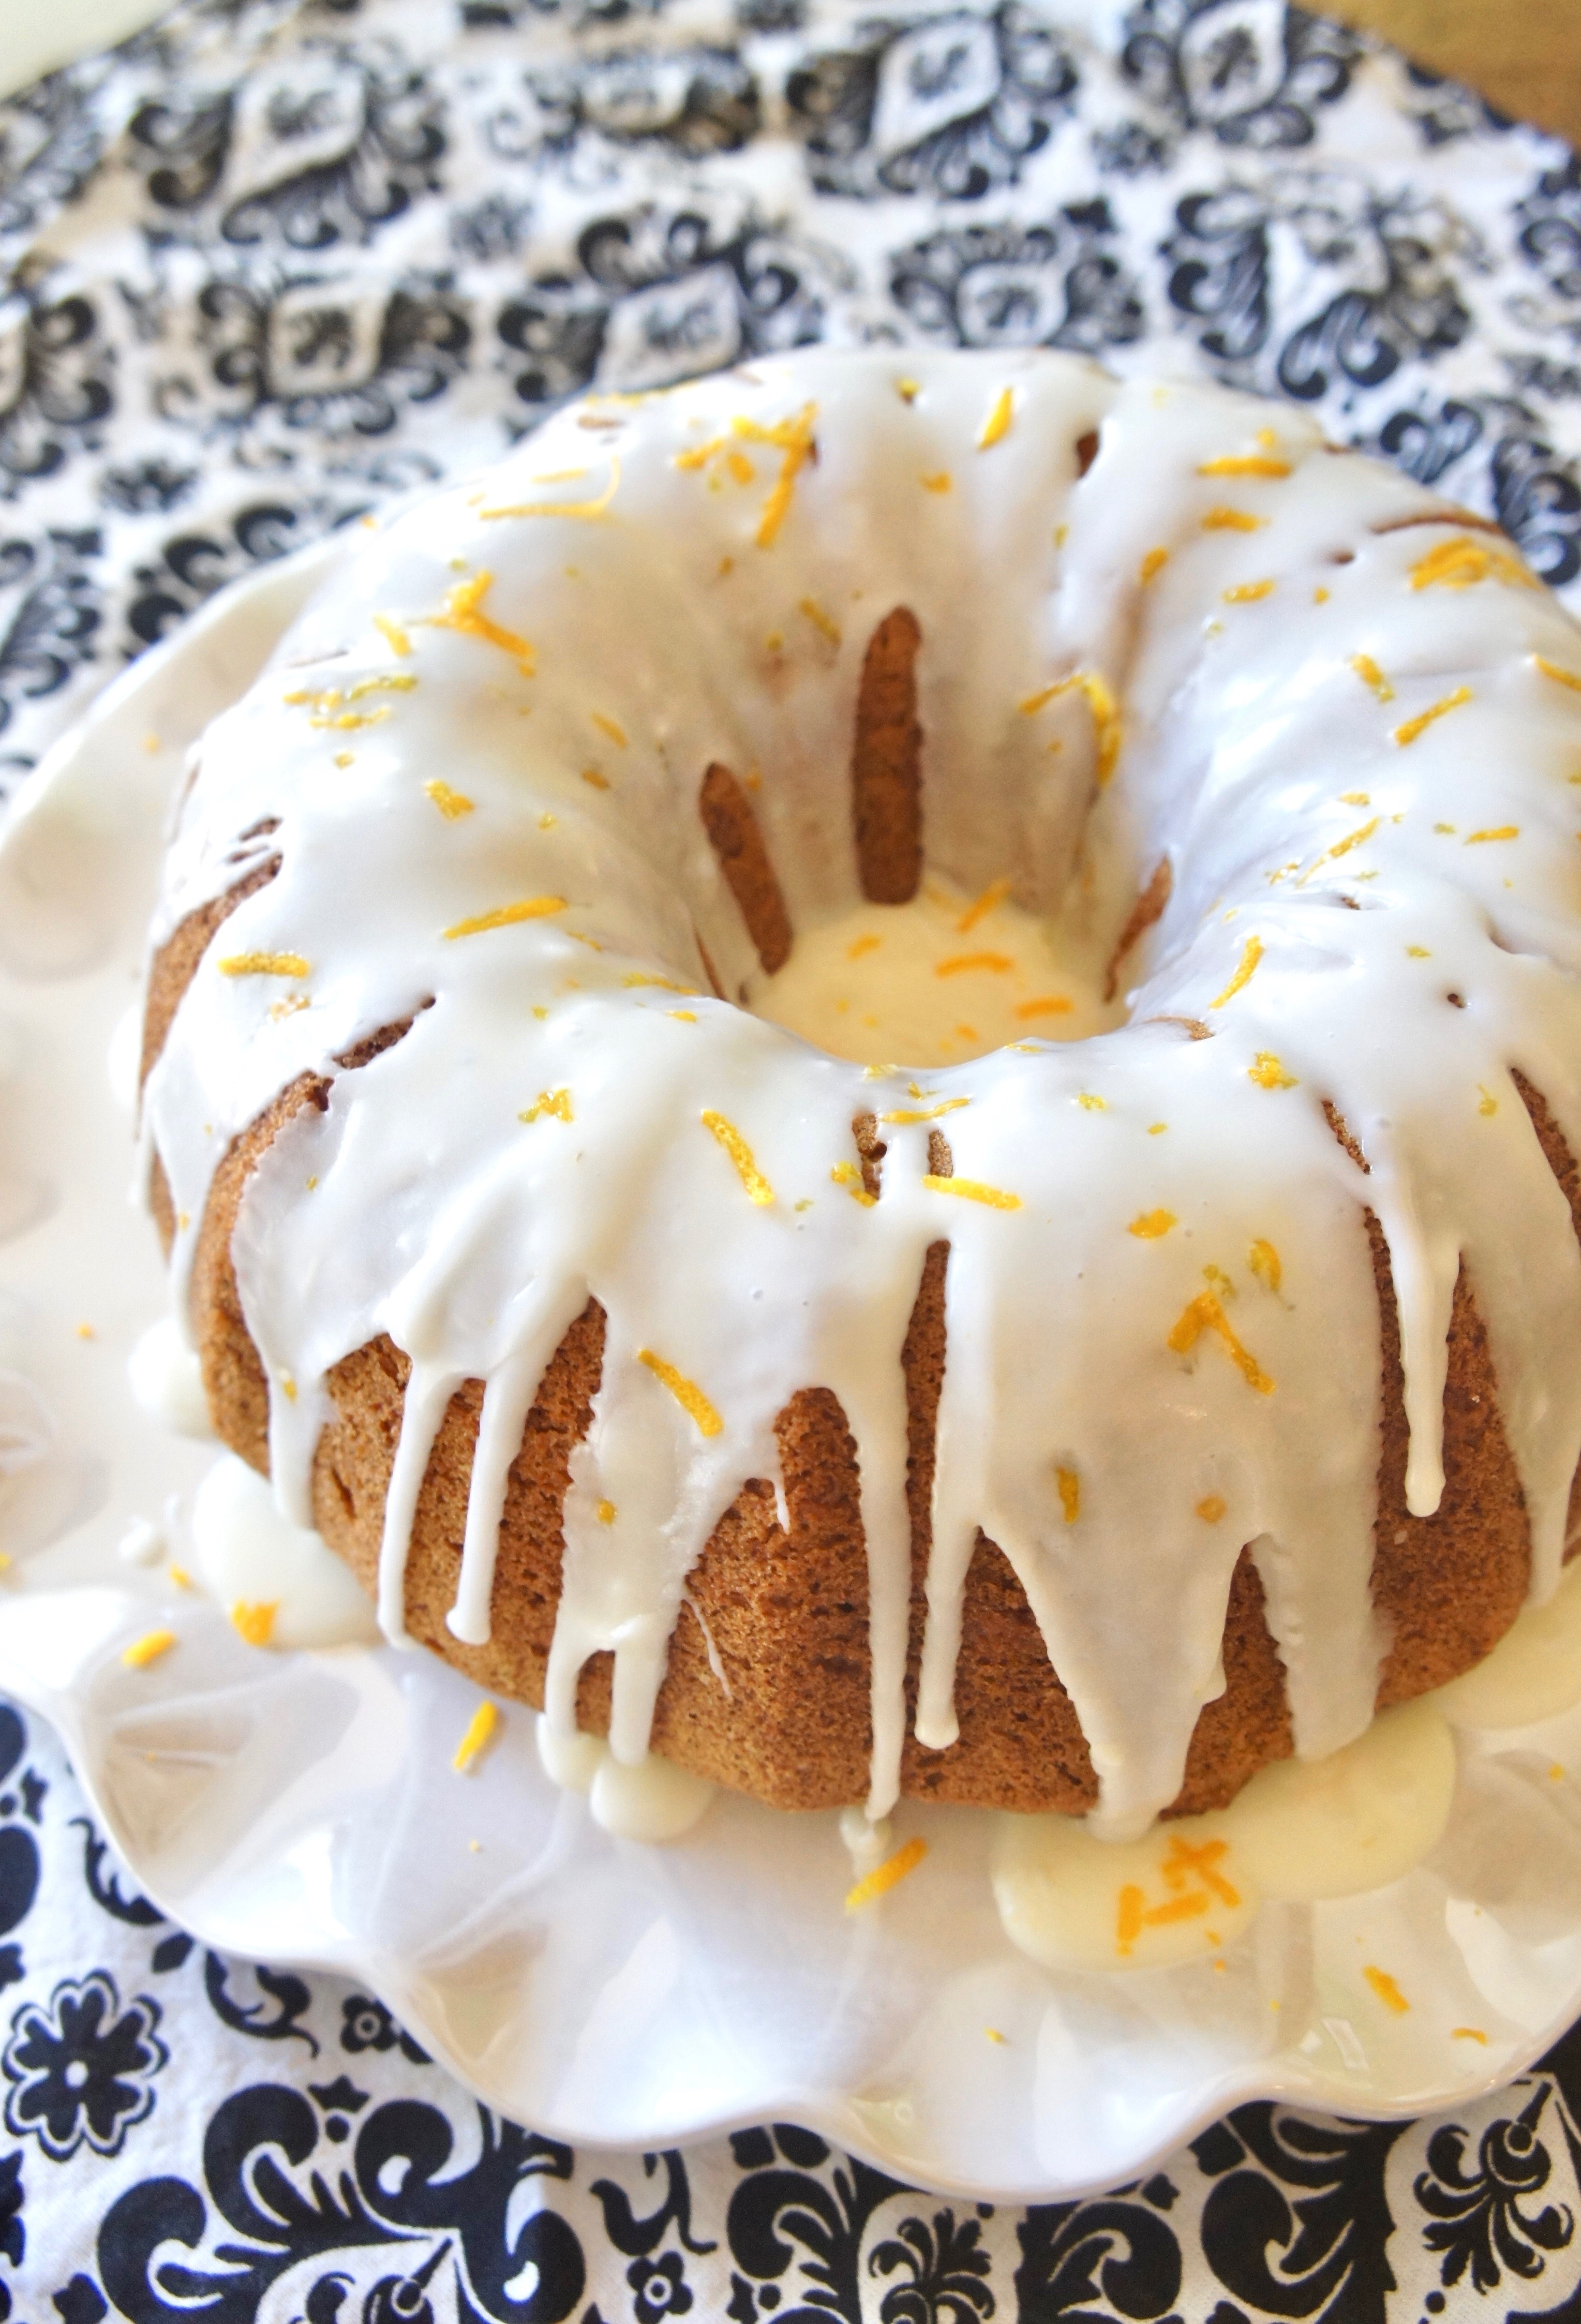
Orange Olive Oil Bundt Cake
Need a dessert to feed a crowd? This Orange Olive Oil Bundt Cake with yogurt icing is just the ticket!

Every other Sunday for the last fifteen years, my husband and I have had Sunday dinner with his family. Coming from a New York Italian family as he does, Sunday dinner is almost more of a religious observance than a simple meal. Barring an act of God, it WILL happen. And it will probably involve sausage.
Over the years, as we’ve gotten together, the family has seen many changes. While Sunday dinner started out at his parents’ house every week, we’ve now transitioned to rotating between the homes of his mom and his siblings. And whereas, fifteen years ago, there were seven of us around the dinner table, there are now eighteen adults and kids. When it’s our turn to host, you can find me searching for recipes that feed a crowd.

I’ve assembled a handful of go-to entrees to serve for dinner, from chili to casseroles to barbecue chicken sandwiches (thank God for the Crock Pot). But sometimes the course that leaves me stumped is dessert. A single pan of brownies no longer suffices for this many people, and forget about a single pie–or even two. One dessert I come back to time and again is the ample, flexible bundt cake. It’s easy to slice and serve for any portion size, it doesn’t require the effort of frosting of a layer cake, and it always turns out so pretty. Plus, who doesn’t like cake?

I made this Orange Olive Oil Bundt Cake for our most recent Sunday dinner. Lately I’ve been digging in to a bit of “research” (aka baking and eating) on replacing butter or other fats with heart-healthier olive oil. This particular olive oil baking experiment was certainly a success! The cake turned out slightly–but not overly–dense, with a delightfully almost-crunchy crust. Drizzled with a yogurt icing with a hint of orange, each slice was a little bit of citrus heaven, especially when accompanied by a dollop of vanilla ice cream.
To complete a Mediterranean-themed meal, I served this after my Twice-Baked Spaghetti Squash with Sausage and Kale. (See? I told you sausage would be involved.) For Sunday dinner or to feed any crowd, I’d say you can’t go wrong with bundt cake–especially this one.


Orange Olive Oil Bundt Cake
Serve up a slice of citrus heaven with this orange olive oil bundt cake topped with yogurt drizzle!
Prep Time15 mins
Cook Time45 mins
Total Time1 hr
Servings: 16
Ingredients
For the cake:
- 1 1/2 c. white sugar
- 4 eggs
- 2/3 c. high quality extra virgin olive oil
- 2 tsp. vanilla extract
- 1/2 tsp. orange extract (optional)
- 2 Tbsp. fresh orange zest
- 6 Tbsp. fresh-squeezed orange juice
- 2 1/2 c. all-purpose flour
- 2 tsp. baking powder
- 1 tsp. baking soda
- 1 tsp. salt
For the orange-yogurt glaze
- 2 c. powdered sugar
- 3 Tbsp. fresh-squeezed orange juice
- 1 Tbsp. full-fat plain yogurt
- extra orange zest for garnish
Instructions
Make the cake:
- Preheat oven to 350 degrees and generously grease a 12-cup bundt pan.
- In a large bowl, mix sugar and eggs with a hand mixer on medium speed. Add olive oil, vanilla, and orange extract and mix until smooth, then repeat with orange zest and juice.
- Add flour, baking soda, baking powder, and salt and mix with hand mixer until no lumps remain.
- Pour into prepared bundt pan and bake 40-45 minutes or until a tester inserted in the center comes out clean. Let cake cool completely before frosting.
Make the glaze:
- In a medium bowl, whisk together powdered sugar, orange juice, and yogurt until smooth.
- Drizzle icing over cooled cake. Garnish with additional orange zest. Refrigerate until ready to serve.
Notes
Adapted from Food Network, glaze my own recipe.