Chunky Cheesecake Brownies

I may have mentioned this before, but my adoration of cheesecake goes back a long way. The Cheesecake Factory is one of my favorite restaurants, and many years ago I made the (possibly ill-advised) resolution to try every kind of cheesecake on their menu. (Still haven’t made it–I keep getting stuck on Adam’s Peanut Butter Fudge Ripple. How can I choose apple when chocolate and peanut butter are being paired with cheesecake in my general vicinity?) When my husband Anthony proposed to me 10+ years ago, he did so by composing a giant cheesecake made of different slices from the Cheesecake Factory. He knew I would I would say yes, but the cheesecake didn’t hurt. I wish I had a picture of it. In fact, I wish I had a replica of it.

A year later at our wedding, the wedding cake was–you guessed it–cheesecake! My dear college roommate and baking whiz Brittany generously made chocolate and white chocolate raspberry cheesecakes for our guests, supplemented by plain ones from Costco. Thankfully, Anthony was kind enough not to shove any cheesecake up my nose during the feed-each-other-cake portion of the reception. As much as I love cheesecake, I don’t think I’d love it lodged in my nasal cavities.

All this being said, the weird thing is that I myself have never actually made a cheesecake. It all comes down to the lame excuse that I don’t own a springform pan. I know, go to Target and get a stinking springform pan, right? Well, maybe tomorrow. For today, I have these delicious chunky cheesecake brownies. Brownie + cheesecake = at least as good as a regular cheesecake, in my book, and definitely worthy of a special occasion like Valentine’s Day tomorrow! Plus, if you, like me, don’t own a springform pan (and don’t have time to go through the rigamarole of the water bath/lengthy baking time/chilling overnight of cheesecake making) you’re in luck–these can be whipped up in short order and baked in a regular old 9-inch Pyrex. Cut into squares to show off their chocolate-chunky cheesecake layer, place on a fancy serving dish, and you have a lovely dessert to serve your special someone.

Happy Valentine’s Day!

Chunky Cheesecake Brownies
(Adapted from Allrecipes.com)

Ingredients:

For the cheesecake layer:

1 8-oz. package cream cheese, softened
1/4 c. sugar
1 egg
1 c. semi-sweet chocolate chips

For the brownies:

1/4 c. butter
1 c. semi-sweet chocolate chips
1/3 c. sugar
2 eggs
2/3 c. all-purpose flour
1/2 tsp. baking powder
1/4 tsp. salt

Directions:

1. Preheat oven to 350 degrees. Grease a 9-inch square baking dish.

2. Make the cheesecake layer: mix cream cheese, sugar, and egg until thoroughly combined. Stir in 1 c. chocolate chips. Set aside.

3. Make the brownie layer: in the microwave or over a double boiler, melt butter and chocolate chips in a large bowl. Mix in sugar and eggs, then flour, baking powder, and salt until evenly blended.

4. Pour half the brownie mixture in the prepared dish. Spread the cheesecake layer on top of the brownie layer, then top with remaining brownie mixture. Swirl with a knife for a marbled effect, if desired.

5. Bake in preheated oven for 40 minutes, or until a toothpick inserted in the center comes out clean.

Bacon-Berry Salad with Raspberry Vinaigrette

And now it’s time for a little Q & A with A Love Letter to Food.

Q: Dear Love Letter to Food, is it okay for a salad to taste like candy?

A: YES.

ABSOLUTELY. NO PROBLEM WITH THAT AT ALL.

This salad is the proof. I’ve been making it for years and it’s probably my favorite way to eat greens. And even though it tastes like something that dropped out of a piñata, I’m pretty sure it’s actually fairly healthy. After all, you can’t argue with spinach, orange slices, almonds, and cranberries. (As for bacon and cheese, well, I guess you can argue about those…but only if you want a salad filibuster from yours truly.)

Q: What’s the best part of this salad?

A: Possibly the highlight of this colorful, mostly healthy melange is the zingy raspberry dressing. Salad dressing is one of those foods that, once you start making it yourself, I believe you’ll never go back to store-bought. (Others include taco seasoning, chicken broth, and pumpkin butter.) Whipping up a small batch for one-time use ensures a freshness you just don’t get from the bottle that’s been sitting in your fridge for two years. (I mean, doesn’t it seem kind of counterintuitive just how long certain “perishable” foods like salad dressing can theoretically be held in a refrigerator?) The muddled raspberries in this particular dressing give it a special sweet-tanginess that goes well with a host of other foods, including the cheesy bread we had as a side with this salad the other night. You could also try it on chicken breast or pork loin.

Q: Does that mean the chicken or pork loin would taste like candy?

A: Yes. No problem with that at all.

Bacon-Berry Salad with Raspberry Vinaigrette
(Dressing adapted from Allrecipes.com)

Ingredients:

For the salad:

6 c. fresh spinach
1/2 c. dried cranberries
1/2 c. slivered or sliced almonds
1 large orange, peeled and sliced into bite-sized pieces
8 slices bacon, cooked and crumbled
1 c. crumbled feta or goat cheese

For the dressing:

3 Tbsp. raspberries
1 Tbsp. red wine vinegar
1/2 Tbsp. white wine vinegar
3 Tbsp. white sugar
1/4 c. olive oil
1 tsp. Dijon mustard
1/8 tsp. oregano
1/8 tsp. black pepper

Directions:

1. In a large bowl, toss spinach with cranberries, almonds, orange slices, bacon, and cheese.

2. To make dressing, mash raspberries, then add all other ingredients and whisk or shake well in a jar with a tight-fitting lid.

3. Toss salad with dressing, or serve on the side.

Serves 4.

Peanut Butter and Jelly Muffins

When I was a student at Wheaton College, our cafeteria food was consistently ranked #1 in the country by U.S. News and World Report. Rightfully so–the food was stellar, especially for a cafeteria. I remember a Southwestern salad that was to die for, and their Texas cake–well, let me just say I would go all the way to Texas to taste it again. As a celebration of maintaining its spot at the top of the list, once a year the cafeteria would host a super-fancy gourmet dinner, complete with lobster, petit fours, and ice sculptures. Yes, ice sculptures.

But I digress…

The thing I really loved best about my college cafeteria was making my own behemoth peanut butter and jelly sandwiches. In the middle of the serving area stood a cut-your-own bread station with every kind of bread under the sun. I used to hack off about a half a loaf of challah bread and slather on the chunky peanut butter and gooey jelly like it was going out of style. In a weird way, this was a declaration of independence for me. Growing up, my mom’s version of PBJ was a paper-thin layer of peanut butter and an *itty-bitty* dollop of jelly spread to its absolute limit. I don’t fault her; we grew up poor. But I always, always wanted more. So the ability to make Big Mac-sized PBJs was big news for me. And I do mean big news–I’m pretty sure these sandwiches were directly responsible for my being about 20 pounds heavier in college.

In the 10 years since graduation, I’ve definitely toned down my colossal PBJ habit, but still have a place in my heart (and my belly) for that flavor match made in heaven. Hence trying these peanut butter and jelly muffins. If you’re like me and tend to get stuck on Recipe Repeat with the same old apple/blueberry/pumpkin baked goods, this twist on the classic sandwich may be just what you need to break out of your muffin rut. They were a MAJOR hit with my kids. My 6-year-old declared them the best muffins I had ever made. And they certainly are fun with their jelly surprise in the middle. Who doesn’t like a jelly surprise?

You could go spelunking in this jelly cave

And, more to the point, who doesn’t like peanut butter and jelly?

Peanut Butter and Jelly Muffins
(Adapted from Myrecipes.com)

Ingredients:

1 c. all-purpose flour
3/4 c. whole wheat flour
1/4 c. white sugar
1/4 c. brown sugar
1 Tbsp. baking powder
1/2 tsp. salt
1 1/4 c. milk
1/2 c. creamy peanut butter
2 Tbsp. applesauce
1 egg
2 Tbsp. butter, melted
1 tsp. vanilla
approx. 1/3 c. grape jelly

Directions:

1. Preheat oven to 400 degrees.

2. Combine flours, sugars, baking powder, and salt in a large bowl. Make a well in the center.

3. Combine milk, peanut butter, applesauce, egg, melted butter, and vanilla and pour into well in dry ingredients. Stir until just mixed.

4. Coat 12 muffin cups coated with cooking spray. Fill each muffin cup about halfway with batter, then place 1/2 Tbsp. jelly in the center. Cover with another generous dollop of muffin batter.

5. Bake in preheated oven about 20 minutes, or until muffin tops spring back when touched in the center.

Makes 12 muffins.

Spanakopita

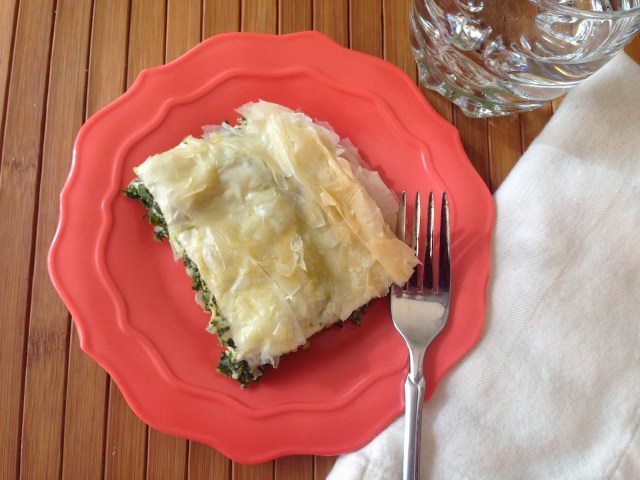
Funny how, a couple posts ago, I was lamenting the fact that’s it’s so much more expensive to make spanakopita from scratch than buy it pre-made. Well, I guess I’m a glutton for punishment, because I went ahead and made it from scratch a few days later. Truth be told, I had never actually done so before. Trader Joe’s fandom has always prevailed (their $4 per box version is delicious). Still, I had this whole package of phyllo dough sitting in my freezer from when I chickened out and didn’t use it in a recipe for our Christmas party and had been wanting to try spanakopita homemade. What to do, what to do… Phyllo seemed like such a tricky thing to work with–so flaky and fine, like you’d need the precision of one of those new, high-tech surgical robots to keep everything from falling apart into a crumbly, Greek mess (not unlike the Greek government in recent years–badum ching!). Then again, it’s not like I wanted to throw it out. “That’s $2.99 worth of phyllo dough in the trash!” (spoken as Chris Rock’s penny-pinching dad in Everybody Hates Chris.) So I watched some Youtube tutorials on how to use it and decided to bite the bullet. As my mom always says, “If it’s bad, we can just order pizza.”

Well, we didn’t have to order pizza. It turns out, in spanakopita at least, phyllo dough is fairly forgiving. I am no surgical robot and the phyllo on top came out less like the glutenous bad hair day I was afraid of and more like golden brown tousled pastry tresses. It’s the Jennifer Aniston of crusts! (And hey, she’s Greek, so that metaphor really makes sense–right?)

Interestingly–and, I guess, obviously–the word “spanakopita” comes from the Greek spanáki (meaning spinach) and pita (meaning pie). What I definitely didn’t know is that spanakopita falls within the “family of pastries” known in the Mediterranean as börek.* Basically, börek dishes are pastries phylled–I mean filled–with savory ingredients like cheese, vegetables, and even meat. Yum! Having tried my hand at spanakopita with tasty results, I’d be curious to attempt other börek…though it sounds like something that would end up on the police blotter. “Woman arrested for attempted börek in a domestic kitchen.” I’ll leave the delicious details to your imagination.

*Ummmm, family of pastries? How do I join? Or can I just show up at the reunion and eat everyone?

Spanakopita
(Adapted from Allrecipes.com)

Ingredients:

3 Tbsp. olive oil
1 onion, chopped
1 bunch green onions, chopped
3 cloves garlic, minced
25 oz. frozen chopped spinach (2.5 10-ounce packages)
1/2 c. chopped fresh parsley (or 3 1/2 Tbsp. dried)
salt and pepper to taste
2 eggs, beaten
3/4 c. ricotta cheese
1 1/2 c. crumbled feta cheese
15 sheets phyllo dough
1/4 c. olive oil

Directions:

1. Preheat oven to 350 degrees. Grease a 7 x 11 inch baking dish.

2. In a large skillet, heat 3 Tbsp. of olive oil over medium heat. Saute onion, green onions, and garlic until soft and lightly browned. Add frozen spinach and parsley and continue to cook until spinach is heated through. Season with salt and pepper. Remove from heat. Drain spinach mixture (my favorite method is to place about 1/3 of the mixture at a time on a dinner plate, then top with another dinner plate right-side-up, then squeeze over the sink).

3. In a large bowl, mix together eggs, ricotta, and feta. Stir in spinach mixture.

4. Working carefully, lay 1 sheet of phyllo dough in the baking dish and brush lightly with olive oil. Repeat until you have 5 sheets stacked. (If the sheets overlap the pan, that’s okay–keep them that way for now.)

5. Spread half the spinach-ricotta filling evenly over the phyllo. Tuck any overhanging dough over the filling and repeat the layering process with 5 more sheets of phyllo. Spread remaining 1/2 of spinach-ricotta filling on top, then repeat the layering once again with 5 more sheets of phyllo to complete the pie, brushing the top layer with olive oil. Again, tuck any extra/overhanging dough into the dish.

6. Bake 30-40 minutes or until golden brown.

Carrot Cake

Sometimes I wonder how certain vegetables have been inducted into the Hall of Acceptable Dessert Ingredients while others stand dolefully outside the gates. Carrots and zucchini, for example, are somehow perfectly admissible in cakes and quick breads, whereas mushrooms and eggplant are not. (Then again, I can’t imagine requesting a mushroom cake for my birthday–can you? If you said yes, I’m not sure we can be friends…) I suppose with carrots, it’s their innate sweetness that makes them fit alongside butter, sugar, and flour in a cake. For zucchini, I have to dig deep. Maybe some zucchini farmer had a bumper crop and made a convincing sales pitch for grating it up and putting it in bread. And here we are in the 21st century with a National Zucchini Day on the books. (April 25th, if you were wondering.) This zucchini farmer must have been one smoooooth operator.

Although I’ve never really gotten used to the idea of zucchini in a sweet package, every year my husband requests carrot cake for his birthday and I am happy to oblige. There *may* have been a year or two when I made a box mix while he was at work and passed it off as homemade. But no longer! Now that I have my chopaholic food processor, grating 3 cups of carrots in a matter of minutes takes a major chunk of the work out of making carrot cake from scratch. (It also nearly took a major chunk out of my hand before I located the pusher that had gone missing.)

This particular recipe has been a success for me in the past, so for my husband’s birthday yesterday, I tried it again. It totally passed the test–light but moist with a hint of cinnamon sweetness and the perfect amount of rich tang in the cream cheese frosting. Definitely a winner even for those who (like me) remain somewhat skeptical about vegetables in dessert.

Just don’t ask me to try carrot pie. That’s taking the idea entirely too far.

Carrot Cake
(Adapted from Allrecipes.com)

Ingredients:

For the cake:

4 eggs
3/4 c. vegetable oil
1/2 c. applesauce
1 3/4 c. white sugar
2 tsp. vanilla extract
2 c. all-purpose flour
2 tsp. baking soda
2 tsp. baking powder
1/2 tsp. salt
2 tsp. ground cinnamon
3 c. grated carrots

For the frosting:

8 oz. cream cheese, softened
1/2 c. butter, softened
4 c. powdered sugar
1 tsp. vanilla
3 Tbsp. milk

Directions:

1. Preheat oven to 350 degrees. Grease two 9-inch cake pans.

2. In a large bowl, beat together eggs, vegetable oil, applesauce, sugar, and vanilla. Mix in flour, baking soda, baking powder, salt, and cinnamon. Stir in carrots. Pour into prepared pans.

3. Bake in preheated oven 30-35 minutes, or until a toothpick inserted in the center comes out clean. Let cool at least ten minutes in the pan, then carefully remove to a cooling rack to finish cooling.*

4. To make the frosting: in a medium bowl, combine cream cheese, butter, powdered sugar, and vanilla. Add milk a little at a time and mix until frosting consistency is to your liking. Frost cake as desired when it has cooled completely.

I ate this piece. And it was delicious.

*If you’d like to make the cake ahead of time and frost later, here’s an awesome hack: spray the inside of two freezer bags with cooking spray and place one cake layer in each. No losing the top of the cake to sticky plastic wrap!