
Tag: Desserts
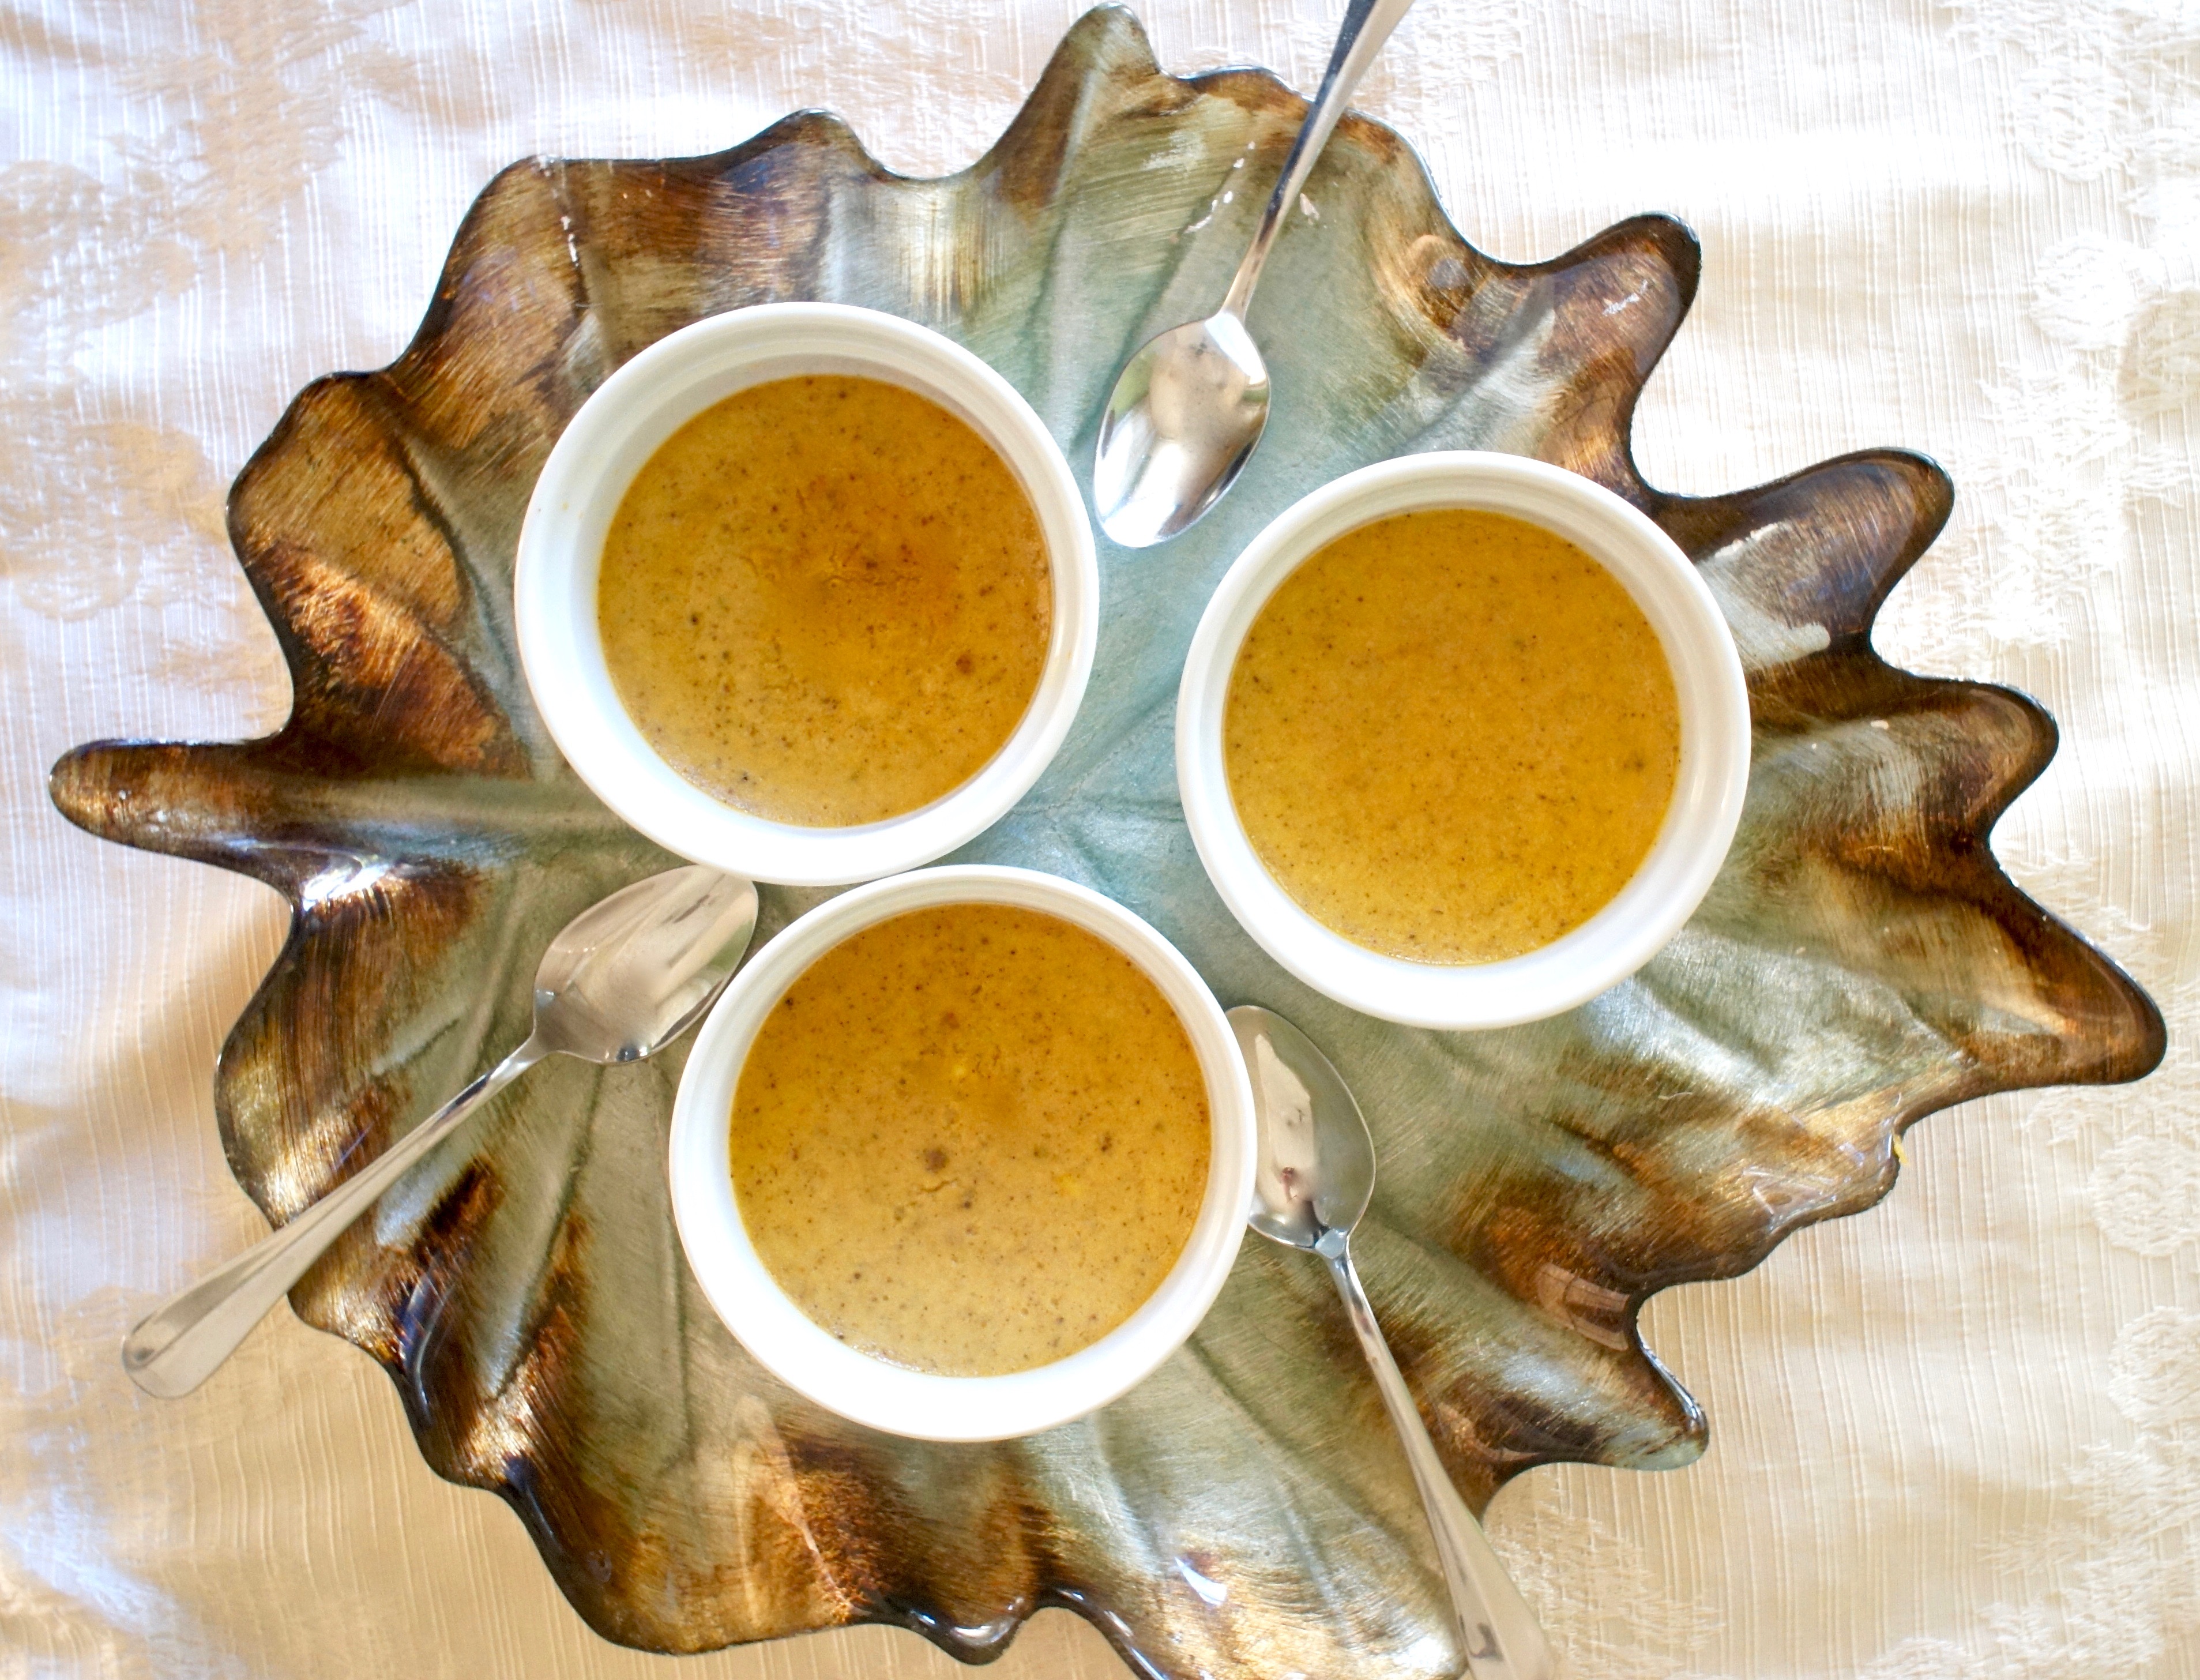
Maple Pumpkin Pots de Creme

Who’s ready for Thanksgiving? Know what you’re making? Need a last-minute dessert? These Maple Pumpkin Pots de Creme could be the impressive after-dinner sweet your gathering needs.
I was chatting with a friend the other day and told her all I have to do for the big day is provide a salad for my husband’s family’s get-together. “How did you get off so easy?” she asked. I hadn’t thought much about it, but she’s right: since I don’t host Thanksgiving, I don’t have to worry about cleaning my house, don’t have to provide a slew of side dishes, and I certainly don’t have to get up in the wee hours to put a turkey in the oven.

Still, since I so enjoy cooking–and the many delicious flavors of the holiday season–I’m actually happy to make additional dishes for Thanksgiving. Though pots de creme (a velvety, creamy pudding, if you’re not familiar with the term) is traditionally made with chocolate (recipe here if you happen to need one!), this unique boasts the flavors of pumpkin and maple syrup. It’s not unlike a crustless pumpkin pie, just creamier and richer. And it’s surprisingly simple to make, with just seven easy ingredients.
So even though I don’t technically have to make a dessert for the big feast, I don’t mind if I do!

Maple Pumpkin Pots de Creme
A simple, creamy pumpkin custard sweetened with maple syrup!
Servings: 6 ramekins
Ingredients
- 1 3/4 c. half and half
- 3/4 c. pure maple syrup
- 1/2 c. pumpkin puree
- 7 large egg yolks
- 1/2 tsp. cinnamon
- 1/8 tsp. nutmeg
- 1/8 tsp. salt
Instructions
- Preheat oven to 325 degrees. In a heavy saucepan, whisk together half and half, maple syrup, and pumpkin. Bring to a simmer over medium heat.
- In a large bowl, combine egg yolks, cinnamon, nutmeg, and salt.
- Slowly add hot pumpkin mixture to egg yolk mixture, whisking constantly. For easy pouring, transfer to a large measuring cup with a pouring spout.
- Set out six ramekins and divide pumpkin mixture between them. Place ramekins in a 13 x 9-inch baking dish, then carefully pour hot water into the space between ramekins until it reaches halfway up their sides.
- Cover dish tightly with aluminum foil and bake 40-50 minutes, or until a knife inserted in the center comes out clean. Chill at least two hours before serving. Dollop with whipped cream, if desired.
Notes
Adapted from Epicurious.
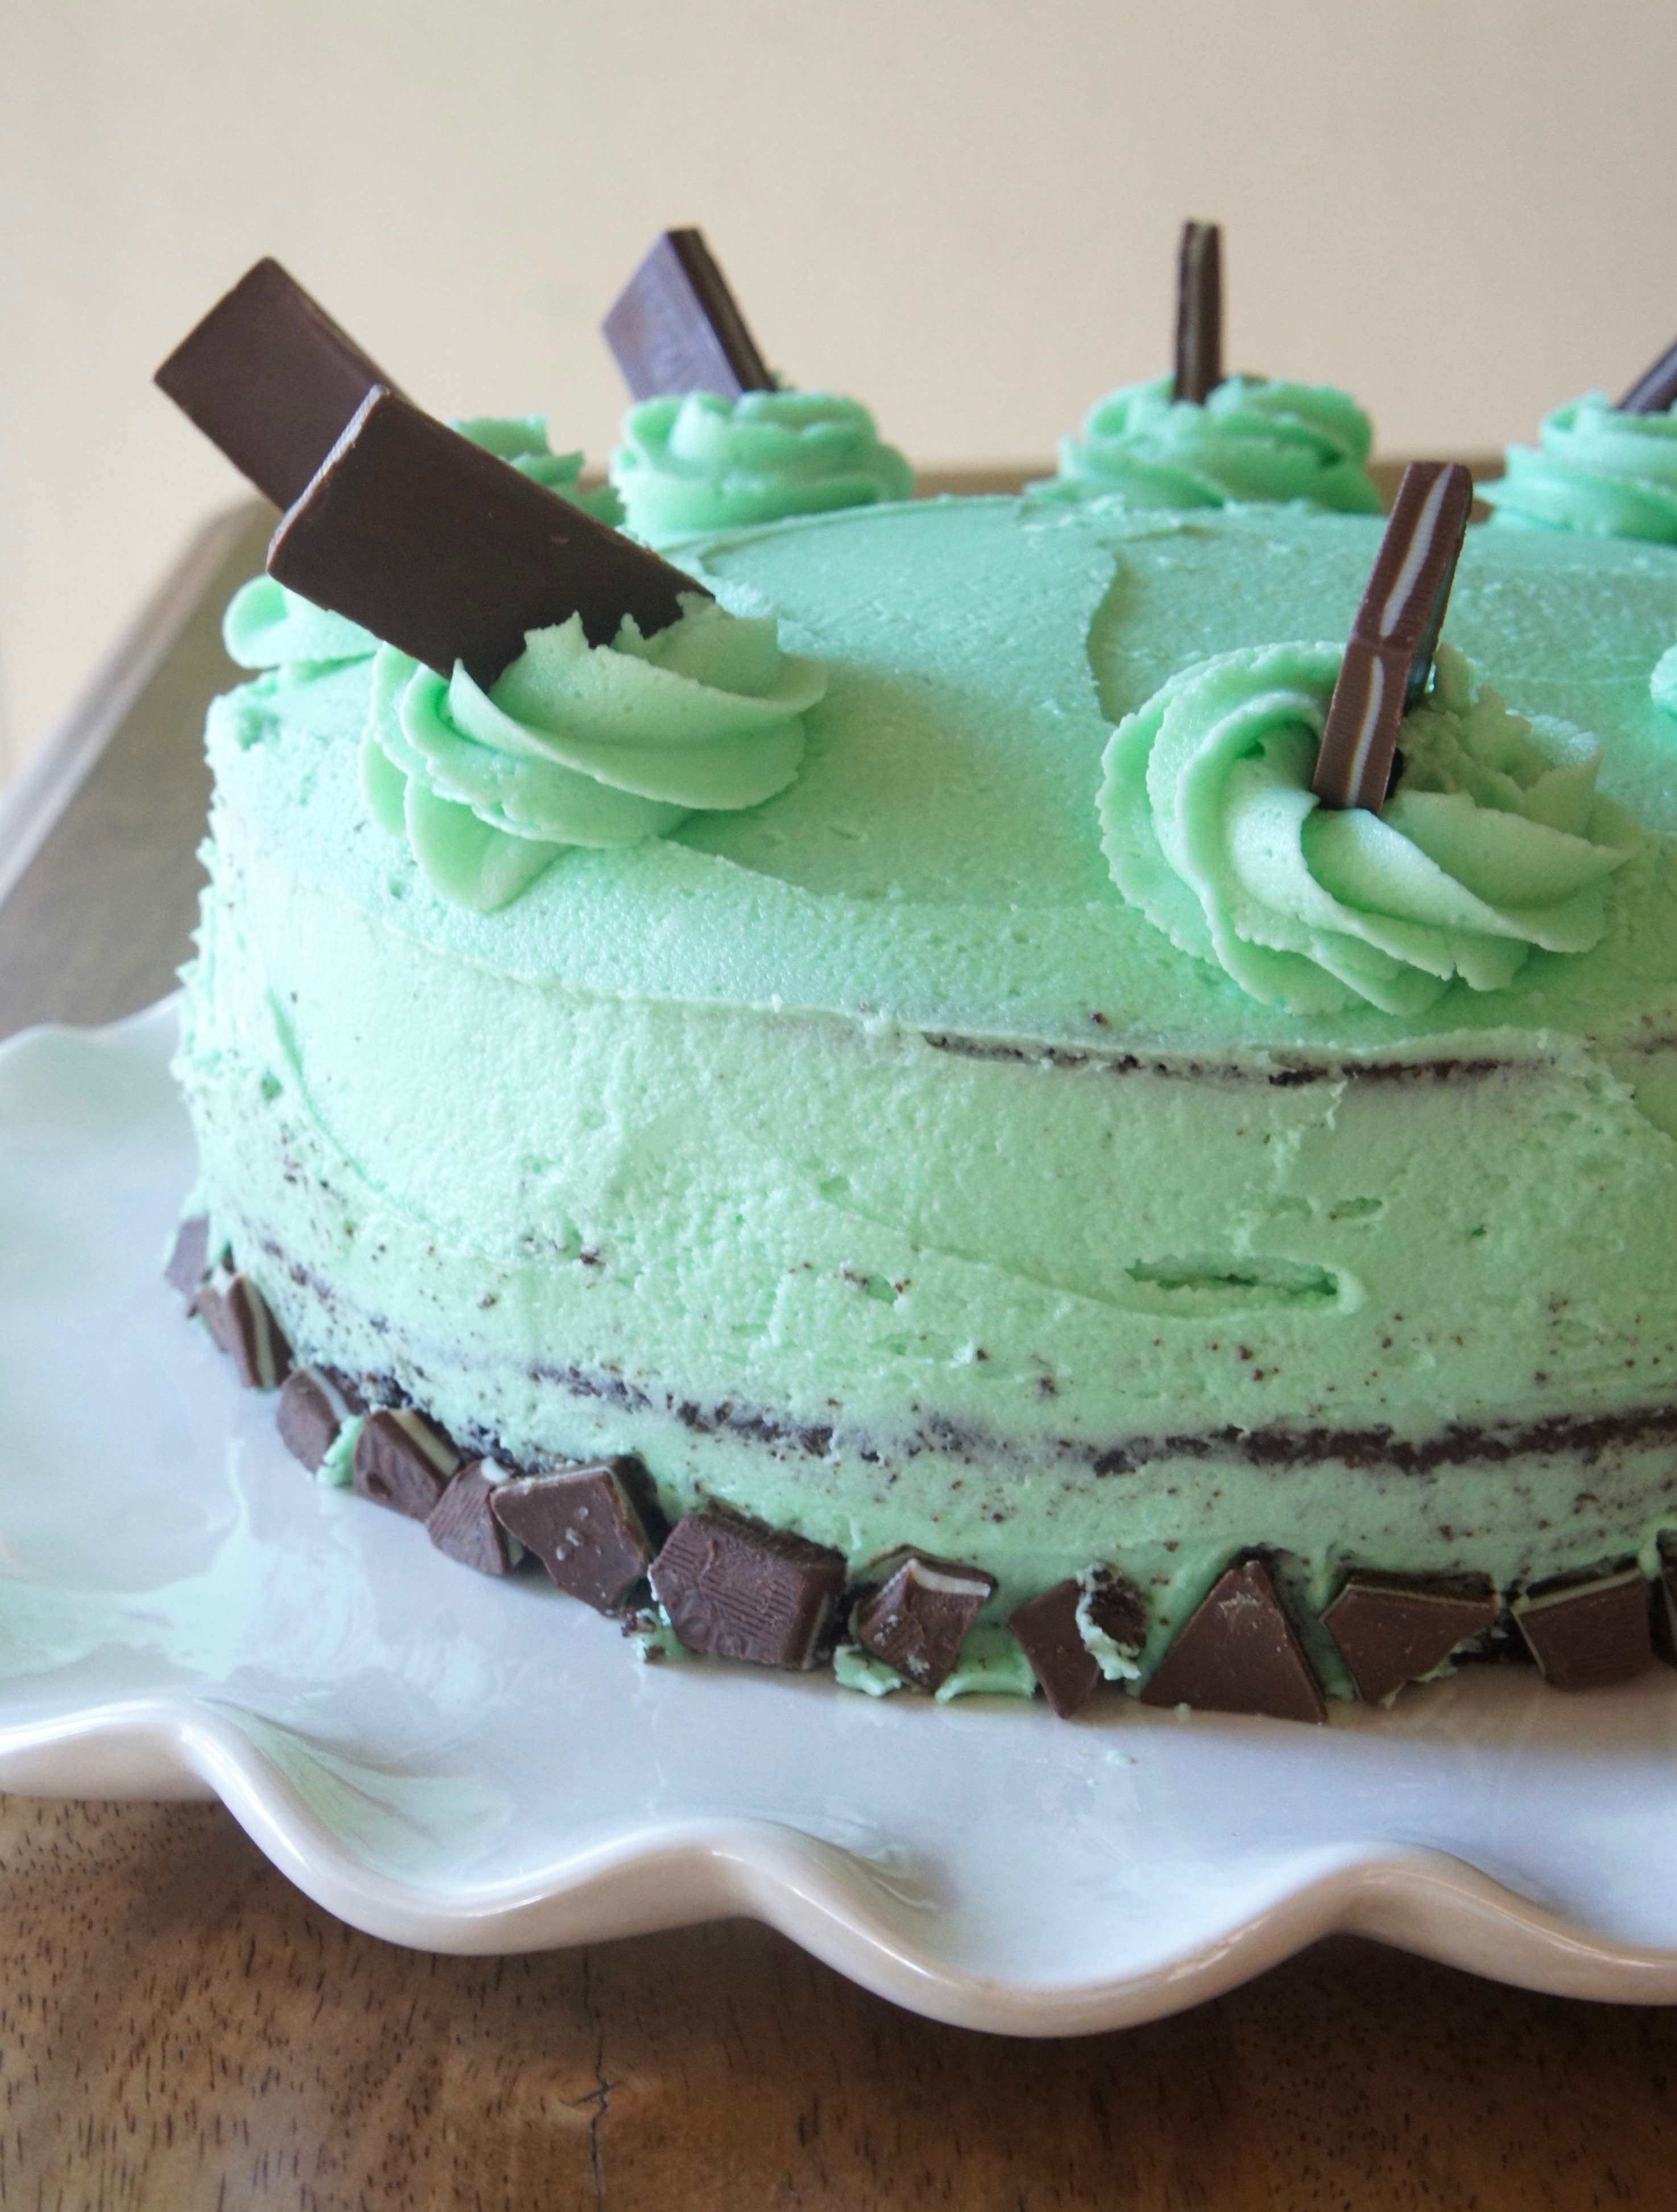
Chocolate Mint Layer Cake

Hi, my name is Sarah and I’m a cake-aholic.
And I am also a nutritionist.
Do we have a problem here? Not necessarily. I mean, while I absolutely love cake, I don’t eat it every day, I maintain a healthy weight, and my diet is generally (I’d like to think) pretty healthy. In fact, I’m a big fan of the 80/20 principle when it comes to eating: stay on course nutritionally about 80% of the time, do what you like–within reason–the other 20% or so. (I even wrote an article about it here.) So do I feel bad posting a totally indulgent, party-perfect Chocolate Mint Layer Cake on the blog today?
No, I actually don’t. Especially because today is my birthday.
This cake isn’t actually for my birthday (mine will be a Neapolitan Strawberry-Vanilla-Chocolate sugar bomb I intend to make this afternoon), but rather, for my mom’s a few weeks ago. My mom and I have a little arrangement where, because I love making cakes and we both love eating them, I get to make her a cake of my choosing every year. Usually with chocolate.
This year mint chocolate was calling to me, and this recipe, modified from Lindsay over at Life, Love, and Sugar was exactly what I was looking for–except that with our family size, I didn’t actually need THREE layers. (Though I may have wanted them.) The cake came out fluffy and moist and kept well in the fridge, where it shockingly actually lasted a week. And though, with mint frosting, it can be tough to strike the right non-toothpaste-y, yet not-too-mild note, this stuff does so beautifully.
I’m no cake decorating expert–I’ve taken one single class at my local Michael’s with an instructor who was oddly enthusiastic about using Snickers to garnish cakes–but I have to say, I think this, with its pretty green color and tempting Andes mint pieces, turned out looking particularly appealing. And tasted amazing. What more does a birthday cake need?
P.S. I’m not including nutrition info for this one. It’s my birthday and I DON’T WANNA KNOW!

Chocolate Mint Layer Cake
Minty, chocolatey, and totally indulgent, this cake makes the perfect choice for a birthday or other special occasion!
Prep Time45 mins
Cook Time35 mins
Total Time1 hr 20 mins
Servings: 12 slices
Ingredients
For the cake:
- 1 1/3 c. all-purpose flour
- 1 1/3 c. white sugar
- 1/2 c. cocoa powder
- 1 1/2 tsp. baking soda
- generous 1/2 tsp. salt
- 1 large egg
- 1 egg white
- 2/3 c. milk
- 2/3 c. vegetable oil
- 1 tsp. vanilla
- 2/3 c. boiling water
For the frosting:
- 1 c. butter, softened
- 1 c. shortening (or another cup of butter)
- 7 1/2 c. powdered sugar
- 3 Tbsp. water or milk
- 1/2 tsp. vanilla
- 2 tsp. peppermint extract
- green food coloring, to your preference
- yellow food coloring, to your preference
- Andes mints, for garnish
Instructions
Make the chocolate cake:
- Preheat the oven to 300 degrees and grease two 9-inch cake pans well. In a large bowl, combine dry ingredients (flour through salt). Make a well in the center of the dry mixture and add egg, egg white, milk, and vegetable oil. Mix to combine. Add vanilla and boiling water and mix until well incorporated.
- Divide batter evenly between the two pans and bake 30-35 minutes, or until a toothpick inserted in the center comes out clean. Cool completely.
Make the mint frosting:
- While the cakes cool, mix softened butter, shortening, and powdered sugar until smooth. Add water or milk, vanilla, and peppermint extract and mix again. Slowly add food coloring to your liking (I'd say go with about 2/3 green and 1/3 yellow) and mix until color is even.
- Place one layer of the cake on a platter and frost the top. Top with second layer of cake and frost the entire cake, reserving about 1 1/2 c. for extra frosting garnishes.
- To get the look pictured, use a cake decorating tip like Wilton 1M to pipe swirls around the outer edge of the cake's surface. Insert whole Andes mints into the swirls, press them into the base of the cake, or garnish however you like!
Notes
Adapted from Life, Love, and Sugar.
Sangria Granita

You know what this blog needs? More alcohol. And it could always use more desserts. Let’s get crazy and combine the two in a fruity, refreshing Sangria Granita.
If you’ve never had granita before, you’ve probably had something similar that goes by a different name–because it’s basically a grown-up slushie. In fact, there’s not even always anything “grown-up” about it. It pretty much IS a slushie…or, if you prefer another name name, a “shaved ice” or, for the truly refined, a “sno cone.” With origins in Sicily, granitas can be found alongside gelato all over Italy (which explains why you might ALSO hear them called “Italian ice”). A dead-easy dessert, granita typically contains just water, sugar, and a flavoring. Add some freezing time and a few rounds of ice crystal-scraping and you have the perfect sweet to hit the spot on a hot day.

With summer on the horizon, this Sangria Granita might be just the light treat you need poolside or after dinner. This version starts with Merlot and the juices of oranges, lemons, and limes, but could easily be adapted to use other wines and/or fruit juices. Let me know which combination you think would taste best!

Sangria Granita
A refreshing, light dessert that's perfect for summer!
Cook Time5 mins
Total Time3 hrs 5 mins
Servings: 4
Ingredients
- 2 c. Merlot or other full-bodied red wine
- 1 c. water
- 3/4 c. white sugar
- 1/2 c. fresh orange juice
- 1/4 c. fresh lemon juice
- 1 Tbsp. fresh lime juice
Instructions
- In a saucepan, heat wine, water, and sugar to boiling over medium heat. Boil and stir one minute, until sugar dissolves. Remove from heat and stir in fruit juices. Let cool.
- Pour mixture into an 9 x 13 baking pan (metal works better than glass for optimal freezing). Place the pan in the freezer. Remove after 30 minutes to scrape and stir the mixture with a fork so that flaky ice crystals form. Repeat every 30 minutes until frozen to your liking.
- To serve, scrape with a fork into individual bowls and serve immediately.
Notes
Adapted from Fine Cooking.
Red Velvet Cookie Cake

I’ve never really thought about it before, but cookie cakes have played kind of a major role in my life.
It started in high school. Junior year when my husband and I were dating, there was a Sadie Hawkins’-style dance called MORP (backwards prom). Everything about it was supposed to be the opposite of the regular protocol for school dances. Instead of dressing up in our fancy best, couples were supposed to dress exactly alike. (This was much trickier in the ’90s, before the age of gender neutralized clothing.) The dance was casual instead of formal; even the photo backdrop was a departure from the usual Grecian columns and silky fabrics:

Ah yes, here we are, dressed alike and casually hanging out on our garland-draped ATV. (Who comes up with this stuff?)
The final detail of MORP was that the girl was supposed to ask the guy to the dance in some clever way. I guess food has always been my love language, because I decided to present my then-boyfriend-now-husband with a cookie cake popping the question in frosting. Unfortunately, “Will you go to MORP with me?” was too long to fit on the cookie I ended up ordering, and instead, I remember it just had the word MORP with a giant question mark.
MORP?
Good thing he knew what I was talking about, or he probably would have thought I was suffering from some sort of delicious aphasic episode.
Fast forward several years. When we found out I was pregnant with our first child, we figured we’d break out the old cookie cake communication trick to inform my husband’s parents of their new grandparent status. We had been tasked to bring dessert to Sunday dinner. Imagine my in-laws’ surprise when they read the happy news in frosted lettering. Good memories.

With this history, cookie cakes have always held a place in my heart as special occasion desserts. So the other night when a friend and her daughter joined us for dinner, I decided a red velvet cookie cake sounded like just the delectable treat to serve after dinner.
When our visiting friend and I took our first bites, we looked at each other and went, “Oh. WOW.” The subtly flavored chocolate cookie dotted with white chocolate chips and covered with smooth cream cheese frosting made for an amazing finish to dinner. Cookie cakes for the win once again!
With Valentine’s Day on the horizon, or for any special occasion, consider this decadent dessert. You don’t even have to spell out any messages on it. It’s special enough all by itself.


Red Velvet Cookie Cake
Perfect for Valentine's Day, this frosted red velvet cookie cake is a decadent treat!
Servings: 12 small slices
Ingredients
For the cookie cake:
- 3/4 c. butter, softened
- 2/3 c. white sugar
- 1/2 c. brown sugar, packed
- 1 egg
- 1 egg yolk
- 2 tsp. vanilla
- 2 tsp. red food coloring
- 2 tsp. vinegar
- 1 3/4 c. flour
- 1/4 c. cocoa powder
- 2 tsp. corn starch
- 1/2 tsp. baking soda
- 1/4 tsp. salt
- 1 c. white chocolate chips
For the frosting:
- 4 oz. reduced fat cream cheese, softened
- 2 Tbsp. butter
- 2 c. powdered sugar
- 1/2 tsp. vanilla
- colored sprinkles (optional)
Instructions
- Preheat oven to 350 degrees. Spray a 10-inch tart pan with cooking spray. In a large bowl, cream the butter and sugars until light and fluffy. Add egg, egg yolk, vanilla, food coloring, and vinegar and mix to combine.
- Add flour, cocoa powder, corn starch, baking powder, and salt and mix until just combined. Stir in white chocolate chips. Pour into prepared pan, smoothing the top of the batter until even. Bake 30 minutes.
- Meanwhile, make the frosting: In a medium bowl, beat cream cheese and butter until smooth. Gradually beat in powdered sugar, then vanilla and milk, until smooth and spreadable.
- When cookie cake has completely cooled, spread frosting in a smooth layer on top. Sprinkle with colored sprinkles, if using. Keep refrigerated.
Notes
Cookie cake adapted from Just So Tasty. Frosting from Betty Crocker.
Apple Pie Truffles

How has it been since August that this blog has featured a dessert recipe? I’ll be honest, the gap in blogging about desserts is certainly not for lack of eating them! Halloween and our Stranger Things Party made sure of that. But now that Thanksgiving is upon us, leading (obviously) straight into the Christmas season, I say we can interrupt our regularly scheduled mostly healthy programming to bring you these Apple Pie Truffles.

Why Apple Pie Truffles? Doesn’t regular pie stand on its own as the top choice of discriminating holiday dessert eaters everywhere? Why would you mess with greatness? Well, pie and truffles are like religion and science: they don’t have to be in opposition! There’s room at the table–literally–for both.
These decadent truffles are like individual apple pies in poppable bite form–oh, and did I mention they’re covered in white chocolate? Apple pie + white chocolate is the flavor combination you didn’t know was missing from your life. The use of shortbread cookies to achieve the buttery texture of crust adds to the sensory experience…and of course the taste.
I’m thinking these need to make an appearance at our annual Christmas party…and maybe at a cookie exchange…and heck, let’s throw in Thanksgiving dinner, too. I don’t think anyone will mind.


Apple Pie Truffles
These decadent truffles are like apple pie in poppable bite form!
Servings: 12 truffles
Ingredients
For the truffle filling:
- 1 Granny Smith apple
- 6 oz. all butter shortbread cookies (I used Archway)
- 2 Tbsp. powdered sugar
- 2 oz. cream cheese, softened
- 1/2 tsp. cinnamon
- 3.5 oz. white chocolate chips, melted
For the white chocolate coating:
- 8.5 oz. white chocolate
- cinnamon for sprinkling
Instructions
- Peel apple and dice fine into ~ 1/4 square cubes. Place in a small saucepan with 1-2 Tbsp. of water, cover, and heat over medium heat about 5 minutes or until apple has just softened. Remove from heat, drain if any water remains, and set aside to cool.
- Crush shortbread cookies into crumbs. In a large mixing bowl, combine cookie crumbs, powdered sugar, cream cheese, 1/2 tsp. cinnamon, and melted white chocolate. Form into a ball as best you can, cover, and refrigerate for 1 hour.
- Line a flat platter or baking sheet with wax paper. Remove truffle mixture from fridge and form into 12-14 balls, about 1 inch in diameter, placing them on wax paper. Return to the fridge for another 30 minutes to 1 hour of chilling.
- In a small bowl, melt white chocolate in the microwave (30 second intervals tends to work well). Carefully dip each ball in the melted chocolate, rolling to cover the exterior and allowing excess chocolate to drip off. Place balls on wax paper. Sprinkle with cinnamon to finish.
- Return to the refrigerator for storing.
Notes
Adapted from Kitchen Sanctuary.