
Tag: Mediterranean Diet
Pear Salad Stack

I guess I would say I’m a fan of any food that manages to pull off an optical illusion while also tasting delicious. You know, like a cake in the shape of a hamburger. Or truffles…(their optical illusion is leading you to believe that something so small couldn’t possibly contain so many calories). This pear salad stack is its own trompe l’oeil, giving the clever impression that a piece of fruit magically unlocked like a 1990’s Caboodle to let a delicious filling of goat cheese, almonds, and dried cranberries hop into its nooks and crannies. Basically, if M. C. Escher ever drew a pear, it would look like this. Thankfully, it’s not nearly as complex and mind-bending as all that. This is probably one of the most interesting salad presentations you can get for the least amount of effort–just the kind of unconventional menu item that makes a lovely first course for a dinner party or a big hit with non-fruit-loving kids. The only downside is having to take it apart to eat it!
Pear Salad Stack
Ingredients:
4 large pears
3/4 c. dried cranberries
3/4 c. crumbled goat cheese
1/2 c. sliced almonds
Balsamic vinegar (optional)
Directions:
1. In a medium bowl, combine dried cranberries, crumbled goat cheese, and sliced almonds.
2. Slice pears horizontally into four equal pieces, then remove core from each piece using a sharp knife. (Alternatively, if you have an apple corer, use it to remove the entire core first, then slice into four pieces.)
3. On four individual plates, layer pear pieces and goat cheese mixture vertically. Drizzle with balsamic vinegar, if desired.
Serves 4.
Creamy Apple Barley Salad

I always seem to overdo it on the weekends. Between the excesses of date night on Friday and Sunday dinner at my Italian mother-in-law’s, I frequently start Monday feeling like the Stay Puft Marshmallow Woman…(in terms of bloating, not like I want to destroy apartment buildings or anything). I’d really like to become as conscious about what I’m putting in my mouth from Friday night through Sunday as I am Monday through Friday. Today, a Saturday, I found myself feeling a little guilty–and, extraordinarily, still a little full–from the Culver’s Oreo and cookie dough concrete mixer I allowed myself on date night last night. (If you don’t believe me, or if you want to feel a tremendous amount of shame for ever having eaten one, check out the jaw-dropping nutrition facts on concrete mixers.) Seriously, wow.
So this Saturday noon found me with the desire for something light and healthy for lunch. Weekend lunches at our house are usually cobbled together with random bits of whatever is left from the week–my husband always says I grocery shop as though a week has only 5 days. Sometimes the results are tasty, sometimes less so. (Tomato-shrimp omelet, anyone?) Today I realized that I had everything needed to make this creamy apple barley salad we had once before and I for one had really liked. It comes from one of my Real Simple cookbooks. What I love about Real Simple is that their recipes truly stand up to the name–more often than not, I have all the ingredients on hand. They make great use of standbys like salt and pepper, wine vinegars, Dijon mustard, yogurt, lemon juice, etc. Love it when I don’t have to run out and buy $5 oyster sauce I’ll use one tablespoon of in a year. (But, hey, no judgment if you’re an oyster sauce nut.)
This recipe pairs the sweet crunch of apple and chewiness of barley against the backdrop of tangy Dijon and yogurt. Toss on top of a bed of spinach and/or arugula and boom, it’s a salad! I added a bit of feta to give it some extra oomph, since this was my lunch in its entirety. (Adding cheese to stuff may actually be the best thing about being a semi-vegetarian.) Cheese or no cheese, though, this makes a nice light lunch or an interesting side salad for a simple entree like grilled chicken or fish.

Creamy Apple Barley Salad
(Adapted from Real Simple Best Recipes: Easy, Delicious Meals)
1/2 c. pearl barley
salt and pepper
1/2 c. plain Greek yogurt
2 Tbsp. extra virgin olive oil
1 Tbsp. fresh lemon juice
1 tsp. Dijon mustard
2 stalks celery, chopped
1 large apple, thinly sliced
1/4 c. fresh mint, chopped
4 1/2 c. fresh spinach, arugula, or mixed greens
Directions:
1. In a medium saucepan, combine barley, 1 1/2 c. water, and 1/4 tsp. salt. Bring to a boil and then reduce heat. Simmer, covered, for 25-30 minutes, until water is absorbed.
2. Meanwhile, in a large bowl, whisk together the yogurt, olive oil, lemon juice, Dijon mustard, 1/2 tsp. salt, and 1/4 tsp. pepper. Add the celery, apple, mint, and cooked barley and toss to combine.
3. In individual bowls, divide the greens. Top with the barley mixture.
Serves 2-3 as a main dish, 4 as a side salad.
Spanakopita
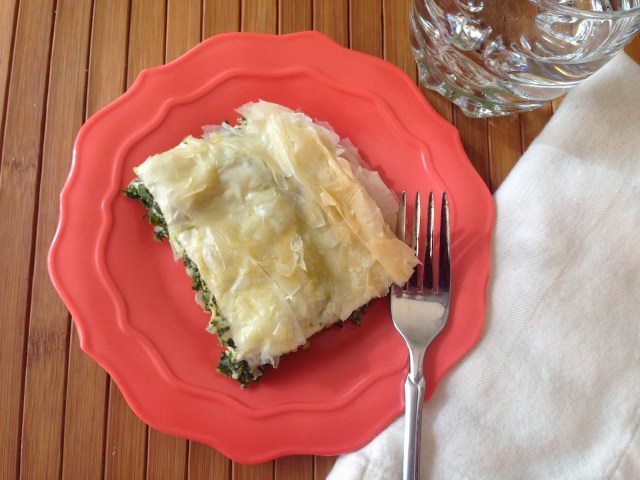
Funny how, a couple posts ago, I was lamenting the fact that’s it’s so much more expensive to make spanakopita from scratch than buy it pre-made. Well, I guess I’m a glutton for punishment, because I went ahead and made it from scratch a few days later. Truth be told, I had never actually done so before. Trader Joe’s fandom has always prevailed (their $4 per box version is delicious). Still, I had this whole package of phyllo dough sitting in my freezer from when I chickened out and didn’t use it in a recipe for our Christmas party and had been wanting to try spanakopita homemade. What to do, what to do… Phyllo seemed like such a tricky thing to work with–so flaky and fine, like you’d need the precision of one of those new, high-tech surgical robots to keep everything from falling apart into a crumbly, Greek mess (not unlike the Greek government in recent years–badum ching!). Then again, it’s not like I wanted to throw it out. “That’s $2.99 worth of phyllo dough in the trash!” (spoken as Chris Rock’s penny-pinching dad in Everybody Hates Chris.) So I watched some Youtube tutorials on how to use it and decided to bite the bullet. As my mom always says, “If it’s bad, we can just order pizza.”
Well, we didn’t have to order pizza. It turns out, in spanakopita at least, phyllo dough is fairly forgiving. I am no surgical robot and the phyllo on top came out less like the glutenous bad hair day I was afraid of and more like golden brown tousled pastry tresses. It’s the Jennifer Aniston of crusts! (And hey, she’s Greek, so that metaphor really makes sense–right?)
Interestingly–and, I guess, obviously–the word “spanakopita” comes from the Greek spanáki (meaning spinach) and pita (meaning pie). What I definitely didn’t know is that spanakopita falls within the “family of pastries” known in the Mediterranean as börek.* Basically, börek dishes are pastries phylled–I mean filled–with savory ingredients like cheese, vegetables, and even meat. Yum! Having tried my hand at spanakopita with tasty results, I’d be curious to attempt other börek…though it sounds like something that would end up on the police blotter. “Woman arrested for attempted börek in a domestic kitchen.” I’ll leave the delicious details to your imagination.

Spanakopita
(Adapted from Allrecipes.com)
Ingredients:
3 Tbsp. olive oil
1 onion, chopped
1 bunch green onions, chopped
3 cloves garlic, minced
25 oz. frozen chopped spinach (2.5 10-ounce packages)
1/2 c. chopped fresh parsley (or 3 1/2 Tbsp. dried)
salt and pepper to taste
2 eggs, beaten
3/4 c. ricotta cheese
1 1/2 c. crumbled feta cheese
15 sheets phyllo dough
1/4 c. olive oil
Directions:
1. Preheat oven to 350 degrees. Grease a 7 x 11 inch baking dish.
2. In a large skillet, heat 3 Tbsp. of olive oil over medium heat. Saute onion, green onions, and garlic until soft and lightly browned. Add frozen spinach and parsley and continue to cook until spinach is heated through. Season with salt and pepper. Remove from heat. Drain spinach mixture (my favorite method is to place about 1/3 of the mixture at a time on a dinner plate, then top with another dinner plate right-side-up, then squeeze over the sink).
3. In a large bowl, mix together eggs, ricotta, and feta. Stir in spinach mixture.
4. Working carefully, lay 1 sheet of phyllo dough in the baking dish and brush lightly with olive oil. Repeat until you have 5 sheets stacked. (If the sheets overlap the pan, that’s okay–keep them that way for now.)
5. Spread half the spinach-ricotta filling evenly over the phyllo. Tuck any overhanging dough over the filling and repeat the layering process with 5 more sheets of phyllo. Spread remaining 1/2 of spinach-ricotta filling on top, then repeat the layering once again with 5 more sheets of phyllo to complete the pie, brushing the top layer with olive oil. Again, tuck any extra/overhanging dough into the dish.
6. Bake 30-40 minutes or until golden brown.
Fig and Goat Cheese Bruschetta

You may have noticed it’s been awhile since my last post, for reasons that are probably obvious–it’s Christmastime! Like everyone else, I have a to-do list longer than Santa’s naughty list every year during December, so writing about food has been pushed from its usual place near the top. Not, of course, for lack of cooking and eating! In fact, so much of my time has been taken up with both these activities the last few weeks that it’s sort of ironic that it’s kept me from blogging. Part of the reason for this, in addition to the usual cookie baking, eggnog drinking, and yuletide haggis feast (your family does that too, right?) is that my husband and I host an annual White Elephant Christmas Party for about 30 of our friends. This may be my favorite tradition of the whole season. We started it when we were newly married, just for fun, and I think about eight people came. Now, nine years later, it’s the biggest event of my year. I start menu planning around Halloween, and prepping and freezing after Thanksgiving. (Someday I’ll write a post about party planning tips/ideas. For now, suffice it to say the top two are Plan Ahead and The Freezer Is Your Friend.) I always provide 8-9 finger food options, as well as a selection of Christmas cookies and one other, more fabulous dessert. Here was this year’s menu:
Crock Pot Barbecue Meatballs
Cherry-Apple-Walnut Chicken Salad Croissants
Mac and Cheese Bites
Puff Pastry Ham Braids with Honey Mustard
Easy Samosas with Mango Chutney
Crudites with White Bean Dip, Tomato Basil Hummus, and Parmesan Ranch
Tortilla Chips with Avocado-Feta Pico de Gallo
Fig and Goat Cheese Bruschetta
While I was happy with the way everything came out, I may have been proudest of the Fig and Goat Cheese Bruschetta. Bursting with flavor from the combination of sweet fig-orange jam with creamy, tangy goat cheese, they definitely make a big impact for such a small appetizer. And look how pretty they are! If these were a fashion accessory, they’d be diamond earrings–small but sparkly. Plus, they’re not too difficult to prep in advance. Make the jam up to three days ahead, then assemble and stick under the broiler for a couple of minutes, and voila! A lovely tiny bite of deliciousness is yours!

As for the rest of the party, my hope is that everyone had a blast. There were certainly some terrible gifts (the more terrible, the better is the idea) and all I can say is I’m glad I didn’t end up with the live goldfish.

And as for you, have a very merry Christmas filled with peace, beauty, and of course lots of wonderful food!
Fig and Goat Cheese Bruschetta
(Adapted from Cooking Light)
Ingredients:
1 1/4 c. chopped dried Mission figs
1/3 c. sugar
1/3 c. coarsely chopped orange sections
1 tsp. grated orange rind
1/3 c. fresh orange juice (about 1 orange)
1/2 tsp. chopped fresh rosemary
1/4 tsp. ground black pepper
30 1/2-inch-thick slices French bread baguette
1 1/4 c. crumbled goat cheese
5 tsp. finely chopped walnuts
Directions:
In a small saucepan, combine the first 7 ingredients; bring to a boil. Cover, reduce heat, and simmer for 10 minutes or until figs are tender. Uncover and cook 5 minutes or until mixture thickens. Remove from heat and cool to room temperature.
Preheat broiler.
To assemble bruschetta, top each bread slice with 1 1/2 tsp. fig jam and 1 1/2 tsp. goat cheese. Sprinkle evenly with walnuts. Broil on a cookie sheet for 2 minutes or until nuts begin to brown.
Makes 30 pieces.
Butternut Squash and Carrot Soup

As an adult–and even as an aspiring dietitian–I have retained a childish stubbornness about trying certain unfamiliar vegetables. Eggplant, for example, seems like a big-bottomed purple flesh monster. And lima beans could be delicious, for all I know, but I remember hating them as a child, so you bet I’m not touching them with a 39 1/2 foot pole now! Don’t even get me started on collard greens.
Butternut squash is another one that alerts my veggie stranger danger. It never made the meal rotation in my household growing up, so I never ventured to try it in any other context. But in recent years, I’ve tried to swallow my inner protestations and make the effort to tackle some new vegetables, one at a time. As with trying anything else new, some things I end up liking, some things I don’t. (Bok choy, kale, endive, and parsnips, get a thumbs-up. Beets and artichokes, thumbs-down.)
Having done quite a bit of reading in the last year on the wisdom of eating seasonally, I decided butternut squash made the short list for must-try vegetables this fall. Now, having eaten it, I don’t know what I was so apprehensive about! If you’ve never had it, it’s not unlike pumpkin–creamy and a bit nutty. Plus, it contains an off-the-charts level of Vitamin A and is a good source of Vitamin C.
We’ve had this soup twice now. (My husband raved about it the first time, so I made it again a couple of weeks later.) It comes together quite simply, with a velvety texture and noticeable hint of nutmeg. We like it as a main dish with cheesy bread or a salad, but it could also serve as a lovely first course for a dinner party. If nothing else, it’s worth making just for the incredible aroma that will fill your home as it simmers!
Butternut Squash and Carrot Soup
(Slightly adapted from Better Homes and Gardens)
Ingredients:
1 Tbsp. butter
3 c. peeled, diced butternut squash
2 c. thinly sliced carrots
3/4 c. diced onion
28 oz. chicken or vegetable broth (homemade makes this especially delicious)
1/4 tsp. ground white or black pepper
1/4 tsp. ground nutmeg
1/4 c. half-and-half
Sour cream (optional)
Directions:
In a large stock pot, melt butter over medium heat. Cook squash, carrots, and onions in butter for about 8 minutes, stirring occasionally. Add broth. Bring to boiling; reduce heat. Simmer, covered, 25-35 minutes, or until vegetables are very tender.
Using an immersion blender (or in batches in a food processor/blender with a tight-fitting lid), puree the soup until smooth. Return to stock pot. Add pepper and nutmeg; bring just to boiling. Add half-and-half; heat through. Garnish with sour cream, if desired.