
Tag: Desserts
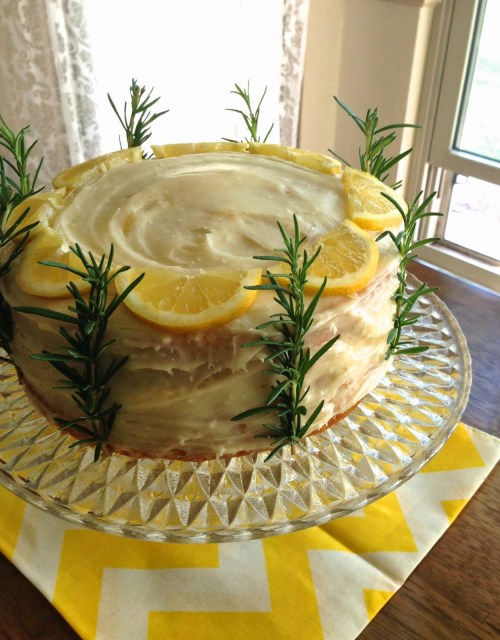
Fluffy Lemon Rosemary Layer Cake
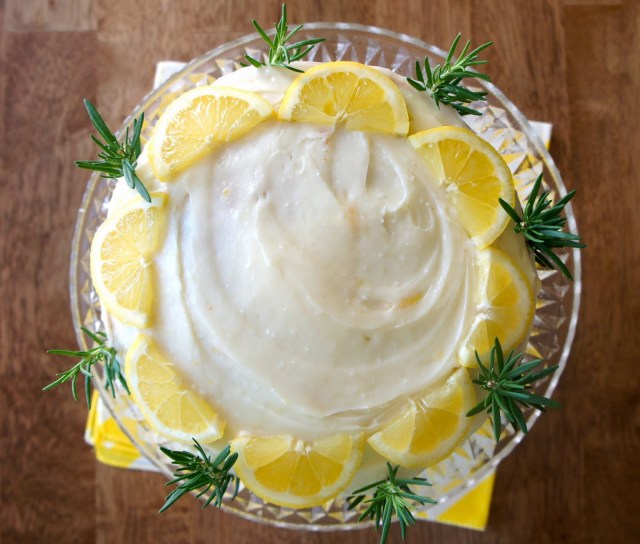
Sometimes I think I should start a separate blog called A Love Letter to Dessert. Or maybe just A Love Letter to Cake. So many flavors, so many fillings, so many different kinds of frosting. It makes me think of the segment of my high school math class about combinations and permutations–remember that? Where you total up the number of all the different ways a collection of things can be combined? Like if you have chocolate, peanut butter, and vanilla, you could make a chocolate cake with peanut butter filling and vanilla frosting–or a vanilla cake with chocolate filling and peanut butter frosting, etc., etc.? There have got to be thousands of cake permutations–or is it combinations? (Either way, look, math was useful! It can be applied to cake! Thanks, Mr. Cox!) I occasionally spend a little too much time thinking about these many configurations, but I’m happy to hit pause on my Cake Permutation daydream for this particular combination of lemon-rosemary cake with lemon cream cheese frosting. It is dessert nirvana. As someone who doesn’t really go for food trends, I am all for the current craze over the marriage of citrus and herbs in sweet treats. (Can we please just let lemon and rosemary get married already–I mean, you love who you love, right?)
I made this delight for my husband’s family’s Easter gathering last month and it received rave reviews. The high number of eggs gives it a light, fluffy texture that matches the lightness of the lemon flavor. Plus, the presentation of the rosemary sentries posted all around the cake make for visual interest. Definitely a special cake for a special occasion!
Fluffy Lemon Rosemary Layer Cake
(Adapted from Baker Bettie, who adapted it from Cook’s Illustrated)
Ingredients:
For the cake:
2 1/2 c. cake flour (make cake flour from all-purpose flour by replacing 2 Tbsp. per cup with corn starch)
1 1/4 tsp. baking powder
1/4 tsp. baking soda
3/4 tsp. salt
1 1/2 c. sugar, divided
10 tbsp. butter, melted and slightly cooled
1 c. buttermilk (make buttermilk from regular milk by replacing 1 Tbsp. per cup with lemon juice or vinegar–let sit 5 minutes, then use)
3 Tbsp. vegetable oil
2 tsp. vanilla
1 Tbsp. lemon zest
1 Tbsp. fresh rosemary, minced
6 large egg yolks
3 large egg whites
1 lemon, sliced
8 sprigs rosemary
For the frosting:
8 oz. cream cheese, softened
1/2 c. butter, softened
1 Tbsp. lemon zest
2 Tbsp. lemon juice
1 tsp. vanilla
2 1/2 c. powdered sugar
Directions:
1. Preheat oven to 350 degrees. Grease two 9-inch cake pans.
2. In a large bowl, combine flour, baking powder, baking soda, salt, and 1 1/4 c. sugar. In another bowl, whisk together the melted butter, buttermilk, vegetable oil, vanilla, lemon zest, minced rosemary, and egg yolks.
3. In a separate bowl bowl, beat egg whites at medium speed until foamy with a hand mixer or stand mixer. Stream in the remaining 1/4 c. sugar. Beat on high speed until stiff peaks form. Set aside.
4. Gradually pour butter mixture into flour mixture, mixing on low until just combined. Gently fold in meringue (egg) mixture one half at a time–a few white streaks are okay. Divide batter evenly between prepared cake pans.
5. Place cake pans on a baking sheet and bake 20-25 minutes, rotating halfway through for best results, until cake does not jiggle in the center.
6. Cool on a wire rack about 20 minutes, then run a knife around the sides of the cakes and invert onto a greased wire rack or wax paper. Allow to cool completely (about another hour) before frosting.
7. Meanwhile, make the frosting by mixing all ingredients on medium speed until creamy.
8. Frost and garnish with sliced lemons and rosemary sprigs.
Coconut Cream Pie
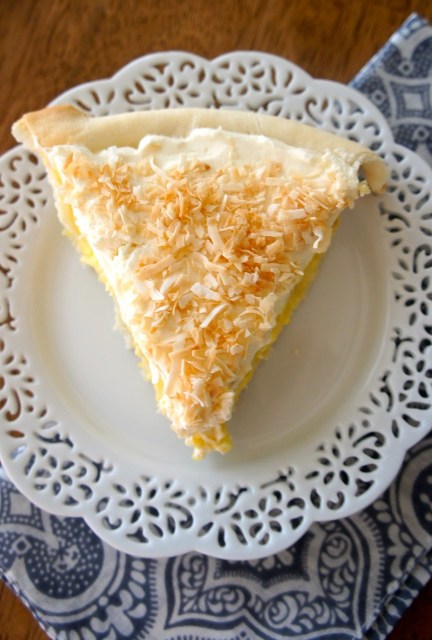
Easter may have come and gone, but is that any reason to stop making spring-y desserts? No way! As far as I’m concerned, we still have another good six weeks of spring (100 degree temps notwithstanding). Before we roll out the watermelon and ice cream, I’m not ready to be done with the lemon bars, the carrot cake, or this delectable coconut cream pie. It’s one of those sleeper recipes that came from my rather unassuming Bridal Edition Betty Crocker Cookbook, but I tell ya, Betty really hit some home runs as a faux homemaker extraordinaire (you did know Betty Crocker wasn’t a real person, right?) Even my husband, who likes cream pies about as much as most men like watching Gilmore Girls, admitted to genuinely liking this version. My only significant change to Betty’s original recipe was to toast the coconut on top, for aesthetic reasons as much as for taste. (Though it does nothing for the coconut getting stuck in your teeth–that’s the price you pay for tropical deliciousness, I guess.) I also like that it’s not one of those cream pies that’s 80% cream and 20% pie. Don’t get me wrong, I enjoy whipped cream. I just like pie better. And I’m not crazy about the heaping pile of excess goo that ends up on the side of my plate like liposuction aftermath.
So on that lovely note: gear up for the rest of spring and get ready for the coconut cream pie of your dreams! (Seriously, it’s really yummy.)
Coconut Cream Pie
(Adapted from Betty Crocker’s Cookbook: Bridal Edition)
Ingredients:
Pastry for a one-crust pie
4 large egg yolks
2/3 c. sugar
1/4 c. cornstarch
1/2 tsp. salt
3 c. milk
2 Tbsp. butter, softened
2 tsp. vanilla
1 1/2 c. flaked unsweetened coconut
3/4 heavy whipping cream
2 Tbsp. powdered sugar
Directions:
1. Bake pastry for one-crust pie at 450 degrees for 9-11 minutes (or according to package/recipe directions).
2. Beat egg yolks with a fork in a medium bowl; set aside. Mix sugar, cornstarch, and salt in a 2-quart saucepan. Gradually stir in milk. Cook over medium heat, stirring constantly until mixture thickens and boils. Boil and stir 1 minute.
3. Stir at least half of the hot mixture gradually into the egg yolks, then stir the whole thing back into hot mixture in the saucepan. Boil and stir 1 minute; remove from heat. Stir in butter, vanilla, and 3/4 c. of the coconut. Pour into pie crust. Press plastic wrap onto filling to prevent a tough layer from forming on top. Refrigerate at least 2 hours until set.
4. To make the whipped cream: In a large chilled bowl, beat whipping cream and powdered sugar on high speed until soft peaks form. To make the toasted coconut: Spread remaining 3/4 c. flaked coconut on a baking sheet and bake at 350 degrees for about 3 minutes.
5. Remove plastic wrap from pie and spread whipped cream on top. Sprinkle with toasted coconut.
Serves 8.
Chocolate Peanut Butter Cups

Easter is almost here! Just one more day until we’ll be celebrating the resurrection of Christ by hiding eggs and digging into colorful baskets of goodies (wait, what?). I’ve always felt that Easter should be my favorite holiday. After all, spiritually speaking, as a Christian, it’s the centerpiece of my faith–Christ’s death to redeem the world followed by His triumph over the grave. Just thinking about that gets me excited. But I am, of course, a product of my culture and my generation, and Christmas has always taken the gold as Holiday #1 in my heart. Still, the older I get, the more I appreciate Easter–both its spiritual significance and its laid-backness as compared to the frenzy of Christmas.
This year, as I did during the Christmas season, I’ve been considering ways to combat the excesses of this holiday. No, it’s not as commercialized as Christmas, but it’s always nice to simplify where you can. From the non-biodegradable Easter grass that gets everywhere to the pointless junk the grocery stores want you to put in your kids’ Easter baskets, there are a lot of things our family could do without. So this year, here are a few changes I made to make our Easter just a little more moderate and eco-friendly:
- used shredded colored printer paper instead of purchasing Easter grass. In fact, I did this last year and kept the shredded paper in the kids’ baskets in the garage. Work involved: ZERO!
- didn’t buy anything non-consumable for my kids’ Easter baskets (just candy and egg-shaped sidewalk chalk)
- bought my daughter’s Easter dress second-hand (for $6, thanks, Love Child!)
- homemade one of the candies for the kids’ baskets
The homemade candies were–you guessed it–these chocolate peanut butter cups. And my kids are lucky that I only made them yesterday, because I tell you, one more day and these things would not have made it to Easter. They are absolutely decadent. So even though Easter is tomorrow, it’s not too late for the Easter bunny (aka Mom) to make a quick batch of these–for the kids or for herself!
Happy Easter!

Chocolate Peanut Butter Cups
(Inspired by Allrecipes.com)
Ingredients:
1 11.5-oz. bag milk chocolate chips, divided
3/4 c. creamy peanut butter
1/3 c. powdered sugar
3 Tbsp. crushed graham crackers
1/8 tsp. salt
1/2 tsp. vanilla
Directions:
1. Lightly grease a 12-cup mini muffin pan. (Or 2 pans–the recipe yielded 15 peanut butter cups for me.)
2. In a microwave-safe bowl, microwave about 2/3 of the chocolate chips in 30-second intervals until melted. Spoon melted chocolate into mini muffin cups, filling halfway. Use the spoon or a small spatula to draw the chocolate up the sides of the muffin cups. (It helps to let the chocolate cool slightly before doing this to keep it from sliding down.) Refrigerate until firm.
3. In a medium bowl, mix together peanut butter, powdered sugar, crushed graham crackers, salt, and vanilla. Divide into chocolate cups.
4. Melt remaining chocolate and cover peanut butter mixture, spreading to the edges.
5. Refrigerate until firm. Store in an airtight container in the refrigerator.
Makes about 15 peanut butter cups.

Maple Orange Creamsicle Granita

As I’ve mentioned before, when it’s citrus season in Arizona, there’s no escaping the hordes of oranges, lemons, and grapefruit that go rolling through the streets like the eleventh plague of Egypt (but, you know, the good kind of plague). This past week, I once again found myself in possession of a superabundance of oranges.
I’ll tell you why.
As a nutrition student, I’ve made it my project to volunteer for a local nonprofit called Save the Family by participating in their sack lunch program. Once a month, I make 15-20 sack lunches for the attendees of their many programs (GED classes, career training, etc.). It’s a great way to volunteer from home on my own time. Plus, it has to do with food! (And if you live in the Phoenix area, I encourage you to get involved!) For the month of March, my Meetup group with the longest name in Meetup.com history–the East Valley Catholic Stay-at-Home Moms–was looking for something to do for our semiannual service project. We ended up settling on providing 50 sack lunches for Save the Family, with each mom supplying one item to go in the lunches. As it turned out, one of the ladies got a friend with an orange tree to donate oranges….lots and lots of oranges. Even after packing the 50 sack lunches AND having my husband take a bag of oranges to give away at work, I still had a dozen oranges squeaking around in the fruit crisper in my fridge. What to do, what to do?
Here’s what to do! Make orange granita with an unusual twist. This is one of the few recipes I’ve found that actually uses up more than a single orange at a time. It knocked out six of those bad boys. Yessssssss! From the first time I made granita, I’ve been a fan–it’s such a fun, versatile (not to mention low calorie) dessert. This version combines tangy orange juice with a maple-cinnamon cream for a sophisticated version of the Creamsicle. (There is such a thing, right?) All in all a unique, refreshing warm weather treat for those of us who are experiencing Citrus March Madness (and 97 degree days in April).

Maple Orange Creamsicle Granita
(Adapted from Martha Stewart)
Ingredients:
2 c. fresh-squeezed orange juice (from about 5 large oranges)
5 Tbsp. maple syrup, divided
1/2 c. Greek yogurt
Dash cinnamon
1 large orange, peel and pith removed and flesh divided into segments
Directions:
1. Stir 2 Tbsp. of maple syrup into orange juice. Transfer to a shallow 1.5 quart dish. Freeze 2 hours, stirring and scraping with a fork every 30 minutes.
2. When ready to serve, combine yogurt, remaining 3 Tbsp. maple syrup, and cinnamon and divide between four bowls or small Mason jars. Using a fork, scrape granita into flaky crystals and place on top of yogurt mixture. Top with orange segments.
Serves 4.
Lemon Cookie Sandwiches

So lately I’ve been on a history of food/food etymology kick. Because, hey, if you love food, isn’t it fascinating to find out about its history? You never know what you might find out about a seemingly modest comestible. Today I was reading this excellent article on The History of the Sandwich–you know, like a normal person would do in their spare time–and let me tell you, there is more to the sandwich than one food stuffed between two slabs of another food. Here are few of the most compelling tidbits I discovered:
- The first recorded sandwich was made by the 1st century B.C. rabbi Hillel the Elder (but was it kosher?)
- The Earl of Sandwich actually had a name (and it was not Earl, like I always vaguely assumed). His name was John Montagu, and his invention of the sandwich is the subject of hot debate. I bet Rabbi Hillel is rolling in his grave over the fact that we don’t eat Turkey and Cheese Hillels. Also, Montagu was a patron of British explorer Capt. James Cook, which is why Cook named the Sandwich Islands after him.
- The sandwich was not introduced to the United States until 1840, when a British woman named Elizabeth Leslie included it in her cookbook, Directions for Cookery. The recipe probably went something like this: “Put something between two slices of bread. Serves 1.”
- There’s a restaurant in Florida called the Earl of Sandwich, founded by the Earl’s descendant Orlando Montagu (gotta lay claim to the fame of the name, I suppose.)
You may be wondering why I’m going on about sandwiches when, clearly, the photo above is of cookies, not sandwiches…or is it?? Here’s the question: are the above goodies cookies or sandwiches?


Whoa, guys, let’s not get in a Cookie Monster/Earl of Sandwich throwdown! (Though my money’s on Cookie Monster if we do.) We can ALL get along here! Cookies and sandwiches are FRIENDS–see?

Look, it’s the perfect marriage of both! These buttery, zingy lemon cookie sandwiches were somehow left off the list of classic sandwiches in The History of the Sandwich, but once you eat them, my guess is they will make it on your list of favorite cookies–or of favorite sandwiches. Trust me, these are yummy enough to earn a place in the history books….or at least your recipe book.
Lemon Cookie Sandwiches
(Adapted from Ldsliving.com and Great American Home Baking)
Ingredients:
For the cookies:
1/2 c. butter, softened
1 c. sugar
1/2 tsp. vanilla
1 egg
1 tsp. lemon zest
1 Tbsp. fresh lemon juice
1/4 tsp. salt
1/4 tsp. baking powder
1/8 tsp. baking soda
1 1/2 c. all-purpose flour
For the frosting:
3 Tbsp. butter
1/2 tsp. lemon zest
1 Tbsp. fresh lemon juice
1 c. and 3 Tbsp. powdered sugar
Directions:
Make the cookies:
1. Preheat oven to 350 degrees. Grease light colored baking sheet with cooking spray.
2. Cream butter and sugar together in a large bowl. Add vanilla, egg, lemon zest, and lemon juice and combine thoroughly. Stir in all dry ingredients until just combined.
3. Drop by rounded teaspoonfuls onto prepared baking sheet. Bake 9-11 minutes or until cookie bottoms begin to brown.
Make the frosting:
Combine butter, zest, and juice. Beat in powdered sugar at medium speed until fluffy.
Make into sandwiches:
Spread a layer of frosting on the bottom of one cookie. Top with a second cookie to make a sandwich!