
Tag: Desserts
Cream Cheese Apple Tart

So it’s been two weeks since my last post, which is the longest I’ve ever gone without blogging since first starting this endeavor last June. I’m sure all three of my readers are seething with rage and anxiety. But it’s been a super busy few weeks, which tends to leave blogging in the dust. First my husband went out of town, meaning I was fending for myself with three little kids for a few days. Then I decided to give him a taste of his own medicine by going out of town myself for three days to my 10-year college reunion in Illinois. The fellowship was sweet, the fall colors were gorgeous, and my poor little tuckus was just about frozen right off of my body. I had signed up to do the Homecoming 5k, but when the morning dawned at about 35 degrees with snow flurries, I decided I’ll save my running in extreme weather conditions for the Zombie Apocalypse, thank you very much. All in all, it was a great trip, though.

The colors! And the friends! And the memories!
The day I returned from the Chicago area, my brother came to town for a few days, inspiring the following goofy faces like any good brother/uncle:

Since my kids were on fall break, we were able to have some quality time with Uncle Joel, visiting the pumpkin patch, going to parks, and arguing over whether it’s okay for him to teach my children how to belch on command.
Now that things are beginning to settle back down to normal and we’re almost halfway through October, I’m ready to share this lovely dessert to ring in the autumn spirit, if you haven’t already rung it in yourself with tall boots over jeans and pumpkin spice lattes to the point of credit card debt. It has two of my favorite flavors of fall–apples and cinnamon–with a unique twist, something different from the usual apple pie. (Not that there’s anything wrong with the usual apple pie.)

I’ve made this twice now and received several compliments on its taste and appearance. The fancy-looking apple pinwheel effect on top definitely gives it visual appeal, and the taste is just as good as the look. Plus, I love the unexpected cheesecakey layer hiding underneath the apples.

And doncha just want to grab that one gooey-looking cinnamon apple on top?

I’d be willing to bet you’ll make a lot of friends if you bring this in place of apple pie to your family’s Thanksgiving this year…but why wait until then? It’s October–let the autumn eating commence!
Cream Cheese Apple Tart
(Adapted from The Cooking Channel)
Ingredients:
For the crust:
1 homemade or purchased pie crust
For the cream filling:
8 oz. cream cheese, softened
1 egg
1/4 c. sugar
1/2 tsp. vanilla extract
For the apple top:
2 large Granny Smith apples, peeled and sliced
1/4 c. sugar
1 tsp. cinnamon
Directions:
1. Bake the pie crust according to package directions in a 10-inch tart pan (or 9-inch pie plate).
2. Preheat oven to 400 degrees.
3. In a medium bowl, beat together cream cheese, egg, sugar, and vanilla until smooth. Pour into the baked pie crust.
4. In a large bowl, mix sugar and cinnamon. Add apple slices and toss to coat. Arrange individual apple slices in a pinwheel pattern on top of the cream cheese filling, starting at the outer edge of the tart and working inward.
5. Bake about 40 minutes, until apples are tender and golden.
Serves 8.

Boston Cream Pie

In 2003, the state of Massachusetts made a bold decision. They designated the Boston Cream Donut as the OFFICIAL DONUT of the state. Good call, Massachusetts. Both on your choice of donut and the choice to have an official state donut. (Massachusetts is, in fact, the only state to have an official donut. The other 49 states need to rectify this immediately.) So it’s all well and good that the people of the Bay State get to enjoy this monument to deliciousness in an official capacity.
But guess what, Massachusetts? Somebody beat you to it.
ME!!!!
The Boston Cream donut has been MY official donut since at least 1991.
For as long as I can remember, I have ALWAYS ordered a Boston Cream donut whenever possible at a donut shop. It started when my grandparents from Iowa would come to town and take my brother and me out for lunch at Sizzler and then to Dunkin Donuts for dessert. (The year 1991 is somewhat arbitrary–I was 9 then, which is about when I first recall this ritual with my grandparents starting.) Even at that young age, I can remember the sureness of my decision. No strawberry frosted, no long johns, no chocolate glazed. I want the grand daddy, that pie-within-a-cake, dream-within-a-dream ALL-STAR Boston Cream Donut. Dark chocolate frosting, buttery cake, and glorious cream filling–can you see why I (and, oh yeah, Massachusetts) have appointed it my official donut?
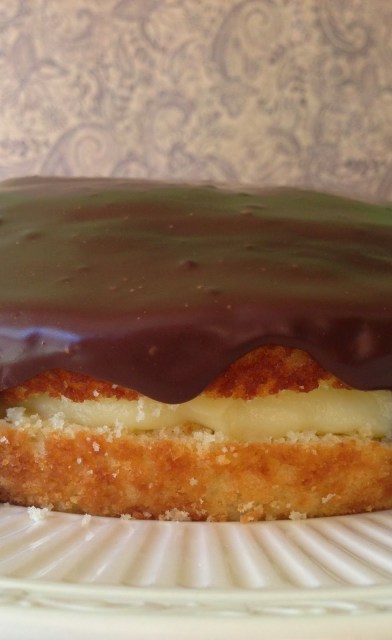
Since it was recently my birthday and I always enjoy making my own birthday cake, I decided this was the year to try actually making a Boston cream pie (which, if you didn’t know, is actually a cake. So in donut form it’s a donut that’s a pie that’s a cake. Still with me?) For as many times as I’ve eaten Boston cream donuts, it’s rare that I have Boston cream pie–and still rarer (as in, never) that I’ve had a homemade Boston cream pie. So giving it a try sounded fabulous. I actually happen to have a cookbook all about the food of Boston, so I pulled it out to find….

Nothing! This cookbook about the distinctive recipes of Boston does not contain a Boston cream pie recipe. Inexcusable.

(Though, actually, otherwise it’s a pretty good cookbook.) Anyway, thank goodness for the Internet, which of course yielded countless Boston cream pie recipes. Sifting through them revealed that most of the top hits had only four-star or less ratings, and I knew this birthday called for a five-star cake. I ended up deciding on one from Saveur.com that had all five-star reviews, and was not disappointed! Neither, I’d say, were the other ten or so people who shared it with me. My neighbor, who recently traveled to Boston, said she thought it was better than the version she’d had at a famous bakery there. The chocolate on top is nice and dark–not too sweet–the cake is fluffy, and the vanilla cream set up perfectly, with just the right amount of spreadability.

All in all, it made for a happy birthday cake realization of my Official Donut–a cake inspired by a donut inspired by a cake (with the name of a pie).

Boston Cream Pie
(Slightly adapted from Saveur.com)
Ingredients:
For the cake:
1 1/2 c. all-purpose flour
2 tsp. baking powder
1/2 tsp. kosher salt
12 Tbsp. butter, softened
1 c. sugar
2 tsp. vanilla extract
3 eggs
2/3 c. buttermilk (see my baking substitutions page for other options)
For the filling:
1 c. sugar
1/4 c. corn starch
1/2 tsp. kosher salt
6 egg yolks
1 1/2 c. milk
4 Tbsp. chilled unsalted butter, cubed
2 tsp. vanilla extract
For the glaze:
4 oz. 60% bittersweet chocolate, finely chopped
1/2 c. heavy cream
Directions:
1. Make the cake: Preheat oven to 350 degrees and grease a 9″ round cake pan well. Whisk together flour, baking powder, and salt in a bowl; set aside. In a large bowl, beat butter, sugar, and vanilla until fluffy, about 3 minutes. Add eggs one at a time, beating well after each addition. Alternately add dry ingredients and buttermilk and beat until just combined. Pour into prepared pan and smooth the top. Bake about 35 minutes or until a toothpick inserted in the center comes out clean. Cool in the pan 15 minutes, then invert onto a wire rack to cool completely.
2. Make the filling: In a 4-quart saucepan, whisk together sugar, corn starch, and salt. Add egg yolks and whisk until smooth, then stir in milk. Heat pan over medium heat and cook, stirring constantly, until thickened, about 10 minutes. (Be especially watchful in the last 3 minutes or so, as the mixture goes from liquid-y to pudding-y quite quickly.) Remove from heat and add butter one cube at a time, whisking until smooth. Stir in the vanilla extract. Transfer the pudding to a bowl and cover with plastic wrap. Chill until firmed, at least 2 hours.
3. Make the chocolate glaze: Place chopped chocolate in a bowl. In a 1-quart saucepan over high heat, bring heavy cream just to a boil. Pour cream over chocolate and let sit 1-2 minutes. Slowly stir the chocolate and cream until smooth and shiny, then set aside to cool for 10 minutes.
4. Assemble the cake: Using a serrated knife, carefully slice cake horizontally into two layers, with the top layer being slightly smaller than the bottom. Spread the chilled pudding over the top side of the bottom layer, then cover with the top layer. Pour chocolate glaze evenly over the top of the cake, letting it drip down the sides. Refrigerate until glaze is set, at least 30 minutes. Serve chilled or at room temperature.
Generously serves 10. (But could be stretched for 12!)
Chocolate Pots de Creme

Pots de creme is one of those desserts I’ve wanted to try for awhile, since I first saw it in one of my Real Simple cookbooks and realized it’s pretty much just chocolate custard with a fancy French name. (Pronounced “po duh cream,” if you were wondering…which kind of makes me snicker, because in German “Po” is slang for your bottom.) I’m basically sold on any kind of chocolate pudding/custard, as well as anything that comes in a small ramekin. Maybe it’s the idea that I have the whole thing all to myself. Or it could be partly the cuteness factor. (Amplified if you serve it in individual teacups–it looks like solidified hot chocolate.) Anyway, it appealed to me big time.
Fortunately, the end result of this dessert lived up to the hype I had built up for it in my mind. Thick, creamy, rich, and chocolatey to the moon and back. I’ve served it to guests twice, after realizing that the 2-hour cooling time makes it a great make-ahead company dessert. Now I’m dreaming of (and Googling) other types of pots de creme…honey, vanilla, lemon, butterscotch, and combinations thereof. Which one do you think I should make next?

Chocolate Pots de Creme
(Adapted from Food Network)
Ingredients:
9 oz. semi-sweet chocolate, chopped (I used two 4-oz. semisweet baking bars and 3 Tbsp. chocolate chips)
1 c. heavy cream
1 1/2 c. whole milk*
6 large egg yolks
5 Tbsp. white sugar
1/4 tsp. salt
Whipped cream, for garnish
*If you have 2% milk instead of whole, you can substitute 1 c. 2% milk plus 1/2 c. heavy cream.
Directions:
1. Place chopped chocolate in a blender. Set out 8 ramekins, tea cups, Mason jars or other 6-8 oz. small containers.
2. In a medium saucepan, whisk the cream, milk, egg yolks, sugar, and salt over medium heat. Cook, stirring constantly, until the mixture is almost boiling and thick enough to coat the back of a spoon, about 8-10 minutes.
3. Immediately pour cream mixture over chocolate in the blender. Cover and hold the lid with a thick kitchen towel (insurance against chocolate redecorating your kitchen); blend until combined and smooth.
4. Pour the chocolate mixture into ramekins and refrigerate until set, at least 2 hours.
Serves 8.
Orange Poppy Seed Shortbread

Recently, I read Gretchen Rubin’s somewhat controversial bestseller The Happiness Project. If you haven’t heard of it, the premise is that the author set out to spend a year of her life becoming happier. The book chronicles her research and experiences in twelve months devoted to different aspects of happiness and well-being. A perfectly commendable pursuit, right? The controversy sets in when you realize that Rubin is an upper-crust Manhattanite with housekeepers and nannies, millions in the bank, and not a single tragic event in her life’s history. Then there’s the problematic issue that the book focuses entirely on her personal well-being, not the well-being of her family or the world at large. (Nary a service project appears in the twelve months.) And, oh yeah, her version of becoming happier is to keep extensive checklists of tasks to complete every day. Not exactly Zen. Strangely, though I was seriously put off by these facts, I ended up reading the entire thing. And strangely again, I got a lot out of it. While I disagreed in major ways with Rubin’s project itself, the research she shared yielded a lot of interesting points about happiness that were real keepers for me. For example, the concept that we are largely in control of our own happiness and can choose it. Or that little things, like putting on the right upbeat music or indulging in a minor splurge (like a pint of fresh raspberries, let’s say), can lift your spirits in a big way. I’ve been trying to keep these truths in mind when I find myself in an irritable, negative state of mind, and have had some genuine success. All in all, I’d say The Happiness Project is worth reading if you can get past its flaws, because ultimately it can serve as a good reminder of how to take responsibility for your own mood.
So why do I bring all that up? And how does it have to do with the orange cookie-type dessert pictured above? Well, I do like to share thoughts on interesting books, but the whole reason I was thinking about The Happiness Project is that I can’t stop thinking about how I laughed out loud at the part where Rubin congratulates herself that she “didn’t grouse when [her husband] made three rich desserts in three nights.” Ha! Not complaining about rich desserts! Ha! Husbands voluntarily making desserts! You sure have it rough, Gretchen!
Sometimes–I won’t say often–I too crave a dessert that’s actually light–not too rich, not chocolate. (Though a rich dessert baked by my husband would seem to me a very welcome surprise, not a nuisance to be suffered. What’s that saying–don’t kick the man out of bed for eating crackers? Or don’t kick him out of the kitchen for making cake, perhaps?) Still, yes, some meals simply call for something delicate to finish. This little shortbread is just right for when the mood strikes for something lighter. (And you can always top it with vanilla ice cream if light isn’t what you’re after.) Served with tea or coffee, it would also make a divine afternoon snack. And did I mention it’s super easy? You don’t even need a bowl; the whole thing is made in the food processor. Maybe I should send the recipe to Gretchen Rubin to give to her husband–or just because with its lovely lightness and hint of orange, making and eating it made me happy. 🙂

Orange Poppyseed Shortbread
(From Real Simple)
Ingredients:
1/2 c. cold unsalted butter, cut into pieces
1 c. all-purpose flour, spooned and leveled
1/2 c. powdered sugar
generous 1/8 tsp. salt
2 tsp. grated orange zest
2 tsp. poppy seeds
Directions:
1. Heat oven to 350 degrees. Grease a 9″ round cake pan or fluted removable-bottom tart pan.
2. In a food processor fitted with the metal blade, process the butter, flour, sugar, and salt until moist clumps form. Add the orange zest and poppy seeds and pulse briefly just to combine.
3. Press the mixture evenly into the prepared pan. Bake until lightly golden, about 25 minutes.
4. Using a serrated knife, cut the warm shortbread into wedges.

Fresh Blueberry Ice Cream

For your reference and mine, here’s a handy flow chart to show the decision-making process for whether or not to write (yet another) post about dessert on the blog:

Yep, that’s basically how it goes around here. I genuinely do like other foods, it’s just that I like dessert so much more. Of course I know it’s supposed to be eaten in moderation and that sugar is killing us all and yada yada yada. But for me, sweet foods are just one of life’s great pleasures, so dang it, I’m gonna keep making them. Maybe someday I’ll achieve some dietary zen where I’m eating lentils for dessert holed up at a hermitage writing a book like this:

but all I can say is I am not there yet, and I don’t think I want to be. (I have a lot more I could say about this topic as a prospective nutritionist, but it would probably just get me all worked up and then I’d have to go diffuse my frustration with a cupcake brisk jog and I’d never get through this post.)
Anyway, so let me tell you about this melt-in-your-mouth blueberry ice cream. Blueberry is a flavor that gets a lot of love in muffins, breads, and even pies, but rarely do you see it headlining in ice cream. This needs to be remedied ASAP. The combination of blueberries and cream just rings with freshness and makes me think of what you would be served at some quaint Alpine pension. With blueberries in season, it’s time to take advantage of rock-bottom sale prices and stock up so you can try blueberry-flavored everything. When we got a giant clamshell of them at Costco recently, they were quickly put to work in fruit salads, jam, and a blueberry-lime pound cake…but I think this creamy treat may have been my favorite. Give it a try and see if you agree!

Blueberry Ice Cream
(Adapted from Your Home-Based Mom)
Ingredients:
2 c. fresh or frozen blueberries
1 c. sugar
1/2 Tbsp. vanilla
pinch of salt
1 c. half and half
1 c. whipping cream
Directions:
1. Puree berries in a standard blender or with an immersion blender.
2. Heat pureed blueberries and sugar in a saucepan over medium-low heat, stirring until sugar has dissolved. Refrigerate until cold–totally, thoroughly cold. Your end result will be much creamier this way.
3. Mix in vanilla, salt, half and half, and whipping cream.
4. Pour into ice cream maker and churn according to manufacturer directions.
