
Author: Sarah
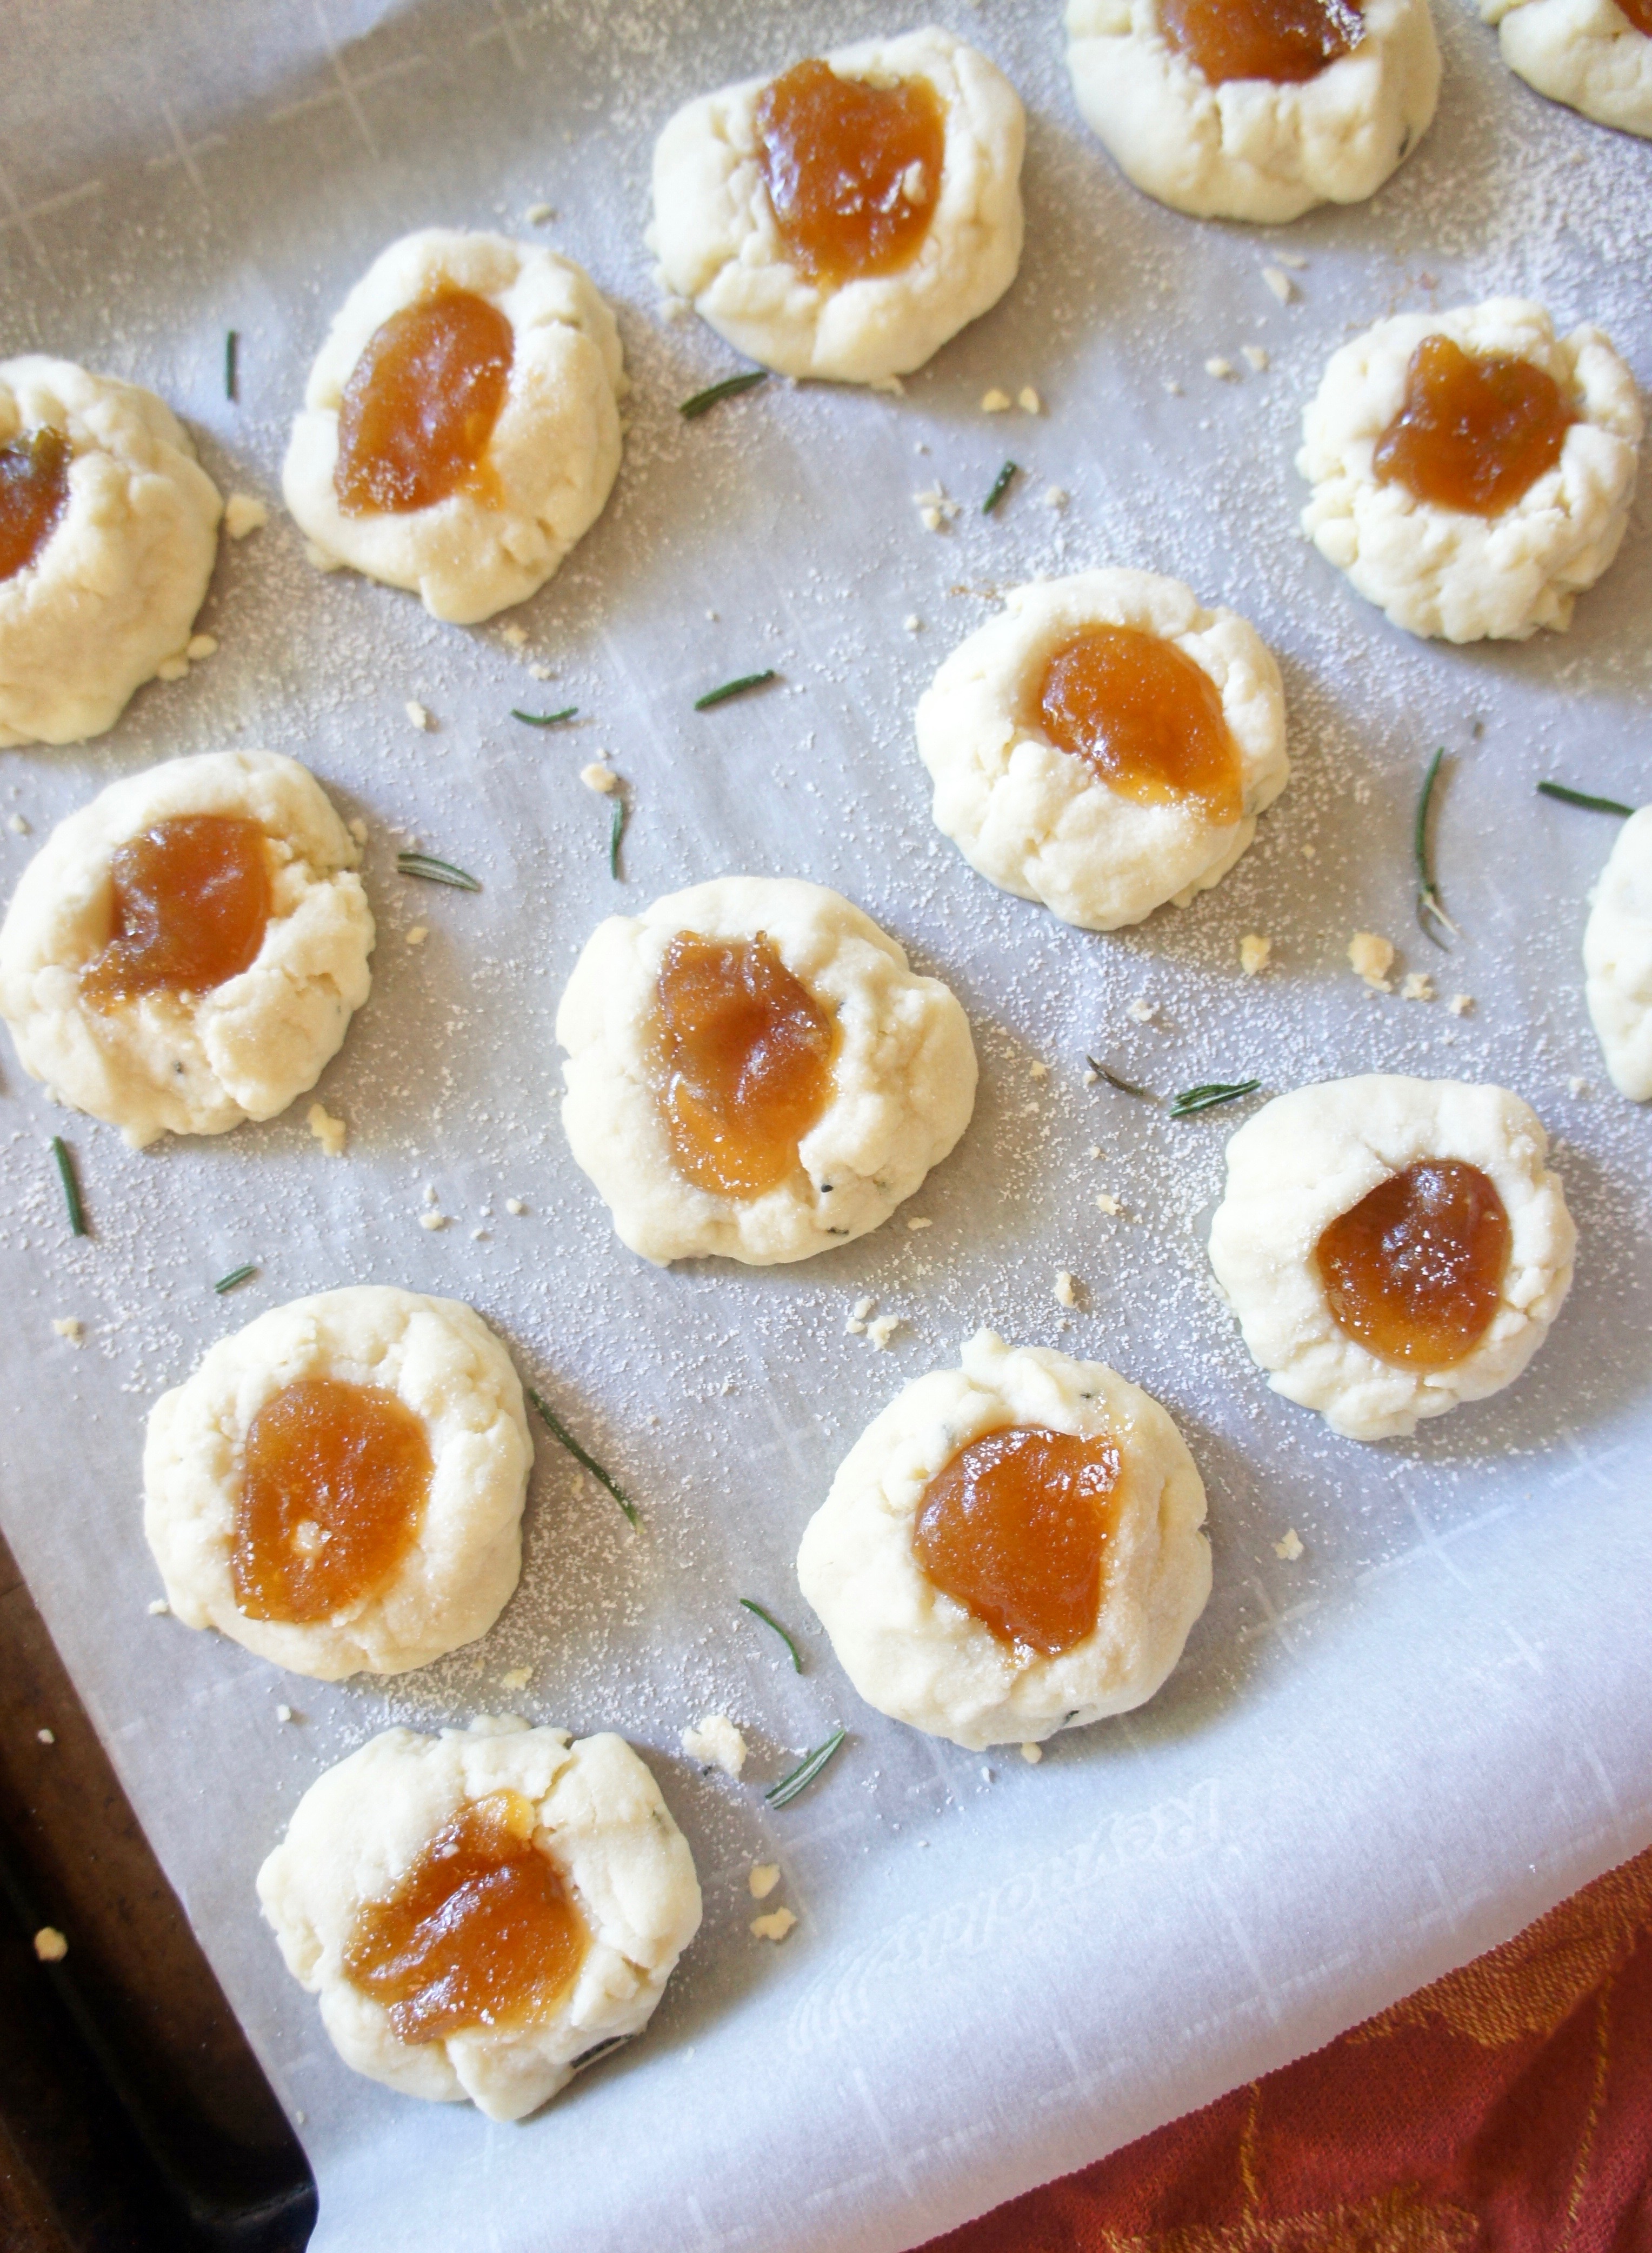
Apricot-Rosemary Thumbprint Cookies

It may only be October, but it’s definitely NOT too early to start thinking about Christmas cookies. In fact, in my house, it’s apparently not too early to think about anything Christmas-related, especially presents. All of my kids have already made their Christmas lists, all of which basically read like Target ads. My middle son actually wrote “all items sold at Target” in large font at the top of his list. Got it, thanks, buddy.

As for me, though I thoroughly enjoy all things fall, I’m also excited about Christmastime. One of my favorite things to look forward to is our annual white elephant Christmas party, celebrating its 15th year this year! I love putting together a vibrant, eclectic menu to serve our guests, and I’d like to think it’s partly the food (and not just the terrible sci-fi DVDs, clown paintings, and poo-scented candles) that keeps people coming back year after year.

Probably my favorite portion of the menu to plan is the dessert spread–for which I believe these Apricot-Rosemary Thumbprint Cookies are a strong contender. I usually like to plan a mix of bars, candies, cookies, possibly a pie or trifle, and at least one show-stopping cheesecake for the event. Past favorite cookies have included mint chocolate candy cane cookies and pumpkin chocolate chip. But the unique hint of savoriness is where I think these apricot-rosemary thumbprints really shine, either on their own or as part of my larger holiday cookie combo.
These don’t take many ingredients, but fresh rosemary is essential. (I’m fortunate enough to have some in my garden, but if you don’t, you can always freeze it if you end up with too much from another recipe!) Also, as you’re making these, you may think, “Holy saturated fat, that’s a lot of butter for such a small batch.” And you’re right. But these come out sooooo perfectly rich and fluffy, I’d say they’re worth the hefty dose of butter. Combine that richness with the earthiness of the rosemary and the fruity sweetness of the apricot jam and you’ve got a Christmas cookie that will disappear fast.
Got a party coming up this holiday season? I’d love to hear if you try these thumbprints!


Apricot-Rosemary Thumbprint Cookies
Sweet and savory, these buttery thumbprints disappear fast!
Prep Time15 mins
Cook Time14 mins
Total Time1 hr 29 mins
Ingredients
- 1 c. all-purpose flour
- 1/2 c. cornstarch
- 2 tsp. snipped fresh rosemary
- 1/4 tsp. salt
- 3/4 c. butter, softened
- 1/3 c. powdered sugar
- 1/8 tsp. almond extract
- 1/3 c. apricot jam
- extra powdered sugar for dusting
Instructions
- In a small bowl stir together flour, cornstarch, rosemary, and salt. Set aside.
- In a large bowl, beat butter with a hand mixer for 30 seconds or until fluffy. Add the powdered sugar and almond extract and beat again.
- Beat in as much of the flower mixture into the butter mixture as you can with the mixer. Work the rest in with a wooden spoon.
- Collect the dough into a disc and wrap in plastic wrap. Refrigerate one hour.
- Preheat oven to 325 degrees and line a baking sheet with parchment paper. Remove dough from fridge and form into about 16 balls, placing them 2 inches apart on the baking sheet. Press a divot into each cookie with your thumb or a spoon and fill in with a little apricot jam.
- Bake about 14 minutes. Cool, then sprinkle with additional powdered sugar.
Notes
Adapted from Better Homes and Gardens.
Green Bean Casserole {No Soups, No Mushrooms}

There was a time when I thought condensed cream soups were God’s gift to the home cook. I specifically recall a Crock Pot chicken recipe I used to make that involved cream of chicken and cream of mushroom soup (and maybe Velveeta cheese?). Yes, it was creamy, and probably tasty, but also crazy high in sodium and pretty highly processed.
I’ve come a long way since those days. Now, whenever I can, I prefer to make sauces for casseroles, meat, or pasta dishes myself. I’ve found doing so cuts back on mystery ingredients, reduces sodium, and honestly just results in better quality food.
Enter this condensed soup-free Green Bean Casserole.
If you’ve ever made green bean casserole with a traditional recipe, I’ll bet it called for cream of mushroom soup. I know the recipes in both my Betty Crocker and Better Homes and Gardens cookbooks start this way. But now that I’m a fan of homemade sauces–and since I’ve never been fond of mushrooms–when I wanted a green bean casserole to go with a grilled chicken dinner recently, I thought I’d try my hand at a 100% from-scratch version. (Except for the fried onions on top. Those I’m happy to outsource to good old French’s.)
This recipe came out full of savory flavor, thanks to shallot, sage, and thyme. And thanks to a vegetable broth base, it’s totally vegetarian. Even though Thanksgiving may be several weeks off, I’d make this again for a veggie side dish any day!
Give this one a try if you’re looking for something a little less processed, or if someone in your family has the good sense to not like mushrooms. 🙂


Green Bean Casserole {No Soups, No Mushrooms}
Not crazy about mushrooms? Prefer not to use condensed soups? This delicious from-scratch Green Bean Casserole is for you!
Prep Time10 mins
Cook Time35 mins
Total Time45 mins
Servings: 8
Ingredients
- 24 oz. frozen French-style green beans
- 3 Tbsp. butter
- 1 small shallot, diced
- 3 Tbsp. all-purpose flour
- generous 1/2 tsp. salt
- 1/4 tsp. black pepper
- 1/4 tsp. dried sage
- 1/4 + 1/8 tsp. dried thyme
- 1 c. milk
- 1 1/4 c. vegetable broth
- 6 oz. crispy fried onions
Instructions
- Heat a large pot of water to boiling. Add green beans and cook about 5 minutes. Drain and set aside. Preheat oven to 350 degrees.
- Wipe out the pot and melt butter over medium-low heat. Satue diced shallot until tender and barely browned. Add flour, salt, pepper, sage, and thyme and whisk about 1 minute.
- Add milk and vegetable broth and whisk to combine. Increase heat to medium and whisk occasionally until sauce thickens. (It's ready when the whisk leaves a defined trail.) Remove from heat and stir in green beans.
- Spray an 11 x 7-inch baking dish with cooking spray. Pour in green bean mixture and smooth. Sprinkle with fried onions.
- Bake 20-25 minutes or until heated through.
Notes
A Love Letter to Food Original Recipe.
Dutch Oven Cooking Class
Helloooooo again! It’s been far too long since I’ve posted! Things have been pretty crazy around here, and I don’t just mean run-of-the-mill busyness. If you don’t follow A Love Letter to Food on Facebook or Twitter (and if not, I’d love it if you would!) let me fill you in:
Last week I went to New York City to be featured on the Today Show! Their producers invited me to be on the show for a segment about a crime I was the victim of several years ago. You can watch my appearance here. After my stint on the show, my husband and I stuck around for a few days to catch the best of NYC. (And, in addition to all that, yes, some run-of-the-mill busyness has also been keeping me occupied.)

Today, though, I’d like to tell you about one other interesting event I recently experienced. With some of my girlfriends, I attended the Becoming an Outdoorswoman weekend in Prescott, AZ. This unique program, 25 years running, is 48 hours of classes (plus socializing and other fun stuff) devoted to teaching women useful skills for the outdoors. I’ll be honest, as someone with basically zero camping experience, a whole lot of it was outside my comfort zone. Examples: putting up a tent, eating javelina stew, sharing a bathroom with four other women…
One thing that was TOTALLY up my alley, however, was my class on outdoor Dutch oven cooking, aka cowboy cooking. I have a totally romantic notion of living in the American West a hundred-plus years ago, harbor a (probably completely unrealistic) fantasy of homesteading, and have always wondered how cooking over a campfire differs from cooking in a kitchen.
Here’s what I learned!
First, explained our lovely instructor Barb of Cowgirls Forever (pictured here in all her Western glory), you have to build your fire.

Once we had laid a nice bed of kindling, Barb added mesquite charcoal. She lighted the coals and allowed them to burn until large chunks were gray.

Meanwhile, we got to work on preparing our ingredients.

Barb had brought a literal truckful of food and said it was up to us to decide what to make! Here are just a few of the ingredients we had available.

Among the dozen or so women in the class, we decided on the following:
- Roasted vegetables
- Green chili with ground pork and hominy
- Elk stew
- Biscuit breakfast casserole with sausage
- Bon bons (rolled around a Hershey’s hug)
- Cinnamon rolls
- Peach cobbler
Yeah, it was a lot of food. And let me tell you, this lady did NOT fear butter. Although none of our recipes were scripted (more “a can of this plus a stick of this and a shake of this”) if I were to guess, I’d say we went through five pounds of butter. NOT KIDDING.
When enough mesquite coals were suitably gray, it was time get cookin’. Barb grabbed her tongs and pulled several coals aside to sit underneath our first Dutch oven. Then, since she instructed us to never cook in an uncreased pan, we set the Dutch oven on top of the coals and poured in some oil (or butter. Lots of butter). Once this was shimmering, we started on our green chili by browning ground pork–the idea being that chili can simmer a long time while everything else cooks. We then moved on to our other savory dishes.


Each time we added a new ingredient, we’d top it with the lid of the Dutch oven, then cover the lid with coals. The ideal ratio of top coals to bottom coals is apparently 1/3 on bottom and 2/3 on the top. And, as a rule of thumb, you can take the number of the Dutch oven’s size (they come in sizes like 12, 14, and 16) and double it to get the appropriate number of coals to use in total. By this metric, the interior of the oven should stay at around 350 to 375 degrees.

Amazingly, according to Barb, you can stack up to five Dutch ovens for space-saving. Alternately, you can make groupings of coals for individual ovens, especially if you frequently need to access the inside to add ingredients or stir. For handling the extremely hot pot lids, Barb came equipped with special lid lifters suited to the task.

By the end of our three-hour class, our feast was complete! Since it was far too much food for our group, a number of ladies from other classes wandered over (drawn by the enticing smells, I’m sure) and enjoyed the various dishes with us.


Everything was decadent and delicious–and truly had that warm-you-from-the-inside-out feel that you only get eating campfire food on a chilly day. I absolutely loved this class and would 100% take it again!
I highly recommend looking into the Becoming an Outdoorswoman program in your area (they’re in over 40 states), and if you live in AZ like I do, Barb from Cowgirls Forever does catering and private classes–check her out!
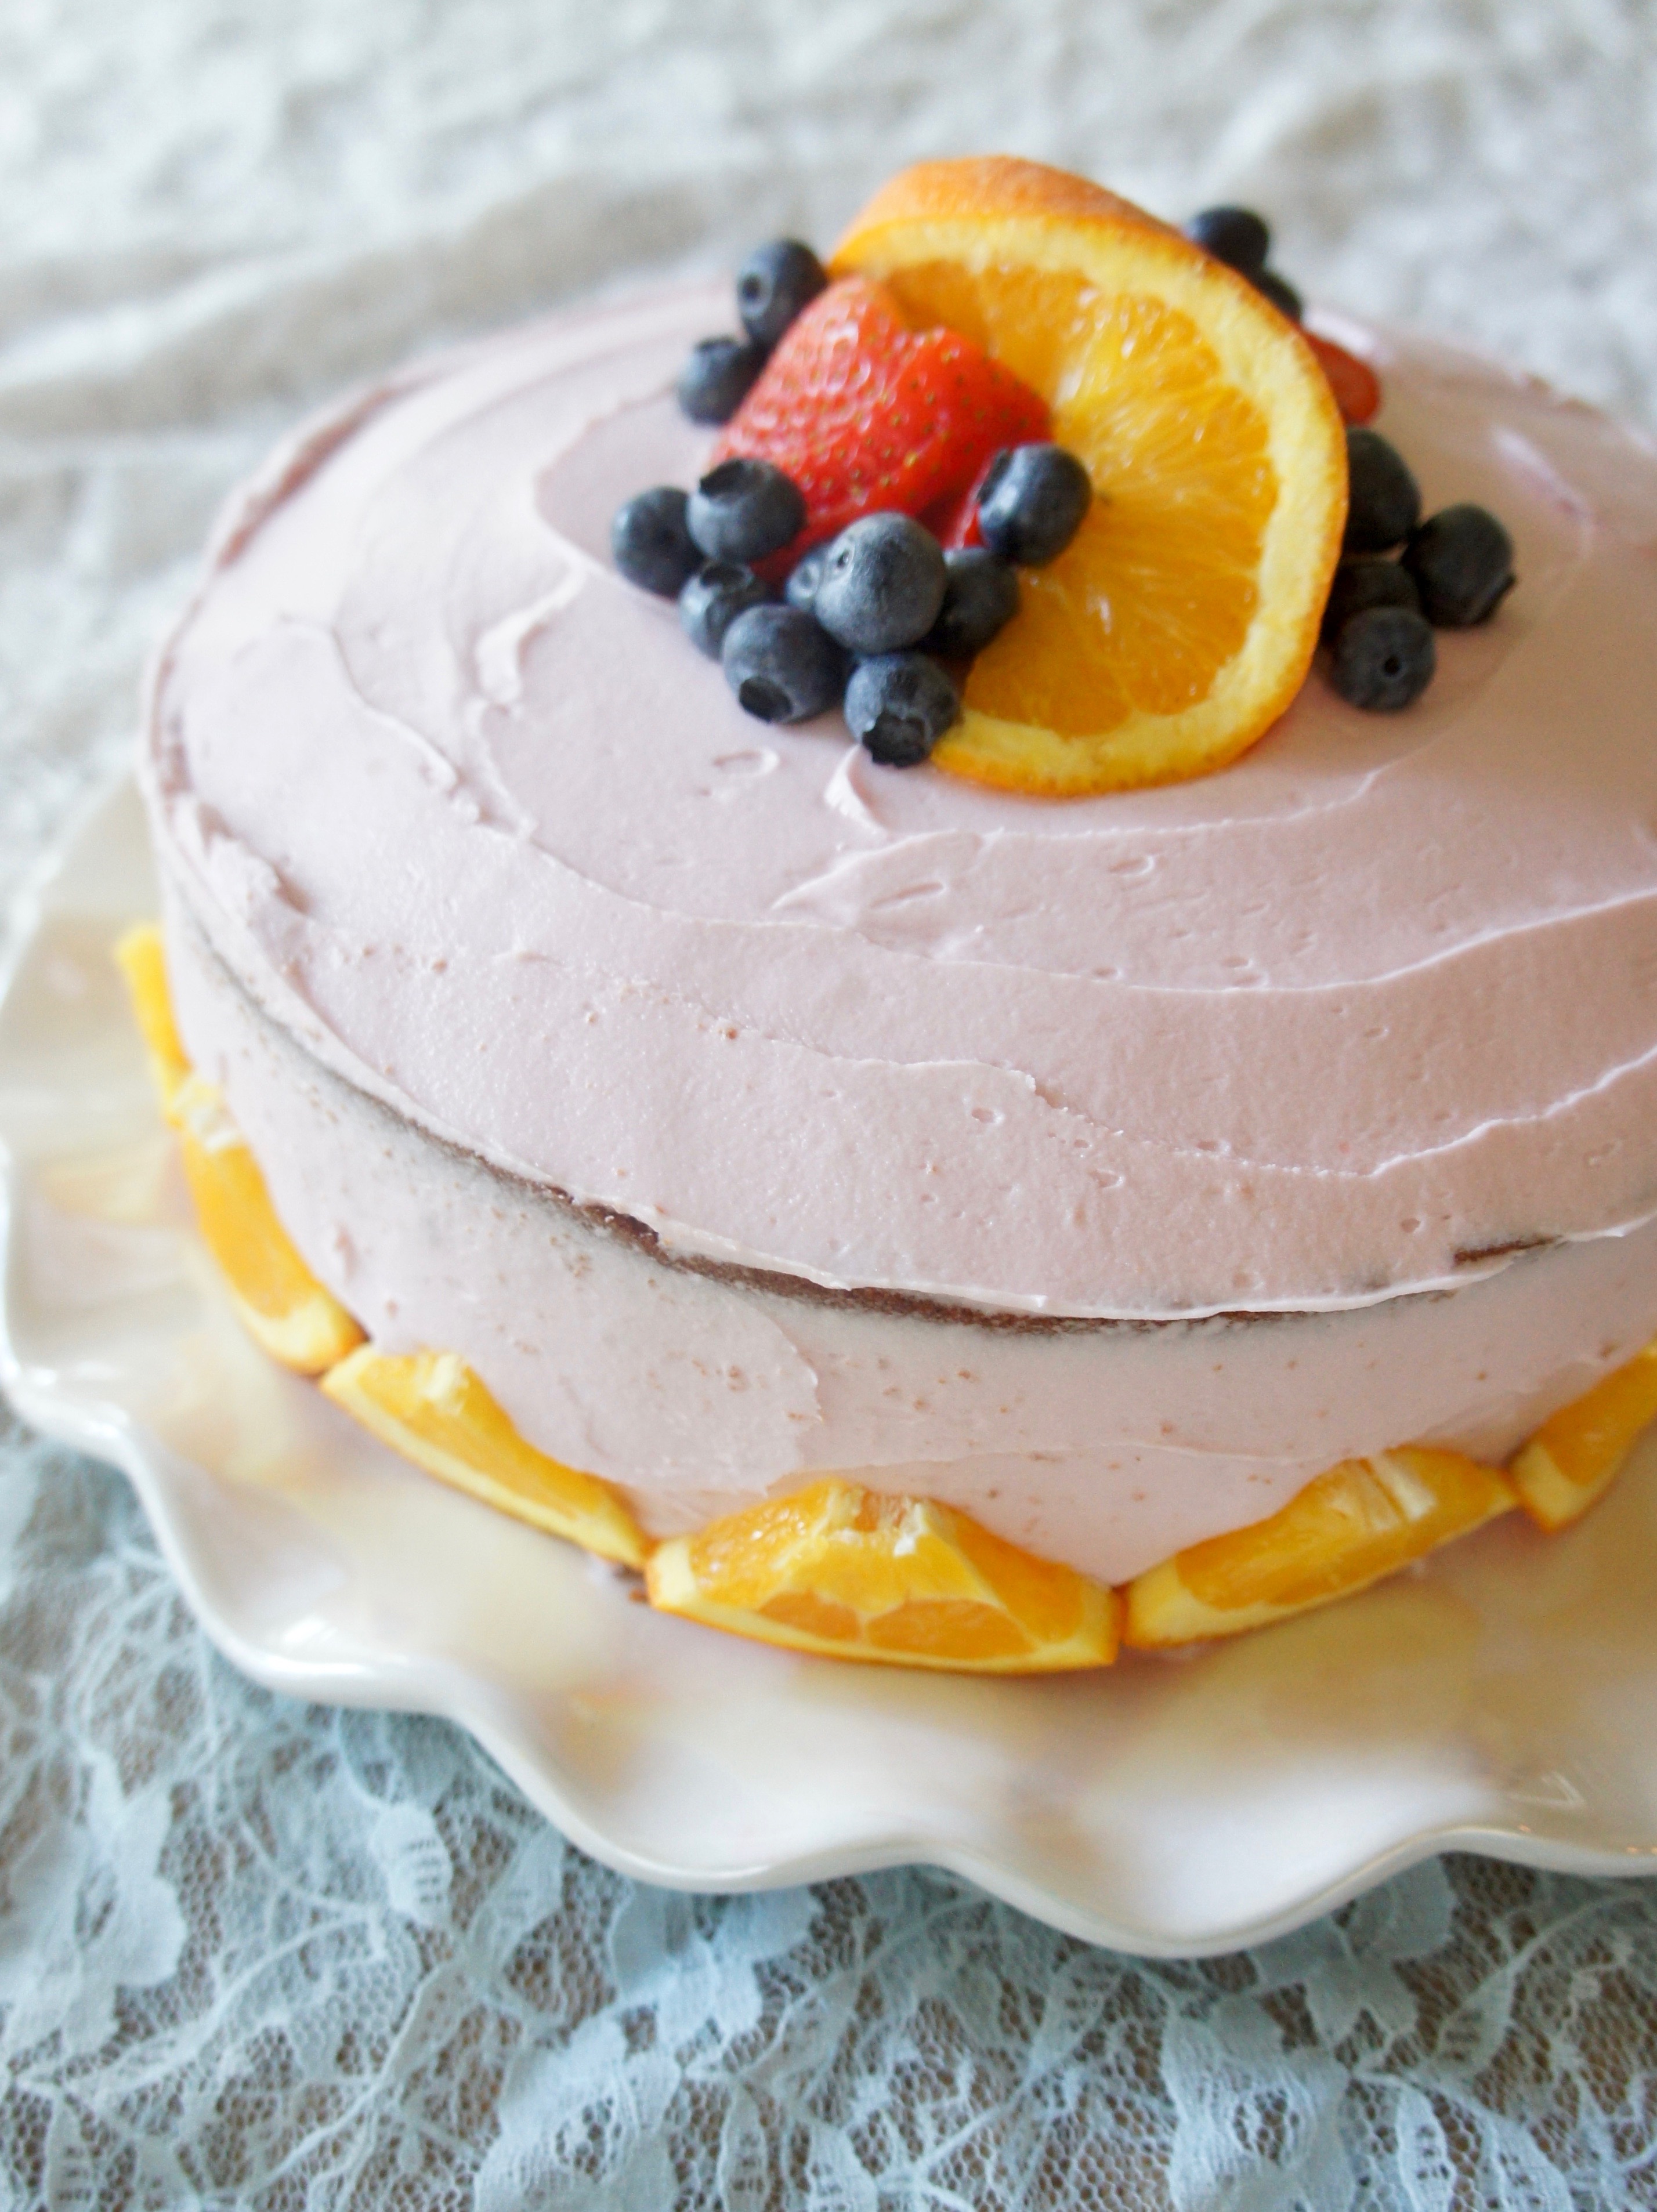
Sangria Cake
A delicious, fruity Sangria Cake for any summer special occasion!

Did you know that August and September are the months with the most birthdays? It’s probably the result of couples getting cozy around Christmastime nine months earlier–or some science even suggests the body is biologically predisposed to procreate in the winter months. Whatever the reason, in my own family of origin, it rings true: Both my parents have August birthdays, and I’m right behind in September.
Every year I bake my mom’s birthday cake. It’s a super fun exercise in creativity because she gives me free reign to make whatever I like, from this Chocolate Mint Layer Cake to this Apple Cream Cheese Bundt Cake.

This year, inspired by some gorgeous cupcakes I saw awhile back, I thought a sangria cake sounded perfect. Fruity, colorful, and a little different, it seemed just right for a summer birthday.
Once made, the flavors in this cake were actually rather subtle–not overpowering, but definitely with a fruity depth and a hint of orange. I especially loved the frosting, which was pretty in pink and just the right level of sweet. And I must confess I geeked out over decorating the exterior with an arrangement of fresh fruit. With the alcohol baked into the cake and just two tablespoons in the frosting, even my kids were free to partake. (And I think my mom liked it, too!)
So, for a special celebration, give this sangria cake a try! (My birthday is next week, hint, hint…)

Sangria Cake
Happy summer! This Sangria Cake makes the perfect pretty, fruity celebration for a summer birthday or other special occasion.
Cook Time35 mins
Total Time35 mins
Servings: 16
Ingredients
For the cake:
- 2 1/2 c. all-purpose flour
- 2 tsp. baking powder
- 3/4 tsp. salt
- 3/4 c. butter, softened
- 1 1/2 c. white sugar
- zest of 1 orange
- 3 eggs
- 2 Tbsp. orange juice
- 1 1/2 tsp. vanilla
- 1 c. room-temperature sangria
- 6 drops pink or red food coloring
For the frosting:
- 1/2 c. butter, softened
- 4 1/2 c. powdered sugar
- 2 1/2 Tbsp. orange juice
- 2 1/2 Tbsp. sangria
- 4 drops pink or red food coloring
Instructions
- Preheat oven to 350 degrees. Grease two 8-inch cake pans. In a medium bowl, whisk together flour, baking powder, and salt. Set aside.
- In a large bowl, cream together butter and sugar until light and fluffy. Mix in orange zest, then add eggs one at a time. Mix in orange juice and vanilla.
- Mix in dry ingredients and sangria, alternating between the two, until fully incorporated. Stir in food coloring until well mixed. Divide between cake pans and bake 30-35 minutes.
- Meanwhile, make frosting: In a large bowl combine butter and powdered sugar. Add orange juice and sangria and mix until smooth. Refrigerate until ready to use.
- Once cake is done, let cool at least two hours. When cake has cooled, frost to your liking.
Notes
Cake adapted from Liv for Cake, recipe A Love Letter to Food Original.
Summer Travel Party

Though it may sound shocking to East Coasters, I sent my kids back to school last Tuesday. (We start early here in Phoenix.) Despite *lots* of sibling conflict the last couple of months (the fights! the injuries! the drama!) ours was overall a good summer. With the kids back in school now, I’m looking back fondly on the good times our family had in May, June, and July.
One fun event was our Summer Travel Party.
The idea for this themed party is that, while we’d all love to trot around the globe visiting exotic locales over the summer, it’s just not always possible. So if we can’t get to Hawaii, England, or Italy, why not have them come to us? We invited our friends to select a destination they’d either traveled to in the past or would like to travel to in the future, then join us for a potluck of foods (and optional costumes) from that place.
Here’s how it went down.
The Decorations
I’ve been a major nerd for party decorating since college (see evidence here, here, and here) and this party proved no different. I decided to decorate each room of the house–well, the usable rooms, anyway, not my master bath or anything–as a different country. Starting with…
England
My family room went British for a day with the inclusion of some fun decor from across the pond, such as a Union Jack, red phone booth, a fun London pillowcase, and plenty of teacups and teapots.


Germany
Our family spent three months in Germany during the summer of 2017, so getting a tricked-out German kitchen was pretty simple stuff. This meant an old stein, photos from a German calendar, an old-timey print I got in Cologne, where we lived, a Bavarian flag tablecloth, and–the piece de resistance–an Oktoberfest head-in-the-hole banner (just in case someone didn’t wear a costume but still wanted a photo).


Mexico
Living in Phoenix, it’s not too hard to come by Mexican decorations, so our living room enjoyed a little mexi-makeover for this party. Streamers, a sombrero, some festive little llamas, and a serape table runner leftover from our Nacho Libre party did the trick.


Tropical Islands
Who doesn’t want to feel like they’re visiting Hawaii while going to the bathroom?
That’s all I have to say about that.


The Food
Since this was a potluck, we enjoyed a lovely array of foods from around the world. Our family represented Germany, so we provided German beer, brats, and fixin’s. Others brought potato salad from Greece, rice and beans from Costa Rica, pizza from Italy, and more.


The costumes
Some of our guests were brave enough to dress in costume from a destination they’ve traveled to (or want to visit). Mostly, though, we got a lot of pictures with the Bavarian head-in-the-hole banner. 😉


This party was a fun and whimsical way to hang with good friends and enjoy good food.
Want to host a summer travel party? I’d love to hear what country you’d represent!