10 Unexpected Uses for Greek Yogurt


“Aaaaaahh!” (Do you hear the angels singing?)

If there is any kind of ranking system for trendy foods, Greek yogurt has to somewhere near the top–up there with quinoa and craft beer. I don’t think I had even heard of it before about three years ago. And while I don’t tend to be a fan of the trendy, whether in food, fashion, or philosophy, I am totally, wholeheartedly on the Greek yogurt bandwagon. Yeehaw!

You’ve probably heard all about its health benefits–its surprisingly high protein content for a dairy product, its drastically reduced sugar (and therefore carbohydrate) content as compared to regular yogurt, and even its lower sodium. (Though you do have to read labels and be careful about saturated fat.) All of these pros give it a nutritional edge–definitely worth incorporating into your diet frequently.

….but how? I mean, you’re not a fan of sitting down with a heaping bowl of plain yogurt? Me neither, actually. But in our family’s reduced-meat eating habits, I do try to make use of this delightful Mediterranean protein powerhouse in a variety of unusual ways. Here’s a few. (And when I say “unusual,” I don’t meant like changing your oil with it or sleeping in a vat of it or anything, so don’t worry.)

1. In Salad Dressing. Mix 1/3 c. each Greek yogurt and mayonnaise, then add 1/4 tsp. salt, pepper, garlic powder, onion powder, dried thyme, and dried parsley for a creamy ranch-style dipping sauce. Tasty with veggies, chips, crackers, etc. (Dilute with milk to thin, if desired for salad.)

2. In Baked Goods. This is one of my favorite uses for GY. There are so many great muffin and bread recipes out there that call for yogurt, giving them a wonderfully moist texture, so why not make it Greek?

3. As a buttermilk substitute. Does anyone ever really buy an entire carton of buttermilk? Unless you’re the flackjap flipper at your local 300-person pancake breakfast fundraiser, I can’t imagine why you would, especially when you can make a cup of your own buttermilk by mixing 3/4 c. Greek yogurt with 1/4 c. milk.

4. In place of sour cream in Mexican dishes, soups, and on baked potatoes. Most likely you’re familiar with this one, though you may not go so far as my admirable friend Renee, who brings her own secret stash of Greek yogurt when she goes to Chipotle to avoid the high fat content in their sour cream. Top that…literally.

5. On Salmon. Mix 2 parts mayo with 1 part Greek yogurt and 1 part grated Parmesan cheese for a super simple creamy salmon topping. Bake at 450 for 15 minutes. Top with chives as garnish.

6. In Faux Cheesecake. As I recently posted for the 4th of July, this is a great way to cut calories in a tasty cheesecake treat.

7. As a topping on waffles or pancakes (instead of butter). Better yet, add fresh or frozen fruit on top!

8. Give it a squeeze. Shake Greek yogurt and a bit of honey together in a plastic squeeze bottle, then drizzle on fruit, cinnamon buns, etc. for a fancy, aesthetically pleasing touch! (A drizzle always looks nicer than a glop.)

9. In healthier mashed potatoes. Yeah, I get it that most people don’t immediately think yogurt + garlic + herbs = delicious, but check out these healthy herbed yogurt mashed potatoes.

10. In chicken nuggets. Nope, not as a dipping sauce. Dredge chicken pieces in Greek yogurt before breading with seasoned Panko bread crumbs. Bake at 375 for 30 minutes or so. Boom!

Baked Falafel and Tzatziki Sauce (with a side of Phineas and Ferb)

If you’re a parent of young children, you are familiar with that incredible window of productivity known as your child’s nap time. Since my 2-year-old blessedly still takes an afternoon nap, I try to get as much done as possible during those couple of quiet(er) hours of the day. My 6 and 4-year-olds are still very much awake at that time, but Legos are a beautiful thing for keeping them entertained…well, Legos and pummeling each other to the ground in what they call “Wrestle Fight.” (Did I mention they’re girls?…haha, just kidding.)

When my 2-year-old was younger and wouldn’t sit through a TV show while I made dinner, I relied on nap time to get prep work done on dinner, easing the pain of her standing at the baby gate screaming her guts out while I chopped vegetables…really not fun for either of us. Since then, the routine of doing dinner prep in the afternoons has become second nature, especially if I want to make a meal that takes longer than a Phineas and Ferb episode. When I meal plan, I typically gravitate toward recipes that I can chop/grate/mix/layer ahead of time.

This is one such recipe. You can mash the chickpeas, chop and process the onions, parsley, and garlic, mix it all up with some egg, spices, and bread crumbs, and mold the result into patties in maybe 20 minutes:


Finished patties before cooking

Stash in the fridge until dinner time and it’s ready to bake. Same goes for the tzatziki…without the baking, obviously. This leaves your 24 minutes of Phineas and Ferb for things like checking Facebook and enjoying a glass of wine.

Baked Falafel and Tzatziki Sauce
(Adapted from Allrecipes.com)

Ingredients:

3/4 c. Greek yogurt
1/2 cucumber–peeled, seeded, and finely chopped
1 tsp. dried dill weed
1 1/2 tsp. lemon juice
1/2 tsp. garlic powder
salt and pepper to taste

1 15-oz. can garbanzo beans, drained
1 small onion, chopped
2 1/2 Tbsp. dried parsley
2 cloves garlic, chopped
1 egg
2 tsp. ground cumin
1/2 tsp. dried cilantro
1 tsp. salt
1 dash pepper
1 pinch cayenne pepper
1 tsp. lemon juice
1 tsp. baking powder
1 Tbsp. olive oil
3/4-1 c. dry bread crumbs

In a small bowl, mix the Greek yogurt, cucumber, dill weed, lemon juice, garlic powder, salt, and pepper. Chill for at least 30 minutes.

In a large bowl, mash chickpeas until thick and pasty. In a blender, process onion, parsley and garlic until smooth. Stir into mashed chickpeas.

In a small bowl combine egg, cumin, coriander, salt, pepper, cayenne, lemon juice and baking powder. Stir into chickpea mixture along with olive oil. Slowly add bread crumbs until mixture is not sticky but will hold together; add more or less bread crumbs, as needed. Form balls and then flatten into patties. (I got 13 smallish patties.)

Preheat oven to 400 degrees. Line a baking sheet with foil. Spray foil with high-quality vegetable oil cooking spray, then place falafel on foil and spray them as well. Bake for 10 minutes, then flip and spray falafel again. Bake another 10 minutes. Finally, broil 1.5-2 minutes on each side.

Serve with tzatziki sauce (and other fixin’s as desired, such as pita, tomato, spinach, etc.)

Lemon-Thyme Granita

I always used to be skeptical of granita. Typically containing only three ingredients–fruit juice, water, and sugar–it kinda sounds like some Weight Watchers trick to make you think juice is dessert. (Nice try, Weight Watchers.) But then I started making it, starting with this fancy-schmancy lime recipe, and I’ve been hooked ever since. It still doesn’t exactly fit the bill for a “real” dessert in my book (I think my definition for real dessert is “must contain fat”) but it is a lovely, light, refreshing after-dinner palate cleanser. Any fruit juice will do to make it. I’ve tried grapefruit, watermelon, lime, and lemon, and I’m especially curious to try this sangria version.

This time around, I happened to have a couple of lemons hanging around waiting to be put to some culinary use, so Dear Old Uncle Google willingly obliged an appropriate recipe. I love the unique twist the thyme infusion gives the flavor here–a subtle depth that balances the lemony sweetness nicely. Excellent for a little something different!

Lemon-Thyme Granita
From Taste of Home

Ingredients:

1 c. water
2/3 c. sugar
2/3 c. fresh lemon juice
2 fresh thyme sprigs

In a small saucepan, bring water and sugar to a boil. Cook and stir until sugar is dissolved. Remove from the heat; stir in lemon juice and thyme. Transfer to an 8-in. square dish; cool to room temperature.

Remove thyme sprigs. Freeze for 1 hour; stir with a fork. Freeze 2-3 hours longer or until completely frozen, stirring every 30 minutes.

Stir granita with a fork just before serving; spoon into dessert dishes. Yield: 2 cups.

Red, White, and Blue Berry Cheesecake Parfaits

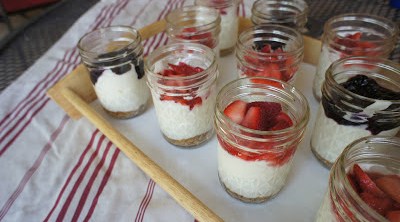
Since my last post was about Christmas, I guess I’ll get back to reality and focus on the holiday actually at hand: the 4th of July! Happy Independence Day! As with most holidays, I imagine everyone has their own food associations for the 4th, probably usually to do with things you can smother in ketchup–burgers, hot dogs, cheesecake…

Wait–did someone say cheesecake?

I don’t actually smother my cheesecake in ketchup, but I do associate any kind of creamy, berry-topped dessert with the 4th of July. My aunt would always make one of those Jell-O and Cool Whip concoctions with a berry stars and stripes flag on the top. But a cheesecake topped with berries would be even better, yes? (I guess now would be the time to tell you that my love for cheesecake is so extreme that my husband proposed to me with one AND we had it as our wedding cake…if that tells you anything.)

Our neighborhood 4th of July potluck has been on my radar for a few weeks now, and I knew I wanted to bring dessert. When I saw this lovely recipe, it looked like the perfect choice, especially since I happened to have some 8 oz. jelly jars laying around from when I made strawberry jam. It definitely took some time to put these together, since there are several steps (and since I doubled the recipe), but they are certainly simpler to make than an actual cheesecake. Not only that, the Greek yogurt stands in for quite a bit of the usual cream cheese. Most cheesecake recipes I’ve seen call for four to five 8 oz. blocks of cream cheese, where this recipe took only two 8-oz. blocks for 15 parfaits.

How about you? What kinds of food do you associate with the 4th of July, and which are your favorites to make?

Red, White, and Blue Berry Cheesecake Parfaits
(From Annie’s Eats)

Ingredients:

For the strawberry topping:

1½ cups chopped strawberries
2 tbsp. granulated sugar

For the blueberry topping:

1 cup fresh blueberries
3 tbsp. granulated sugar
1½ tsp. cornstarch
2 tsp. water
Squeeze of fresh lemon juice

For the graham cracker base:

¾ cups graham cracker crumbs
1 tbsp. granulated sugar
1½ tbsp. unsalted butter, melted

For the cheesecake layer:

8 oz. cream cheese (reduced fat is fine)
2 cups low-fat greek yogurt
1½ cups confectioners’ sugar, sifted
1 tsp. vanilla
1 tbsp. heavy cream

To make the strawberry topping, combine the strawberries and sugar in a small bowl and toss with a fork to combine. Let stand at least 1 hour, stirring once or twice, until the berries have released their juices. Mash the berries a bit with the fork. Cover and refrigerate until ready to use.

To make the blueberry topping, combine the blueberries and sugar in a small saucepan over medium-high heat. In a small pinch bowl, whisk together the cornstarch and water until smooth. Stir the berries occasionally when they begin to release their juices. Once the juices are bubbling, stir in the cornstarch mixture. Continue to cook, stirring frequently, until the mixture bubbles and thickens. Remove from the heat, stir in the lemon juice. Transfer to a bowl, cover, and refrigerate until ready to use.

Set out 8 8-oz. mason jars (small glasses will also work). In a small bowl, combine the graham cracker crumbs, sugar, and butter. Stir with a fork until evenly combined. Scoop about 1½ tablespoons of the mixture into the bottom of each jar and tamp down gently with the bottom of a small glass.

To make the cheesecake mixture, combine the cream cheese and greek yogurt in the bowl of an electric mixer. Scrape the seeds from the vanilla bean into the bowl. Beat the mixture on medium-high speed until smooth, about 1-2 minutes. Add in the confectioners’ sugar and mix until well incorporated, 1-2 minutes. Blend in the vanilla and heavy cream on low speed, then increase the speed to medium-high and beat until light and fluffy, 2-3 minutes more. Divide the mixture between the serving jars. Spoon the blueberry topping over 6 of the servings. Spoon the strawberry topping over the remaining servings, partially draining of the excess juices before using. Cover and refrigerate until ready to serve.

Christmas in July: Raspberry Eggnog Trifle

IIIIIII’m dreaming….of a whiiiiite…..Christmas….

Actually, no. I’m just dreaming of a day I can walk outside without feeling like my organs are going to melt right out of my body. This last week in Mesa, AZ has been outrageously hot. You’d think I would be used to it by now, having lived in the Phoenix Valley since I was two years old, but you know, when it’s 119 degrees outside, I don’t care who you are, it’s just too dang hot. I could swear I saw the Heat Miser from A Year Without a Santa Claus trying to sneak into an air conditioned movie theater the other day. Even with the A/C on in my house, my bag of chocolate chips was literally melting when I walked into the pantry to grab a heaping handful before dinner.

With all this organ-and chocolate-chip melting heat, I am trying to savor those moments throughout the day when I can actually get cold (in my car, usually, or at JC Penney’s where the middle-aged ladies work). I am also reminding myself that I truly would rather be excessively hot than excessively cold. Four years of college in Chicago have drilled that into my psyche pretty firmly. And yet, I can’t keep my thoughts from turning to fantasies of winter and Christmas. And if I’m going to fantasize, it might as well include food, right?

This showstopping dessert was one of the features at our Christmas party this past year. The party is an annual tradition eight years running, and as a foodie/obsessive planner, I view it as my time to shine. I spend weeks preparing the menu, and in addition to an array of Christmas cookies, I always try to include one other fabulous dessert in the lineup. The more jaw-droppingly decadent, the better. This delightful trifle fit the bill. Technically, I realize this may be considered cheating to blog about something that I actually made six months ago…but it really was that good. And if you substitute the eggnog for regular milk, this could easily transition to a summer dessert. A trifle is one dish that has the aesthetics and versatility to pull off any time of year. And if you decide to make it now, at least it won’t heat up your kitchen. 🙂

Raspberry Eggnog Trifle
(From Boston Uncommon)

Ingredients:

2 4-oz packages vanilla instant pudding mix
3 1/2 c. eggnog (or milk)
1/4 tsp. nutmeg
2 c. heavy cream
2 Tbsp. powdered sugar
1 1/2 tsp. vanilla extract
1 purchased angel food cake, cut into cubes
2 12-16-oz packages frozen raspberries (or 24-32 oz fresh)
24 whole graham crackers, crushed

Chill a mixing bowl and beaters in the freezer for 5-10 minutes. Prepare the pudding mixes using the package directions, substituting the eggnog for the milk, if using. Blend in the nutmeat; set aside.

Beat the cream with the powdered sugar in the chilled bowl until soft peaks form. Fold in the vanilla.

Layer 1/3 of the angel food cake, 1/3 of the pudding, 1 1/2 cups of the raspberries, 1/4 of the graham cracker crumbs, and 1/3 of the whipped cream in a trifle dish. Repeat the layers twice to form three layers. Garnish with the remaining raspberries and graham cracker crumbs. Chill before serving. Serves 24.