
Tag: Baked Goods
Raspberry Almond Overnight French Toast

Well, the Christmas season has come and gone, though you might not know it at our house. At least, not immediately outside our house. It’s not that we haven’t taken down our lights or have left some tacky blowup snowman out front. It’s that our 8-foot tall live Christmas tree is sitting directly outside of our front door because we don’t have a truck and it’s too big to haul away in our Mazda 5. Nothing says class like a Sasquatch-sized withering Christmas tree smack dab in front of your house halfway into January, right? I would almost rather have an 8-foot tall actual Sasquatch out there. At least that would be less cliche. Our kind neighbors have offered to take it to the Christmas tree recycling center (yes, that’s a thing) when they take theirs (which is NOT sitting in front of their house) one of these days soon. Yay for helpful neighbors!
At any rate, our Christmas 2014 was a pleasant and mostly peaceful one and in some ways I wasn’t ready for it to be over. (Just ready for the tree to be gone.) For me, holidays are marked by the foods I cook/our family eats, many of which have become traditions. For several years now I’ve done an overnight French toast for Christmas morning–usually a banana-pecan one–but this year I wanted to try something new. I ended up settling on this scrumptious, colorful cinnamon-spiced raspberry almond French toast. The original recipe calls for a whole cup of brown sugar, which I get, cause yeah, it’s Christmas and all, but as much as I love sugar, I also love cutting it out where it won’t really be missed. So I scaled it way back to just over a half cup and nobody thought it wasn’t sweet enough. (Plus, who are we kidding, it’s gonna get bathed in maple syrup anyway….I mean, it is Christmas after all.)
So while the Christmas season may be over, I think I have found a new favorite overnight French toast–cinnamon-y with bursts of tart raspberries and the crunch of almonds to contrast with the soft texture of the bread. Now I think I may need to start a Valentine’s Day breakfast tradition just so I can make it again…

Raspberry Almond French Toast
(Adapted from Taste of Home)
Ingredients:
12 slices cinnamon bread, cubed
5 eggs, beaten
1 3/4 c. milk
1/2 c. + 2 Tbsp. brown sugar
1 tsp. cinnamon
heaping 1/4 tsp. nutmeg
1/2 c. slivered almonds
2 c. raspberries, fresh or frozen
Directions:
1. Place bread cubes in a greased 9 x 13 inch baking dish (you will get about two layers of bread). In a bowl, combine eggs, milk, brown sugar, cinnamon, and nutmeg. Pour over bread. Cover and refrigerate 8 hours or overnight.
2. When ready to bake, preheat oven to 400 degrees. Sprinkle almonds over egg mixture. Bake uncovered for 25 minutes. Sprinkle with raspberries and bake another 10 minutes. Slice and serve with your favorite maple syrup.
Serves 6-8.

Mint Chocolate Candy Cane Cookies

Isn’t it interesting how every language has at least a few words that defy translation? (Like “fun” or “bromance” in English.) Recently I read this article about the Danish concept of “hygge” (“HYU-gah”), a tough-to-pin-down notion of coziness, well-being, or togetherness. It seems that any experience that evokes these feelings of comfort–coming home to a warm house on a cold night, savoring a candlelit dinner, snuggling in a cozy sweater–qualifies as hygge. In other words, hygge is the feeling of Christmas. The article theorizes that Danes’ cultural emphasis on this concept is a key factor in its consistently ranking as the happiest country on earth.
One of my favorite hygge-inducing activities at Christmastime is baking. I have happy memories of making spritz cookies with my mom every year using this contraption that looks more like an instrument of torture than a baking tool.

Baking for my loved ones, knowing I’m providing them with a special treat at Christmastime, continues to be a joy for me during the holiday season. So when I manage to pull off a really delicious, visually appealing confection like these mint chocolate candy cane cookies, I’m a happy Christmas camper. These require a little extra effort than the standard mix-and-bake drop cookies, but the presentation (and the taste) are worth it! I made a batch and froze it a few weeks ago and our family is still enjoying them one by one out of the freezer–I think we may even like them better cold. Something about the mint flavor’s inherent chilliness just makes it work.

Wishing you a very merry Christmas filled with whatever brings you hygge!

Mint Chocolate Candy Cane Cookies
(Base recipe adapted from Allrecipes.com/inspired by Bon Appetit)
Ingredients:
1 c. butter, softened
1 1/2 c. white sugar
2 eggs
1 tsp. vanilla extract
1 tsp. peppermint extract
2 c. all-purpose flour
2/3 c. cocoa powder
3/4 tsp. baking soda
1/4 tsp. salt
2 c. mini semisweet chocolate chips, divided
1 c. crushed candy cane
Directions:
1. Preheat oven to 350 degrees.
2. In a large bowl, beat the butter, sugar, eggs, vanilla extract, and peppermint extract until light and fluffy. Combine the flour, cocoa powder, baking soda, and salt; stir into the butter mixture until blended. Mix in 1 c. mini chocolate chips. Drop by rounded Tablespoons onto a greased baking sheet.
3. Bake 10-11 minutes or until just set. Cool 10 minutes.
4. In a small bowl, microwave remaining 1 c. mini chocolate chips at 20 second intervals until melted. Pour melted chocolate into a squeeze bottle and drizzle in a zig-zag pattern over cookie tops. (Alternatively, if you don’t have a squeeze bottle, dredge a fork through the melted chocolate and drizzle over cookies that way.) Sprinkle with crushed candy cane. Refrigerate until set, about 20 minutes.
Makes 3-4 dozen.
Whole-Grain Blueberry Orange Muffins

I’ve been making muffins for a looong time now, and through my many experiments with flavors from plum poppyseed to pumpkin banana, blueberry muffins remain the gold standard in my mind’s eye of All That Is Muffin. This may be because they were the only kind of muffin I recall my mom making when I was growing up, and I have memories of unabashedly devouring the batter from the mixing bowl like a piranha stripping a cow carcass. Since then, I’ve run the gamut of blueberry muffin recipes (and their batter, if we’re being honest). You’ve got your cake-like blueberry muffins, with white flour, a mountain of sugar, and streusel for days. Then there are the blueberry health bombs that that are so dense you could knock someone senseless with one. And somewhere in between are the blueberry muffins I usually make, which are healthy and adequately tasty, but nothing I’ve put on the blog because they’re a wee bit boring.
So my blueberry muffin world was rather rocked when I tried this recipe from Real Simple. These have got to be the most unique blueberry muffin recipe I’ve ever tried. I’ll tell you why. No, it’s not the fact that blueberry combined with orange is slightly unusual. There’s……shhhh…..a secret ingredient. Well, at least I thought it was unexpected enough and blends seamlessly enough into the texture of the muffin that heck, sure, let’s call it a secret ingredient. Pecans! Not pecans loaded with sugar as a crumb topping, but pecans ground in the food processor along with whole wheat flour and oats for a robust (but not crunchy) texture that makes you go, “What’s so deliciously different about these?” Add to that the bright sweetness of orange flavor combined with the more mellow sweetness of blueberries and you have a very intriguing mix. My kids devoured them for breakfast, then asked if they could have them packed in their lunches, then asked if they could have them for snack when they got home. And if I weren’t saving them for my kids, I probably would have eaten them three times in one day, too.
So if you find yourself jaded in a world of dime-a-dozen blueberry muffin recipes, perhaps these can broaden your breakfast horizons like they did mine.

Whole Wheat Blueberry Orange Muffins
(Slightly adapted from Real Simple)
Ingredients:
1 1/4 c. white whole wheat flour
1 c. old-fashioned rolled oats
1/3 c. pecans
1 tsp. baking powder
1 tsp. baking soda
1/2 tsp. salt
1 c. plain yogurt
1/2 c. packed light brown sugar
3 Tbsp. butter, melted
1 Tbsp. grated orange zest
1/4 c. orange juice
1 large egg
1 tsp. vanilla extract
2 c. blueberries, frozen or fresh
Directions:
1. Preheat oven to 375 degrees. Line a 12-cup muffin tin with paper liners.
2. In a food processor, process the flour, oats, pecans, baking powder, baking soda, and salt until finely ground.
3. In a large bowl, combine yogurt, brown sugar, butter, orange zest, orange juice, egg, and vanilla. Add flour mixture and stir until just combined. Fold in blueberries. The batter will appear dry, but don’t worry, the finished product won’t be!
4. Divide the batter evenly between the muffin cups. Bake 23-25 minutes.

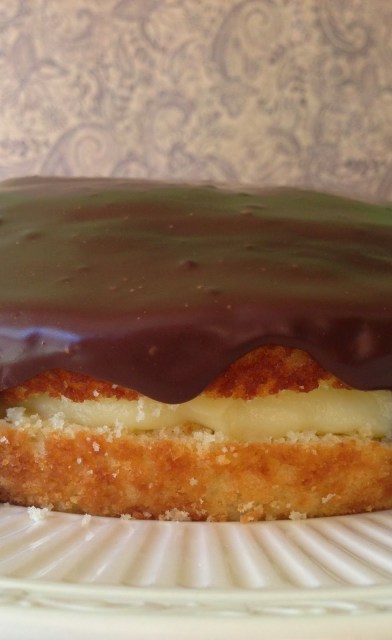
Boston Cream Pie

In 2003, the state of Massachusetts made a bold decision. They designated the Boston Cream Donut as the OFFICIAL DONUT of the state. Good call, Massachusetts. Both on your choice of donut and the choice to have an official state donut. (Massachusetts is, in fact, the only state to have an official donut. The other 49 states need to rectify this immediately.) So it’s all well and good that the people of the Bay State get to enjoy this monument to deliciousness in an official capacity.
But guess what, Massachusetts? Somebody beat you to it.
ME!!!!
The Boston Cream donut has been MY official donut since at least 1991.
For as long as I can remember, I have ALWAYS ordered a Boston Cream donut whenever possible at a donut shop. It started when my grandparents from Iowa would come to town and take my brother and me out for lunch at Sizzler and then to Dunkin Donuts for dessert. (The year 1991 is somewhat arbitrary–I was 9 then, which is about when I first recall this ritual with my grandparents starting.) Even at that young age, I can remember the sureness of my decision. No strawberry frosted, no long johns, no chocolate glazed. I want the grand daddy, that pie-within-a-cake, dream-within-a-dream ALL-STAR Boston Cream Donut. Dark chocolate frosting, buttery cake, and glorious cream filling–can you see why I (and, oh yeah, Massachusetts) have appointed it my official donut?
Since it was recently my birthday and I always enjoy making my own birthday cake, I decided this was the year to try actually making a Boston cream pie (which, if you didn’t know, is actually a cake. So in donut form it’s a donut that’s a pie that’s a cake. Still with me?) For as many times as I’ve eaten Boston cream donuts, it’s rare that I have Boston cream pie–and still rarer (as in, never) that I’ve had a homemade Boston cream pie. So giving it a try sounded fabulous. I actually happen to have a cookbook all about the food of Boston, so I pulled it out to find….

Nothing! This cookbook about the distinctive recipes of Boston does not contain a Boston cream pie recipe. Inexcusable.

(Though, actually, otherwise it’s a pretty good cookbook.) Anyway, thank goodness for the Internet, which of course yielded countless Boston cream pie recipes. Sifting through them revealed that most of the top hits had only four-star or less ratings, and I knew this birthday called for a five-star cake. I ended up deciding on one from Saveur.com that had all five-star reviews, and was not disappointed! Neither, I’d say, were the other ten or so people who shared it with me. My neighbor, who recently traveled to Boston, said she thought it was better than the version she’d had at a famous bakery there. The chocolate on top is nice and dark–not too sweet–the cake is fluffy, and the vanilla cream set up perfectly, with just the right amount of spreadability.

All in all, it made for a happy birthday cake realization of my Official Donut–a cake inspired by a donut inspired by a cake (with the name of a pie).

Boston Cream Pie
(Slightly adapted from Saveur.com)
Ingredients:
For the cake:
1 1/2 c. all-purpose flour
2 tsp. baking powder
1/2 tsp. kosher salt
12 Tbsp. butter, softened
1 c. sugar
2 tsp. vanilla extract
3 eggs
2/3 c. buttermilk (see my baking substitutions page for other options)
For the filling:
1 c. sugar
1/4 c. corn starch
1/2 tsp. kosher salt
6 egg yolks
1 1/2 c. milk
4 Tbsp. chilled unsalted butter, cubed
2 tsp. vanilla extract
For the glaze:
4 oz. 60% bittersweet chocolate, finely chopped
1/2 c. heavy cream
Directions:
1. Make the cake: Preheat oven to 350 degrees and grease a 9″ round cake pan well. Whisk together flour, baking powder, and salt in a bowl; set aside. In a large bowl, beat butter, sugar, and vanilla until fluffy, about 3 minutes. Add eggs one at a time, beating well after each addition. Alternately add dry ingredients and buttermilk and beat until just combined. Pour into prepared pan and smooth the top. Bake about 35 minutes or until a toothpick inserted in the center comes out clean. Cool in the pan 15 minutes, then invert onto a wire rack to cool completely.
2. Make the filling: In a 4-quart saucepan, whisk together sugar, corn starch, and salt. Add egg yolks and whisk until smooth, then stir in milk. Heat pan over medium heat and cook, stirring constantly, until thickened, about 10 minutes. (Be especially watchful in the last 3 minutes or so, as the mixture goes from liquid-y to pudding-y quite quickly.) Remove from heat and add butter one cube at a time, whisking until smooth. Stir in the vanilla extract. Transfer the pudding to a bowl and cover with plastic wrap. Chill until firmed, at least 2 hours.
3. Make the chocolate glaze: Place chopped chocolate in a bowl. In a 1-quart saucepan over high heat, bring heavy cream just to a boil. Pour cream over chocolate and let sit 1-2 minutes. Slowly stir the chocolate and cream until smooth and shiny, then set aside to cool for 10 minutes.
4. Assemble the cake: Using a serrated knife, carefully slice cake horizontally into two layers, with the top layer being slightly smaller than the bottom. Spread the chilled pudding over the top side of the bottom layer, then cover with the top layer. Pour chocolate glaze evenly over the top of the cake, letting it drip down the sides. Refrigerate until glaze is set, at least 30 minutes. Serve chilled or at room temperature.
Generously serves 10. (But could be stretched for 12!)
Almond Butter Oatmeal Muffins

Whoa, it’s been a busy couple of weeks! The fall semester has started, which means I am knee deep in Medical Nutrition Therapy (loving it so far), last week was my birthday (cake recipe forthcoming), and this weekend we hosted a big surprise birthday bash for my sister-in-law’s 30th! (I was going to write a post about all the party food and games, but again, things got so busy that I didn’t even take many pictures, and what’s a food blog post without pictures?) One thing I DO have pictures of, though, are these tasty nut butter oatmeal muffins.

Up until recently, I had never purchased almond butter, mostly because it’s hard to justify spending as much on one jar as I would on a pizza to feed my whole family AND because I already love peanut butter so much that experimenting with other nut butters hardly seemed necessary. Why mess with a good thing? And wouldn’t it make the peanut butter feel bad? Then a few weeks ago, Maranatha almond butter was on sale for a mere 5 bucks, which is bargain basement for almond butter, so I splurged.
Assuming one uses almond butter in all the same ways as peanut butter (you know, as shaving cream, leather cleaner, hair moisturizer…seriously, these are actual ways people claim to use peanut butter), I figured I’d go a traditional route by giving it a whirl in these oatmeal muffins. Aaaaand success! These were simple to whip up, reasonably healthy, and as an established fan of oatmeal muffins, I really enjoyed the uniqueness of the almond taste paired with the quasi-nuttiness of oats. It was like being in a Peanut Butter Parallel Universe.
(Sorry, peanut butter. We can still be friends. I promise I’ll still slather you on ice cream eat you in heart-healthy portions.)
You could, of course, use peanut butter instead of almond in this recipe. Either would be delicious.
P.S.: Days after making and eating these muffins, I received a call from the grocery store saying this particular brand of almond butter had been recalled for salmonella. Awesome. Is that why it was so cheap? Still gonna buy it again.
P.P.S.: None of us got salmonella. And neither will you from looking at the pictures. Just be sure to buy non-bacterially infected almond butter. Or peanut butter. Either will work. 🙂

Almond Butter Oatmeal Muffins
(Adapted from The Cooking Actress)
Ingredients:
1 1/4 c. whole wheat flour (white whole wheat is especially good because of its lighter texture)
1 c. quick or rolled oats
1 tsp. baking powder
1 1/2 tsp. baking soda
1 tsp. salt
1/4 c. brown sugar
1/3 c. honey
1/2 c. almond or peanut butter
1/2 c. Greek yogurt
1 egg
1 tsp. vanilla extract
3/4 c. milk
Directions:
1 Preheat oven to 375. Spray a 12-cup muffin tin with cooking spray.
2. In a large bowl, combine flour, oats, baking powder, baking soda, salt, and brown sugar.
3. In a smaller bowl, whisk together honey, almond or peanut butter, yogurt, egg, vanilla, and milk.
4. Stir the wet ingredients into the dry until combined. Divide evenly into prepared muffin tin, filling about 2/3 full.
5. Bake 17-20 minutes, or until a toothpick inserted in the center comes out clean.
Makes about 12 muffins.
