
Tag: Vegetarian
Pear Salad Stack

I guess I would say I’m a fan of any food that manages to pull off an optical illusion while also tasting delicious. You know, like a cake in the shape of a hamburger. Or truffles…(their optical illusion is leading you to believe that something so small couldn’t possibly contain so many calories). This pear salad stack is its own trompe l’oeil, giving the clever impression that a piece of fruit magically unlocked like a 1990’s Caboodle to let a delicious filling of goat cheese, almonds, and dried cranberries hop into its nooks and crannies. Basically, if M. C. Escher ever drew a pear, it would look like this. Thankfully, it’s not nearly as complex and mind-bending as all that. This is probably one of the most interesting salad presentations you can get for the least amount of effort–just the kind of unconventional menu item that makes a lovely first course for a dinner party or a big hit with non-fruit-loving kids. The only downside is having to take it apart to eat it!
Pear Salad Stack
Ingredients:
4 large pears
3/4 c. dried cranberries
3/4 c. crumbled goat cheese
1/2 c. sliced almonds
Balsamic vinegar (optional)
Directions:
1. In a medium bowl, combine dried cranberries, crumbled goat cheese, and sliced almonds.
2. Slice pears horizontally into four equal pieces, then remove core from each piece using a sharp knife. (Alternatively, if you have an apple corer, use it to remove the entire core first, then slice into four pieces.)
3. On four individual plates, layer pear pieces and goat cheese mixture vertically. Drizzle with balsamic vinegar, if desired.
Serves 4.
Creamy Apple Barley Salad

I always seem to overdo it on the weekends. Between the excesses of date night on Friday and Sunday dinner at my Italian mother-in-law’s, I frequently start Monday feeling like the Stay Puft Marshmallow Woman…(in terms of bloating, not like I want to destroy apartment buildings or anything). I’d really like to become as conscious about what I’m putting in my mouth from Friday night through Sunday as I am Monday through Friday. Today, a Saturday, I found myself feeling a little guilty–and, extraordinarily, still a little full–from the Culver’s Oreo and cookie dough concrete mixer I allowed myself on date night last night. (If you don’t believe me, or if you want to feel a tremendous amount of shame for ever having eaten one, check out the jaw-dropping nutrition facts on concrete mixers.) Seriously, wow.
So this Saturday noon found me with the desire for something light and healthy for lunch. Weekend lunches at our house are usually cobbled together with random bits of whatever is left from the week–my husband always says I grocery shop as though a week has only 5 days. Sometimes the results are tasty, sometimes less so. (Tomato-shrimp omelet, anyone?) Today I realized that I had everything needed to make this creamy apple barley salad we had once before and I for one had really liked. It comes from one of my Real Simple cookbooks. What I love about Real Simple is that their recipes truly stand up to the name–more often than not, I have all the ingredients on hand. They make great use of standbys like salt and pepper, wine vinegars, Dijon mustard, yogurt, lemon juice, etc. Love it when I don’t have to run out and buy $5 oyster sauce I’ll use one tablespoon of in a year. (But, hey, no judgment if you’re an oyster sauce nut.)
This recipe pairs the sweet crunch of apple and chewiness of barley against the backdrop of tangy Dijon and yogurt. Toss on top of a bed of spinach and/or arugula and boom, it’s a salad! I added a bit of feta to give it some extra oomph, since this was my lunch in its entirety. (Adding cheese to stuff may actually be the best thing about being a semi-vegetarian.) Cheese or no cheese, though, this makes a nice light lunch or an interesting side salad for a simple entree like grilled chicken or fish.

Creamy Apple Barley Salad
(Adapted from Real Simple Best Recipes: Easy, Delicious Meals)
1/2 c. pearl barley
salt and pepper
1/2 c. plain Greek yogurt
2 Tbsp. extra virgin olive oil
1 Tbsp. fresh lemon juice
1 tsp. Dijon mustard
2 stalks celery, chopped
1 large apple, thinly sliced
1/4 c. fresh mint, chopped
4 1/2 c. fresh spinach, arugula, or mixed greens
Directions:
1. In a medium saucepan, combine barley, 1 1/2 c. water, and 1/4 tsp. salt. Bring to a boil and then reduce heat. Simmer, covered, for 25-30 minutes, until water is absorbed.
2. Meanwhile, in a large bowl, whisk together the yogurt, olive oil, lemon juice, Dijon mustard, 1/2 tsp. salt, and 1/4 tsp. pepper. Add the celery, apple, mint, and cooked barley and toss to combine.
3. In individual bowls, divide the greens. Top with the barley mixture.
Serves 2-3 as a main dish, 4 as a side salad.
Caprese Tart with Basil-Garlic Crust

The funny thing about eating seasonally in the Phoenix area is that it’s all bass-ackwards from pretty much everywhere else in the country. Knowing what little I do about gardening and harvesting in Illinois, where my family is from, I realize that Midwesterners–and therefore probably other cold-climate residents–are used to tomatoes in the summer (and probably almost nothing in February). Right now in our garden, however, sits a bed of tomatoes as crowded as Wal-Mart on Black Friday.

Unlike Wal-Mart shoppers on Black Friday, we have not had to call the cops on them.
Or Disneyland on this ill-timed weekend last December:

With this tomato horde taking over our garden bed, I’m on a mission to use every single one of them–not because I’m afraid they’ll take over our entire property (well, maybe a little) but because my husband has spent so much time and devotion planting, watering, and tending to them. (I don’t even try to pretend I have anything to do with it. I seem to have the opposite of a Green Thumb–something like the Black Thumb of Death.) I do enjoy the harvest, though, and fresh-from-the-garden tomatoes are one of life’s best simple pleasures.
This week’s tomato feature is this delightful caprese tart. I wasn’t quite sure what to expect after reading through the recipe. Would it be dessert-like, with its buttery crust? Or pizza-like, with its tomato-basil-mozzarella topping? Strange as it sounds, it was exactly both of those things–in the best way possible! The crust certainly sets this apart from your typical pizza with its thick, rich texture, but the melted mozzarella, oven-softened tomatoes, and crispy baked basil identify it as definitively savory. Kind of makes your mind go in chicken-or-the-egg circles–pizza or tart? tart or pizza? It’s a mystery. A delicious mystery that you might as well just eat.

Caprese Tart with Basil-Garlic Crust
(Adapted from Annie’s Eats, originally from Ezra Pound Cake and The Complete Vegetarian Cookbook)
Ingredients:
For the crust:
1/3 c. fresh basil leaves
2 cloves garlic
1 1/4 c. all-purpose flour
1/2 tsp. salt
8 Tbsp. unsalted butter, chilled and cut into small pieces
4-5 Tbsp. cold water
For the filling:
8 oz. fresh mozzarella, sliced
1 c. ripe cherry tomatoes, sliced
1 Tbsp. olive oil
Salt & pepper
Freshly grated Parmesan cheese
1 Tbsp. minced fresh basil
Directions:
1. Make the crust dough: in the bowl of a food processor, combine basil and garlic. Process, scraping the sides down as needed, until finely minced. Add flour and salt and process briefly to mix. Add butter pieces and pulse about 10 times, or until the mixture resembles pea-sized crumbs. Add 3 Tbsp. of the cold water and pulse a few times to incorporate. Add 1 more Tbsp. water and pulse again to see if the dough forms into a ball. If not, add the remaining 1Tbsp. water and pulse again until a ball forms. Remove the dough, flatten into a 5-inch disc, and wrap in plastic wrap. Refrigerate for at least 1 hour.
2. When you are ready to bake the tart, preheat oven to 425 degrees. Transfer the dough to a lightly floured work surface (or a greased sheet of wax paper–less messy) and roll out into a 12-inch circle. Lay the dough in a 10-inch tart pan and press it into the sides. Lay a piece of aluminum foil or parchment paper loosely over the dough and fill the center with baking beads. (Rice, dry beans, or small pasta also work as baking beads.) Bake 10-12 minutes, then remove foil and beads and bake another 5 minutes. Lower oven temperature to 375.
3. Layer the bottom of the pre-baked crust with the sliced mozzarella, followed by the sliced cherry tomatoes. Season with salt and pepper and drizzle with olive oil. Top with Parmesan and fresh minced basil.
4. Bake about 30 minutes, or until the crust is golden brown. Allow the tart to rest at least 5 minutes before slicing and serving.
Makes 1 10-inch tart.

Spanakopita
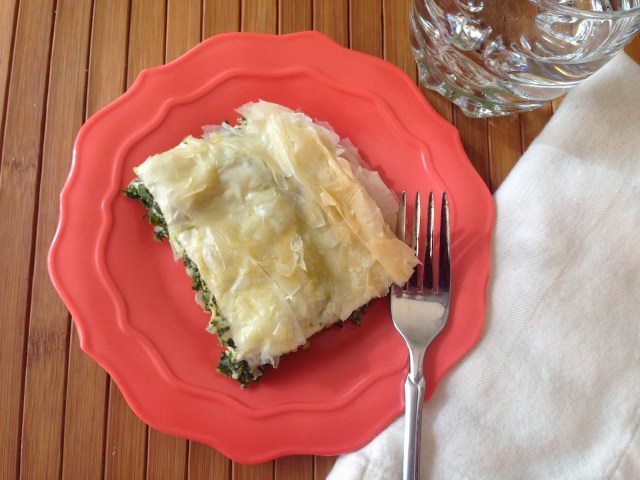
Funny how, a couple posts ago, I was lamenting the fact that’s it’s so much more expensive to make spanakopita from scratch than buy it pre-made. Well, I guess I’m a glutton for punishment, because I went ahead and made it from scratch a few days later. Truth be told, I had never actually done so before. Trader Joe’s fandom has always prevailed (their $4 per box version is delicious). Still, I had this whole package of phyllo dough sitting in my freezer from when I chickened out and didn’t use it in a recipe for our Christmas party and had been wanting to try spanakopita homemade. What to do, what to do… Phyllo seemed like such a tricky thing to work with–so flaky and fine, like you’d need the precision of one of those new, high-tech surgical robots to keep everything from falling apart into a crumbly, Greek mess (not unlike the Greek government in recent years–badum ching!). Then again, it’s not like I wanted to throw it out. “That’s $2.99 worth of phyllo dough in the trash!” (spoken as Chris Rock’s penny-pinching dad in Everybody Hates Chris.) So I watched some Youtube tutorials on how to use it and decided to bite the bullet. As my mom always says, “If it’s bad, we can just order pizza.”
Well, we didn’t have to order pizza. It turns out, in spanakopita at least, phyllo dough is fairly forgiving. I am no surgical robot and the phyllo on top came out less like the glutenous bad hair day I was afraid of and more like golden brown tousled pastry tresses. It’s the Jennifer Aniston of crusts! (And hey, she’s Greek, so that metaphor really makes sense–right?)
Interestingly–and, I guess, obviously–the word “spanakopita” comes from the Greek spanáki (meaning spinach) and pita (meaning pie). What I definitely didn’t know is that spanakopita falls within the “family of pastries” known in the Mediterranean as börek.* Basically, börek dishes are pastries phylled–I mean filled–with savory ingredients like cheese, vegetables, and even meat. Yum! Having tried my hand at spanakopita with tasty results, I’d be curious to attempt other börek…though it sounds like something that would end up on the police blotter. “Woman arrested for attempted börek in a domestic kitchen.” I’ll leave the delicious details to your imagination.

Spanakopita
(Adapted from Allrecipes.com)
Ingredients:
3 Tbsp. olive oil
1 onion, chopped
1 bunch green onions, chopped
3 cloves garlic, minced
25 oz. frozen chopped spinach (2.5 10-ounce packages)
1/2 c. chopped fresh parsley (or 3 1/2 Tbsp. dried)
salt and pepper to taste
2 eggs, beaten
3/4 c. ricotta cheese
1 1/2 c. crumbled feta cheese
15 sheets phyllo dough
1/4 c. olive oil
Directions:
1. Preheat oven to 350 degrees. Grease a 7 x 11 inch baking dish.
2. In a large skillet, heat 3 Tbsp. of olive oil over medium heat. Saute onion, green onions, and garlic until soft and lightly browned. Add frozen spinach and parsley and continue to cook until spinach is heated through. Season with salt and pepper. Remove from heat. Drain spinach mixture (my favorite method is to place about 1/3 of the mixture at a time on a dinner plate, then top with another dinner plate right-side-up, then squeeze over the sink).
3. In a large bowl, mix together eggs, ricotta, and feta. Stir in spinach mixture.
4. Working carefully, lay 1 sheet of phyllo dough in the baking dish and brush lightly with olive oil. Repeat until you have 5 sheets stacked. (If the sheets overlap the pan, that’s okay–keep them that way for now.)
5. Spread half the spinach-ricotta filling evenly over the phyllo. Tuck any overhanging dough over the filling and repeat the layering process with 5 more sheets of phyllo. Spread remaining 1/2 of spinach-ricotta filling on top, then repeat the layering once again with 5 more sheets of phyllo to complete the pie, brushing the top layer with olive oil. Again, tuck any extra/overhanging dough into the dish.
6. Bake 30-40 minutes or until golden brown.
Sweet Potato Enchiladas

Recently I Googled the phrase “enchilada fan club.” Why, you may ask? Was I playing that Stump Google game where you type in the most random, unassociated words to try to get zero results? Nope. I just really, really love enchiladas. And believe it or not, “enchilada fan club” yields only 4 results–almost stumping Google. None of them represent an actual fan club for lovers of enchiladas, though. (Boo.) Maybe I just need to start my own. There’s a meetup.com group for everything, right? I can see it on my resume now….“President and Founder, Enchilada Fan Club of Arizona.” I think that could really open some doors for me.
Enchiladas are fan club-worthy for a variety of reasons. They’re the Mexican comfort food with their hot, creamy, savory filling, soft tortilla shell, and gooey, stretchy cheese topping; they’re surprisingly easy to make; they travel well; they can be mixed up for variety. To me, they’re an ideal entree for a variety of occasions. Cinco de Mayo party? Enchiladas. Birthday party for your teacup chihuahua? Enchiladas. Your nephew’s bar mitzvah? Enchiladas.
Today’s recipe takes this Mexican classic to the next level with its unexpected filling: sweet potatoes! If you’re a vegetarian or serving vegetarians, you still have the option of making hearty enchiladas that aren’t just rolls of melted cheese (though, let the record show, I see nothing wrong with rolls of melted cheese.) If you can’t imagine sweet potatoes involved in a Mexican-flavored dish, you’re in for a surprise. Once you’ve tasted them with green onions, cumin, and chili powder, you’ll never think of them as just a marshmallow-covered Thanksgiving dish again.
And while I have your attention, can I interest you in membership in Arizona’s newest elite foodie fan club? No money down, low commitment–you just have to be able to eat 6+ enchiladas in one sitting. Video applications accepted.

Sweet Potato Enchiladas
(Inspired by Allrecipes.com)
Ingredients:
5 sweet potatoes
5 oz. cream cheese, softened
4 green onions, chopped
1 tsp. chili powder
1 tsp. ground cumin
1 tsp. dried oregano
1/2 tsp. salt
1/2 tsp. black pepper
12 6-inch corn tortillas
1 10 oz. can red enchilada sauce
6 oz. shredded cheddar cheese
Directions:
1. Place sweet potatoes in a large stock pot and cover with water. Bring to a boil over high heat; reduce heat to medium and boil gently for 25-30 minutes or until tender. Let cool. When cooled, peel skins off and place sweet potatoes in a large bowl.
2. Mash sweet potatoes. Add cream cheese, green onions, chili powder, cumin, oregano, salt, and pepper and mix well.
3. Preheat oven to 350 degrees.
4. Cover the bottom of a large baking dish with a layer of enchilada sauce.
5. On a microwave-safe plate, individually microwave 1 tortilla 10-15 seconds, or until pliable. (This is so you don’t have to fry them in oil…much healthier!) Place about 1/3 cup sweet potato filling down the center of the tortilla, roll it up, and place seam side down in the prepared baking dish. Repeat with all remaining tortillas.
6. Drizzle remaining enchilada sauce over rolled tortillas. Sprinkle with shredded Cheddar.
7. Bake in preheated oven 25-30 minutes until enchiladas are bubbling and cheese is beginning to brown.
Makes 12 enchiladas.