Orange Marmalade

Drenched in sunshine!

While the rest of the country seems to be entrenched in a real-life version of Disney’s Frozen–a nightmare of blizzards and record low temps–we here in the Phoenix Valley are enjoying our 9th or 10th day of sunshine with temperatures in the upper 60s/low 70s. It was actually getting a little too hot for me this afternoon as I sat on my patio in a light sweater. (Yeah, I am going to be that person who rubs it in. The rest of you get gorgeous summers, falls, and springs while we hide in our air conditioning, the sun turning our iPhones into molten heaps in our cars.)

As I mentioned last time, winter in the valley is the time for citrus–mountains of citrus in every grocery store, citrus dropping from trees and rolling giddily in the street, and bags of excess citrus dropped at your door. After taking care of my free grapefruit, it was time to move on to the oranges included in the bag. It didn’t take long to formulate a plan: marmalade! Having made a batch last year, I wanted to try it again with less sugar. The sickening post-breakfast sugar crash every time I ate marmalade on my toast just wasn’t working with my schedule–you know, the one where I actually need to take care of my children and run errands and all that jazz. This time I decided to slash the sugar by half of what Ina Garten calls for in her recipe (the one I used last year). I must say I’m pleased with the result. While cutting back so significantly on the sugar definitely increased the cooking time–I’m sure there’s some chemical reason why–it was worth it. It came out sweet enough with the real taste of citrus behind it, like a tangy lemonade. Also, if you’re looking at this recipe and wondering when you’ll find the time to make it (yes, it is time-consuming, though not labor-intensive) like most jam/jelly recipes, it yields a high quantity, so your labor is not in vain. But if you’re a planner, a weekend day might be the best choice for when to make this particular recipe.

Lastly, cool fact: the word “marmalade” has been in use in English since 1480 and was originally a Portuguese specialty made from quince. Ever had a quince? Me, neither. Though surprisingly, this marmalade includes both oranges and lemons. Yum!

Aaaaand one more of the marmalade in the sun-drenched backyard, thank you.

Orange Marmalade
(Adapted from Ina Garten)

4 large seedless oranges
2 lemons
4 c. sugar

Cut the oranges and lemons in half cross-wise, then into very thin half-moon slices. (Use a mandoline if you have one.) Discard seeds. Place fruit slices and their juices in a large stainless steel pot. Add 8 cups of water and bring to a boil over high heat, stirring often. Remove from heat and stir in the sugar until dissolved. Bring to room temperature and leave covered overnight.

The next day, bring the mixture back to a boil. Reduce heat to low and simmer uncovered for two hours. Turn the heat up to medium and boil, stirring often, another 30-45 minutes, or until it reaches 220 degrees F on a candy thermometer. (Alternatively, if you don’t have a candy thermometer, you can use the cold plate test: scoop a small amount of the mixture onto a spoon and place on a plate in the freezer. Test marmalade consistency when cool but not cold. If it is too runny, it needs more boiling time. If too sticky, add more water. If consistency is to your liking, you’re done!)

Pour marmalade into clean canning jars and seal with the lids. If canning, process the jars in a water bath for 15 minutes. Otherwise, store in the refrigerator for best results. (And give a few away as gifts!)

Makes 3-4 pints.

My daughter’s plastic dinosaur was a BIG fan.

Warm Grapefruit “Tea”

Here in the Phoenix area, it’s inevitable–every winter, some friend or neighbor WILL give you a giant grocery bag of extra citrus from their tree. There are just no two ways about it. It goes along with living in the Valley like getting used to the idea of scorpions and thinking of 87 degrees as normal October weather. It’s a blessing and a curse. But if you like citrus like I do, mostly a blessing. Every season when the bag shows up in my home, I engage in a frenzied scouring of the internet to determine how I will use up a gazillion oranges/lemons/grapefruit before they all go bad.

This year my citrus grab bag included quite a bit of grapefruit. Last year when this happened, I made several loaves of grapefruit bread (which surprisingly ended up being the hit of a bridal shower I threw–who knew?), ate grapefruit halves broiled with brown sugar (meh–okay), and made one heinously inedible grapefruit-tofu stir fry. (Please DON’T. EVER. TRY. THIS.) This year I went straight to Martha Stewart, remembering a grapefruit granita of hers I also made last year. Yeah, so I made a lot of grapefruit…it was a weird time in my life.

Anyway, one of Martha’s 30 grapefruit recipes (or should I say her staff’s 30 grapefruit recipes–no one in their right mind has 30 grapefruit recipes of their own) sounded intriguing. Warm Grapefruit Tea. I figured this must be an infusion of a regular tea with grapefruit juice. Nope. This, ladies and gentlemen, is a recipe for how to make hot grapefruit juice. There is no tea involved.

Gross, right?

Well, like I say, I was intrigued. Reviewers raved about it, and I judge a lot by reviews–and who am I kidding, I have like 9 freaking grapefruit to get through! Throw me a bone here! Plus, as mentioned in previous posts, I do enjoy the element of surprise and/or trying something new when it comes to cooking. So I went for it. You’ll never guess…

It was amazing!

It really does taste like tea, but like the most refreshing hot tea ever. And with cold and flu season upon us, it certainly can’t hurt to get some vitamins and antioxidants in a new and unique way. Grapefruit is loaded with Vitamin C, as you may have guessed, but what you might not know is that it contains lycopene, the same antioxidant found in tomatoes (makes sense when you realize their flesh is in the same color family of pink/red). Grapefruit also contains plenty of Vitamin A and has a low glycemic index, which has been indicated in weight control and disease prevention.

Now what to do with all those oranges…

Warm Grapefruit Tea
(Adapted from Martha Stewart)

Juice from 2 large pink or red grapefruit (about 2 cups)
2-4 Tbsp. honey
1 cinnamon stick
1/2 tsp. whole allspice or cloves
1/2 c. water

In a medium pot, combine all ingredients and bring to a boil over high heat. Strain and discard solids and enjoy carefully–it will be very hot!

Serves 2.

Fig and Goat Cheese Bruschetta

You may have noticed it’s been awhile since my last post, for reasons that are probably obvious–it’s Christmastime! Like everyone else, I have a to-do list longer than Santa’s naughty list every year during December, so writing about food has been pushed from its usual place near the top. Not, of course, for lack of cooking and eating! In fact, so much of my time has been taken up with both these activities the last few weeks that it’s sort of ironic that it’s kept me from blogging. Part of the reason for this, in addition to the usual cookie baking, eggnog drinking, and yuletide haggis feast (your family does that too, right?) is that my husband and I host an annual White Elephant Christmas Party for about 30 of our friends. This may be my favorite tradition of the whole season. We started it when we were newly married, just for fun, and I think about eight people came. Now, nine years later, it’s the biggest event of my year. I start menu planning around Halloween, and prepping and freezing after Thanksgiving. (Someday I’ll write a post about party planning tips/ideas. For now, suffice it to say the top two are Plan Ahead and The Freezer Is Your Friend.) I always provide 8-9 finger food options, as well as a selection of Christmas cookies and one other, more fabulous dessert. Here was this year’s menu:

Crock Pot Barbecue Meatballs

Cherry-Apple-Walnut Chicken Salad Croissants

Mac and Cheese Bites

Puff Pastry Ham Braids with Honey Mustard

Easy Samosas with Mango Chutney

Crudites with White Bean Dip, Tomato Basil Hummus, and Parmesan Ranch

Tortilla Chips with Avocado-Feta Pico de Gallo

Fig and Goat Cheese Bruschetta

While I was happy with the way everything came out, I may have been proudest of the Fig and Goat Cheese Bruschetta. Bursting with flavor from the combination of sweet fig-orange jam with creamy, tangy goat cheese, they definitely make a big impact for such a small appetizer. And look how pretty they are! If these were a fashion accessory, they’d be diamond earrings–small but sparkly. Plus, they’re not too difficult to prep in advance. Make the jam up to three days ahead, then assemble and stick under the broiler for a couple of minutes, and voila! A lovely tiny bite of deliciousness is yours!

As for the rest of the party, my hope is that everyone had a blast. There were certainly some terrible gifts (the more terrible, the better is the idea) and all I can say is I’m glad I didn’t end up with the live goldfish.

Everyone with their terrible gifts

And as for you, have a very merry Christmas filled with peace, beauty, and of course lots of wonderful food!

Fig and Goat Cheese Bruschetta
(Adapted from Cooking Light)

Ingredients:

1 1/4 c. chopped dried Mission figs
1/3 c. sugar
1/3 c. coarsely chopped orange sections
1 tsp. grated orange rind
1/3 c. fresh orange juice (about 1 orange)
1/2 tsp. chopped fresh rosemary
1/4 tsp. ground black pepper
30 1/2-inch-thick slices French bread baguette
1 1/4 c. crumbled goat cheese
5 tsp. finely chopped walnuts

Directions:

In a small saucepan, combine the first 7 ingredients; bring to a boil. Cover, reduce heat, and simmer for 10 minutes or until figs are tender. Uncover and cook 5 minutes or until mixture thickens. Remove from heat and cool to room temperature.

Preheat broiler.

To assemble bruschetta, top each bread slice with 1 1/2 tsp. fig jam and 1 1/2 tsp. goat cheese. Sprinkle evenly with walnuts. Broil on a cookie sheet for 2 minutes or until nuts begin to brown.

Makes 30 pieces.

Easy Samosas

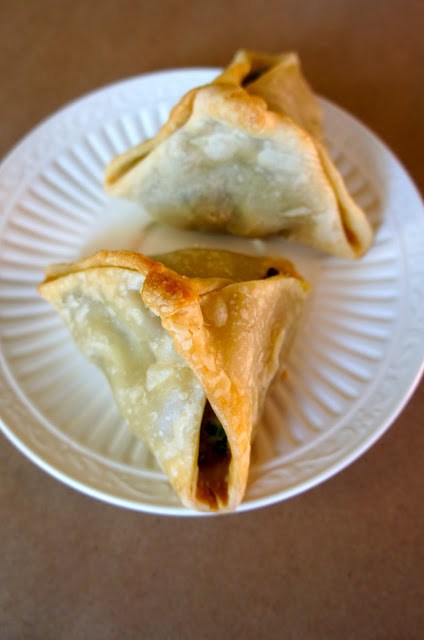
I could start this post with the confession that these samosas have made people cry. But then I should probably explain that the people were my children, who are 2, 4, and 6, and they cry over anything they deem too spicy. Pretty much all Indian food fits the bill. I want to raise them with adventurous palates, so I keep making spicy foods, but they usually get an alternative if they really, really hate whatever it is. So I guess what I’m trying to say is that these easy Indian apps are genuinely spicy, but I happen to think that’s a good thing. They’re not drain-your-sinuses spicy, or run-to-the-bathroom-to-wash-your-mouth-out spicy (my husband actually did this when we ate Indian in London. One of us was embarrassed…), but they definitely have a kick–hence the side of sweet mango chutney you see in the picture. Oddly enough, I’ve decided to put them on my upcoming Christmas party menu. Samosas might not seem like a traditional choice for a Christmas buffet, but that’s part of their charm for me. I like the idea of the element of surprise in a party menu–good surprise, not dinosaur-popping-out-of-a-cake surprise. Nobody likes that at a Christmas party.

Even if you’re not hosting a party this holiday season, samosas make an unexpected contribution to any potluck. Maybe people will think you secretly have an Indian grandma who makes amazing Eastern cuisine from scratch (if you actually do have such a grandma, disregard this sentence…and let me borrow her). In the potluck world of cocktail meatballs, pigs in blankets, and bags of chips alongside onion dip, you can do better. These savory-spicy pockets of veggie goodness are sure to be a stand-out.

Easy Samosas
(From Real Simple)

Ingredients:

1 Tbsp. olive oil
1 medium onion, chopped
1 1/2 tsp. curry powder
3/4 tsp. salt
1/2 tsp. pepper
1 10-oz bag frozen peas, thawed
2 c. mashed potatoes (store-bought, homemade, or leftover)
1 15-oz. package refrigerated pie crusts
1 jar mango chutney (optional…but I may I suggest Trader Joe’s)

Directions:

Heat oven to 375° F. Heat the oil in a large saucepan over medium heat. Add the onion and cook, stirring occasionally, until soft and golden brown, 10 to 12 minutes. Add the curry powder, ¾ teaspoon salt, and ½ teaspoon pepper and cook, stirring, until fragrant, about 1 minute. Stir in the potatoes and peas.

Unroll the piecrusts and cut each into 6-8 triangles, depending on desired size of samosas. Place a heaping tablespoon of the potato mixture in the center of each piece. Gather the corners of the dough and pinch to form a point. Pinch the seams to seal. Transfer to a baking sheet.

Bake the samosas until golden, 22 to 25 minutes. Serve with the mango chutney, if using.

Caramelized Onion and Apple Pizza

Is it just me or does that look like bacon on there? Mmm….bacon…

Has this ever happened to you: You have a meal planned for dinner, but something happens and then you don’t end up getting to it until a few days later. You go to start dinner around 5:00, only to realize that in the intervening days, a key ingredient has gone bad! What are you supposed to do? Pack up your three small kids and make a grocery run? Not worth it. Borrow something from a neighbor? In my case, the ingredient was pre-cut butternut squash chunks. I’m close with my neighbors so I wouldn’t mind asking, but I don’t think they’re likely to have any of those lying around. The meal in question was this roasted apple-butternut squash-onion pizza with a white bean puree for the sauce. It sounded really interesting…but, you know, without the butternut squash not quite the same. Faced with this dilemma, I decided it was time to switch gears a little. Having just (almost) finalized my Christmas party menu, which includes these puff pastry apple and caramelized onion bites, they were on my mind. I figured if it works on puff pastry, it’ll work on pizza, right? As a matter of fact, yes! The only thing I really wish I had added was some crumbled bacon. But that would have required a trip to the store…which, again, I wasn’t about to do. Fortunately, even without bacon, this turned out to be a really delicious vegetarian dinner. (But next time, yeah, it’ll include bacon. Here’s even an NPR article about why bacon makes everything better. ‘Nuff said.)

Caramelized Onion and Apple Pizza

Ingredients:

3 Tbsp. butter
1 lb. yellow onions, thinly sliced (about 2 medium onions)
2 Granny Smith apples, peeled, cored, and thinly sliced
1/2 tsp. salt
1/4 tsp. pepper
1 recipe whole wheat pizza dough (or the bagged Trader Joe’s kind, which is what I always use)
2 Tbsp. olive oil
6 oz. shredded mozzarella cheese
2 Tbsp. fresh thyme

Directions:

Make the caramelized onions and apples:

Melt butter in a medium to large skillet over medium-high heat. Add onions, salt, and pepper. Cook, stirring occasionally, until onions are soft, about 5 minutes. Add apples and stir to coat. Reduce heat to medium and cook, stirring occasionally, until onions are medium brown, about 20-25 minutes.

Prepare the pizza:

Preheat oven to 450 degrees.* Spread pizza dough in a greased 10 x 15 in jelly roll pan. Prick dough with a fork and brush with olive oil. Place caramelized onions and apples on the dough, then shredded mozzarella. Sprinkle fresh thyme over top. Bake 8-10 minutes.

Serves 4.

*Note: If using Trader Joe’s bagged pizza dough, I recommend pre-baking at 375 degrees for 9-10 minutes. The dough will remain gooey if not pre-baked.