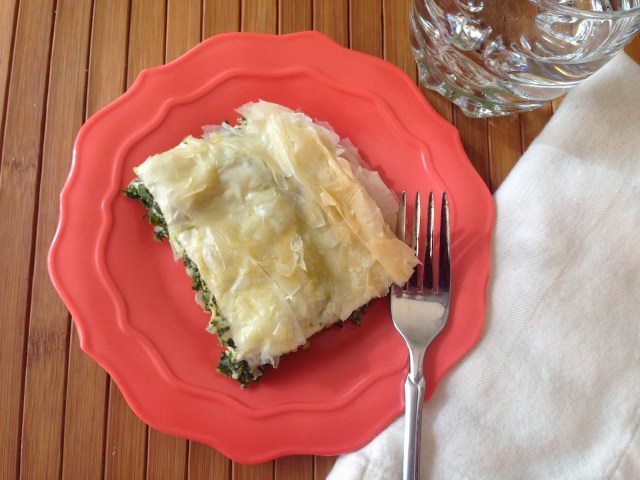
Spanakopita

Funny how, a couple posts ago, I was lamenting the fact that’s it’s so much more expensive to make spanakopita from scratch than buy it pre-made. Well, I guess I’m a glutton for punishment, because I went ahead and made it from scratch a few days later. Truth be told, I had never actually done so before. Trader Joe’s fandom has always prevailed (their $4 per box version is delicious). Still, I had this whole package of phyllo dough sitting in my freezer from when I chickened out and didn’t use it in a recipe for our Christmas party and had been wanting to try spanakopita homemade. What to do, what to do… Phyllo seemed like such a tricky thing to work with–so flaky and fine, like you’d need the precision of one of those new, high-tech surgical robots to keep everything from falling apart into a crumbly, Greek mess (not unlike the Greek government in recent years–badum ching!). Then again, it’s not like I wanted to throw it out. “That’s $2.99 worth of phyllo dough in the trash!” (spoken as Chris Rock’s penny-pinching dad in Everybody Hates Chris.) So I watched some Youtube tutorials on how to use it and decided to bite the bullet. As my mom always says, “If it’s bad, we can just order pizza.”

Well, we didn’t have to order pizza. It turns out, in spanakopita at least, phyllo dough is fairly forgiving. I am no surgical robot and the phyllo on top came out less like the glutenous bad hair day I was afraid of and more like golden brown tousled pastry tresses. It’s the Jennifer Aniston of crusts! (And hey, she’s Greek, so that metaphor really makes sense–right?)

Interestingly–and, I guess, obviously–the word “spanakopita” comes from the Greek spanáki (meaning spinach) and pita (meaning pie). What I definitely didn’t know is that spanakopita falls within the “family of pastries” known in the Mediterranean as börek.* Basically, börek dishes are pastries phylled–I mean filled–with savory ingredients like cheese, vegetables, and even meat. Yum! Having tried my hand at spanakopita with tasty results, I’d be curious to attempt other börek…though it sounds like something that would end up on the police blotter. “Woman arrested for attempted börek in a domestic kitchen.” I’ll leave the delicious details to your imagination.

*Ummmm, family of pastries? How do I join? Or can I just show up at the reunion and eat everyone?

Spanakopita
(Adapted from Allrecipes.com)

Ingredients:

3 Tbsp. olive oil
1 onion, chopped
1 bunch green onions, chopped
3 cloves garlic, minced
25 oz. frozen chopped spinach (2.5 10-ounce packages)
1/2 c. chopped fresh parsley (or 3 1/2 Tbsp. dried)
salt and pepper to taste
2 eggs, beaten
3/4 c. ricotta cheese
1 1/2 c. crumbled feta cheese
15 sheets phyllo dough
1/4 c. olive oil

Directions:

1. Preheat oven to 350 degrees. Grease a 7 x 11 inch baking dish.

2. In a large skillet, heat 3 Tbsp. of olive oil over medium heat. Saute onion, green onions, and garlic until soft and lightly browned. Add frozen spinach and parsley and continue to cook until spinach is heated through. Season with salt and pepper. Remove from heat. Drain spinach mixture (my favorite method is to place about 1/3 of the mixture at a time on a dinner plate, then top with another dinner plate right-side-up, then squeeze over the sink).

3. In a large bowl, mix together eggs, ricotta, and feta. Stir in spinach mixture.

4. Working carefully, lay 1 sheet of phyllo dough in the baking dish and brush lightly with olive oil. Repeat until you have 5 sheets stacked. (If the sheets overlap the pan, that’s okay–keep them that way for now.)

5. Spread half the spinach-ricotta filling evenly over the phyllo. Tuck any overhanging dough over the filling and repeat the layering process with 5 more sheets of phyllo. Spread remaining 1/2 of spinach-ricotta filling on top, then repeat the layering once again with 5 more sheets of phyllo to complete the pie, brushing the top layer with olive oil. Again, tuck any extra/overhanging dough into the dish.

6. Bake 30-40 minutes or until golden brown.

Carrot Cake

Sometimes I wonder how certain vegetables have been inducted into the Hall of Acceptable Dessert Ingredients while others stand dolefully outside the gates. Carrots and zucchini, for example, are somehow perfectly admissible in cakes and quick breads, whereas mushrooms and eggplant are not. (Then again, I can’t imagine requesting a mushroom cake for my birthday–can you? If you said yes, I’m not sure we can be friends…) I suppose with carrots, it’s their innate sweetness that makes them fit alongside butter, sugar, and flour in a cake. For zucchini, I have to dig deep. Maybe some zucchini farmer had a bumper crop and made a convincing sales pitch for grating it up and putting it in bread. And here we are in the 21st century with a National Zucchini Day on the books. (April 25th, if you were wondering.) This zucchini farmer must have been one smoooooth operator.

Although I’ve never really gotten used to the idea of zucchini in a sweet package, every year my husband requests carrot cake for his birthday and I am happy to oblige. There *may* have been a year or two when I made a box mix while he was at work and passed it off as homemade. But no longer! Now that I have my chopaholic food processor, grating 3 cups of carrots in a matter of minutes takes a major chunk of the work out of making carrot cake from scratch. (It also nearly took a major chunk out of my hand before I located the pusher that had gone missing.)

This particular recipe has been a success for me in the past, so for my husband’s birthday yesterday, I tried it again. It totally passed the test–light but moist with a hint of cinnamon sweetness and the perfect amount of rich tang in the cream cheese frosting. Definitely a winner even for those who (like me) remain somewhat skeptical about vegetables in dessert.

Just don’t ask me to try carrot pie. That’s taking the idea entirely too far.

Carrot Cake
(Adapted from Allrecipes.com)

Ingredients:

For the cake:

4 eggs
3/4 c. vegetable oil
1/2 c. applesauce
1 3/4 c. white sugar
2 tsp. vanilla extract
2 c. all-purpose flour
2 tsp. baking soda
2 tsp. baking powder
1/2 tsp. salt
2 tsp. ground cinnamon
3 c. grated carrots

For the frosting:

8 oz. cream cheese, softened
1/2 c. butter, softened
4 c. powdered sugar
1 tsp. vanilla
3 Tbsp. milk

Directions:

1. Preheat oven to 350 degrees. Grease two 9-inch cake pans.

2. In a large bowl, beat together eggs, vegetable oil, applesauce, sugar, and vanilla. Mix in flour, baking soda, baking powder, salt, and cinnamon. Stir in carrots. Pour into prepared pans.

3. Bake in preheated oven 30-35 minutes, or until a toothpick inserted in the center comes out clean. Let cool at least ten minutes in the pan, then carefully remove to a cooling rack to finish cooling.*

4. To make the frosting: in a medium bowl, combine cream cheese, butter, powdered sugar, and vanilla. Add milk a little at a time and mix until frosting consistency is to your liking. Frost cake as desired when it has cooled completely.

I ate this piece. And it was delicious.

*If you’d like to make the cake ahead of time and frost later, here’s an awesome hack: spray the inside of two freezer bags with cooking spray and place one cake layer in each. No losing the top of the cake to sticky plastic wrap!

Sweet Potato Enchiladas

Recently I Googled the phrase “enchilada fan club.” Why, you may ask? Was I playing that Stump Google game where you type in the most random, unassociated words to try to get zero results? Nope. I just really, really love enchiladas. And believe it or not, “enchilada fan club” yields only 4 results–almost stumping Google. None of them represent an actual fan club for lovers of enchiladas, though. (Boo.) Maybe I just need to start my own. There’s a meetup.com group for everything, right? I can see it on my resume now….“President and Founder, Enchilada Fan Club of Arizona.” I think that could really open some doors for me.

Enchiladas are fan club-worthy for a variety of reasons. They’re the Mexican comfort food with their hot, creamy, savory filling, soft tortilla shell, and gooey, stretchy cheese topping; they’re surprisingly easy to make; they travel well; they can be mixed up for variety. To me, they’re an ideal entree for a variety of occasions. Cinco de Mayo party? Enchiladas. Birthday party for your teacup chihuahua? Enchiladas. Your nephew’s bar mitzvah? Enchiladas.

Today’s recipe takes this Mexican classic to the next level with its unexpected filling: sweet potatoes! If you’re a vegetarian or serving vegetarians, you still have the option of making hearty enchiladas that aren’t just rolls of melted cheese (though, let the record show, I see nothing wrong with rolls of melted cheese.) If you can’t imagine sweet potatoes involved in a Mexican-flavored dish, you’re in for a surprise. Once you’ve tasted them with green onions, cumin, and chili powder, you’ll never think of them as just a marshmallow-covered Thanksgiving dish again.

And while I have your attention, can I interest you in membership in Arizona’s newest elite foodie fan club? No money down, low commitment–you just have to be able to eat 6+ enchiladas in one sitting. Video applications accepted.

Sweet Potato Enchiladas
(Inspired by Allrecipes.com)

Ingredients:

5 sweet potatoes
5 oz. cream cheese, softened
4 green onions, chopped
1 tsp. chili powder
1 tsp. ground cumin
1 tsp. dried oregano
1/2 tsp. salt
1/2 tsp. black pepper
12 6-inch corn tortillas
1 10 oz. can red enchilada sauce
6 oz. shredded cheddar cheese

Directions:

1. Place sweet potatoes in a large stock pot and cover with water. Bring to a boil over high heat; reduce heat to medium and boil gently for 25-30 minutes or until tender. Let cool. When cooled, peel skins off and place sweet potatoes in a large bowl.

2. Mash sweet potatoes. Add cream cheese, green onions, chili powder, cumin, oregano, salt, and pepper and mix well.

3. Preheat oven to 350 degrees.

4. Cover the bottom of a large baking dish with a layer of enchilada sauce.

5. On a microwave-safe plate, individually microwave 1 tortilla 10-15 seconds, or until pliable. (This is so you don’t have to fry them in oil…much healthier!) Place about 1/3 cup sweet potato filling down the center of the tortilla, roll it up, and place seam side down in the prepared baking dish. Repeat with all remaining tortillas.

6. Drizzle remaining enchilada sauce over rolled tortillas. Sprinkle with shredded Cheddar.

7. Bake in preheated oven 25-30 minutes until enchiladas are bubbling and cheese is beginning to brown.

Makes 12 enchiladas.

Creamy Crock Pot Tomato Soup

Remember that ad campaign Campbell’s Soup ran a few years ago, “Make it Campbell’s Instead”? I’m sure all sorts of market research and lots of money went into creating it, and maybe there was more to it than just that phrase, but it always seemed like kind of a lame slogan to me. Like, really? Like their marketing team was tired one night and just said, “We got nothin’. Just tell ’em to choose Campbell’s instead of something else.” And then it always made me think, Well, maybe it’s because it doesn’t have that much to recommend it, so there was nothing else to say…?

That being said, I love tomato soup and used to eat lots of the iconic Campbell’s variety. Every time I watch Willy Wonka and the Chocolate Factory, I thrill at the thought of trying Violet Beauregarde’s Everlasting Gobstopper with the tomato soup that runs down her throat (then again, I’m not crazy about the idea of turning into a giant blueberry…so scratch that). Up until a few years ago, I would buy Campbell’s tomato soup and eat it with a passion, despite the fact that it left my microwave looking like a scene out of The Texas Chainsaw Massacre. As I became more aware of the downsides to processed food, however, I eventually realized that, like most canned soups, the classic Campbell’s tomato is not a particularly great choice. The sodium in just a 1/2 cup is 20% of the daily value, plus it contains high fructose corn syrup and some funky additives. I’ve since converted to the Trader Joe’s variety (organic, no HCFS, only one not-so-awful additive) but am always on the lookout for a homemade version to provide that perfect hot, creamy cup of comfort.

Of the recipes I’ve tried, this one is the clear winner:

Not only is this crock pot gem creamy and delicious, it also clandestinely contains 3 full cups of vegetables, not including the tomatoes, which is great for kids or other picky eaters! (Though I’m not really into the whole hide-vegetables-in-your-kids’-food movement. I think beets belong in salads, not in brownies. …Actually, no. Beets belong in the trash. They’re disgusting.) Regardless, you really can’t taste the other vegetables in this soup. The flavor that comes through loud and clear is tomato. We had it with homemade bread (pictured) and I’m sure you couldn’t go wrong with garlic croutons or grilled cheese. All in all, a huge improvement over anything you’ll find in a can.

Creamy Crock Pot Tomato Soup
(Adapted from Skinnytaste)

Ingredients:

1 Tbsp. olive oil
1 c. finely chopped celery
1 c. finely chopped onion
1 c. finely chopped carrot
28 oz. can whole plum tomatoes with juice
1 tsp. dried ground thyme
1/4 c. fresh basil, chopped
3 1/2 c. chicken broth
Parmesan or Romano cheese rind (optional)
1 bay leaf
2 Tbsp. butter
2 Tbsp. flour
1/3 c. grated Parmesan cheese
1 3/4 c. 2% milk
garlic salt and black pepper to taste

Directions:

1. Heat olive oil in a large skillet over medium heat. Add the celery, onion, and carrots and sauté 5-6 minutes or until onions begin to turn golden. Add to slow cooker.

2. Pour the juice from the tomatoes into the slow cooker, then roughly crush the tomatoes with your hands and add. Add thyme, basil, chicken broth, cheese rind, and bay leaf.

3. Cover and cook on Low for 6 hours, until vegetables are soft.

4. Remove cheese rind and, using an immersion blender, blend the soup until smooth.

5. Melt the butter over low heat in a saucepan. Whisk in flour and stir constantly for 4-5 minutes. Pour about 1 cup of the hot soup into the saucepan, then add the milk and stir until smooth.

6. Pour entire mixture into the slow cooker, along with grated cheese.

7. Continue cooking until warmed through. Season with garlic salt and black pepper to taste.

Better-Than-Store-Bought Biscuits

Over the Christmas season, we were fortunate enough to spend quite a bit of time with my husband’s high school friends, a group they call “The Core” (which always reminds me an ’80s band or a trendy gym). Our friend Eric and his wife Christa were in town for the wedding of another Core member, and since they’re the only ones who live out of state, it’s always a good excuse to get everyone together when they’re in town. During a little dinner party at our house, somehow Christa and I ended up talking about how you can never make homemade biscuits turn out quite as delicious as the store-bought ones that come in the tube you smack with a spoon. Seriously, they’re never as good. What does Pillsbury put in those tubes that makes their biscuits come out all airy and fluffy and buttery? (Do I actually want to know?) Christa is from Alabama, which I figured meant she would have a slam-dunk biscuit recipe–don’t they eat biscuits all the time in the South? But even she agreed that store-bought always turns out best.

A week or so later I was making a turkey soup that needed some kind of accompaniment and remembered my conversation with Christa. Thus far in my life I had never made a successful biscuit. They always come out more gluten-y doorstoppers than buttery showstoppers. This time I turned to Mark Bittman’s trusty How to Cook Everything Vegetarian to see if his recipe could bring me out of my biscuit funk. And indeed it did! Any guesses for the secret ingredient that made the difference? More baking powder? The lately-super-popular coconut oil? Eye of newt?

Nope, the thing that made the difference was none other than that most versatile of dairy products: yogurt. (Wish I had known this when I wrote about unexpected uses for Greek yogurt.) Then again, the use of the food processor may have also made a difference–though even Mark Bittman says it’s the yogurt. These came out light, buttery, and yes, even fluffy! With the addition of some fresh herbs, they made for a hearty sidekick to turkey soup–and from now on, I’m sure I’ll be using them to accompany many other dishes, because they actually were…

better than store-bought!

Better-Than-Store-Bought Biscuits
(Adapted from How to Cook Everything Vegetarian by Mark Bittman)

Ingredients:

2 c. all-purpose or cake flour
3/4 tsp. salt
1 Tbsp. baking powder
1 tsp. baking soda
2 tsp. dried herbs, such as rosemary or thyme (optional)
4 Tbsp. butter
7/8 c. yogurt
3 Tbsp. milk

Directions:

1. Preheat oven to 450 degrees.

2. Mix the dry ingredients in the bowl of a food processor. Cut the butter into small pieces and pulse it in the food processor until thoroughly blended.

3. Transfer mixture to a large bowl. Stir in the yogurt and milk and form dough into a ball. Turn the dough out onto a lightly floured surface and knead it 10 times.

4. Press the dough to a 3/4 inch thickness and cut into 2-inch rounds with a biscuit cutter or open end of a glass. Gently reshape the leftover dough and cut again. Place the rounds on an ungreased baking sheet. Bake 9-10 minutes or until biscuits are golden brown.

Makes about 10 biscuits.