Apple Cinnamon Energy Bites

Energy bites are one of those trendy foods that seem to be popping up everywhere. These golf ball-sized snacks with vaguely nutritious connotations have appeared at bakeries near my house, and my husband and I saw several varieties on display at a cafe on our vacation in England a couple weeks ago. As a bit of a food traditionalist, I tend to shy away from anything that strikes me as super hip (see also: kombucha, golden milk lattes, anything with matcha). So until recently, I definitely had not jumped on the energy bites bandwagon.

Then again, I never realized how ridiculously easy they are to make, or that they don’t even require turning on the oven–two factors that pretty much seal the deal for a snack-slash-breakfast item to add to my repertoire.

This particular Apple Cinnamon Energy Bites recipe was inspired by a mailer I received from my grocery store. Anyone else feel like grocery stores are seriously stepping up their marketing game these days? We’ve long since left the territory of mere boring newsprint circulars. My local store now sends me books of custom-curated coupons that include glossy, colorful sheets of recipes. Though I don’t generally pay much attention to the recipes in these mailers (I tend to gravitate immediately to the 50 cents off of cream cheese, thank you) this one caught my eye. Something about the small size and roundness of these bites made them seem so delightfully poppable, like donut holes, but healthier. Inspired, I even went out and bought flax seed meal just so I could try these. (Ironically, however, I went to a different store than the one that sent me the recipe. Ha.)

Once mixed and molded–with some ingredient adjustments based on my preferences–these energy bites turned out remarkably tasty with a texture I could eat all day–smooth and chewy for the most part, but with snappy crunches of chopped pecan. Everyone in my family was a bit surprised by how they were a bit sticky to handle, but that didn’t stop us from finishing these off in 24 hours. I’ll definitely be making them again for a nutrient-packed after-school snack for my kids (and myself). And maybe from now on I’ll keep my eyes open for more successful recipes on grocery store mailers.

Where do you get new recipes from? Tell me in the comments!

Print Recipe
5 from 1 vote

Apple Cinnamon Energy Bites

A tasty mix of chewy and crunchy gives these apple cinnamon bites their appealing texture. And did I mention they're no-bake?
Servings: 12 balls

Ingredients

  • 1 1/2 c. old-fashioned oats (gluten free, if necessary)
  • 3/4 c. creamy peanut butter
  • 1/3 c. honey
  • 1/3 c. flax seed meal
  • 1/2 c. pecans, finely chopped
  • 1/2 tsp. vanilla extract
  • 1/2 tsp. cinnamon
  • 1 medium Granny Smith apple

Instructions

  • In a large bowl, combine all ingredients from oats through cinnamon. Using a box grater, grate green apple (complete with peel) directly into the bowl and mix.
  • Cover and refrigerate for at least 30 minutes. Using your hands, form mixture into 1.5-inch balls. Store in an airtight container in the refrigerator.

Notes

A Love Letter to Food Original Recipe, inspired by a Fry's Foods mailer.

Chocolate Mint Layer Cake

Hi, my name is Sarah and I’m a cake-aholic.

And I am also a nutritionist.

Do we have a problem here? Not necessarily. I mean, while I absolutely love cake, I don’t eat it every day, I maintain a healthy weight, and my diet is generally (I’d like to think) pretty healthy. In fact, I’m a big fan of the 80/20 principle when it comes to eating: stay on course nutritionally about 80% of the time, do what you like–within reason–the other 20% or so. (I even wrote an article about it here.) So do I feel bad posting a totally indulgent, party-perfect Chocolate Mint Layer Cake on the blog today?

No, I actually don’t. Especially because today is my birthday.

This cake isn’t actually for my birthday (mine will be a Neapolitan Strawberry-Vanilla-Chocolate sugar bomb I intend to make this afternoon), but rather, for my mom’s a few weeks ago. My mom and I have a little arrangement where, because I love making cakes and we both love eating them, I get to make her a cake of my choosing every year. Usually with chocolate.

This year mint chocolate was calling to me, and this recipe, modified from Lindsay over at Life, Love, and Sugar was exactly what I was looking for–except that with our family size, I didn’t actually need THREE layers. (Though I may have wanted them.) The cake came out fluffy and moist and kept well in the fridge, where it shockingly actually lasted a week. And though, with mint frosting, it can be tough to strike the right non-toothpaste-y, yet not-too-mild note, this stuff does so beautifully.

I’m no cake decorating expert–I’ve taken one single class at my local Michael’s with an instructor who was oddly enthusiastic about using Snickers to garnish cakes–but I have to say, I think this, with its pretty green color and tempting Andes mint pieces, turned out looking particularly appealing. And tasted amazing. What more does a birthday cake need?

P.S. I’m not including nutrition info for this one. It’s my birthday and I DON’T WANNA KNOW!


Chocolate Mint Layer Cake

Minty, chocolatey, and totally indulgent, this cake makes the perfect choice for a birthday or other special occasion!
Prep Time45 mins
Cook Time35 mins
Total Time1 hr 20 mins
Course: Dessert
Servings: 12 slices

Ingredients

For the cake:

  • 1 1/3 c. all-purpose flour
  • 1 1/3 c. white sugar
  • 1/2 c. cocoa powder
  • 1 1/2 tsp. baking soda
  • generous 1/2 tsp. salt
  • 1 large egg
  • 1 egg white
  • 2/3 c. milk
  • 2/3 c. vegetable oil
  • 1 tsp. vanilla
  • 2/3 c. boiling water

For the frosting:

  • 1 c. butter, softened
  • 1 c. shortening (or another cup of butter)
  • 7 1/2 c. powdered sugar
  • 3 Tbsp. water or milk
  • 1/2 tsp. vanilla
  • 2 tsp. peppermint extract
  • green food coloring, to your preference
  • yellow food coloring, to your preference
  • Andes mints, for garnish

Instructions

Make the chocolate cake:

  • Preheat the oven to 300 degrees and grease two 9-inch cake pans well. In a large bowl, combine dry ingredients (flour through salt). Make a well in the center of the dry mixture and add egg, egg white, milk, and vegetable oil. Mix to combine. Add vanilla and boiling water and mix until well incorporated.
  • Divide batter evenly between the two pans and bake 30-35 minutes, or until a toothpick inserted in the center comes out clean. Cool completely.

Make the mint frosting:

  • While the cakes cool, mix softened butter, shortening, and powdered sugar until smooth. Add water or milk, vanilla, and peppermint extract and mix again. Slowly add food coloring to your liking (I'd say go with about 2/3 green and 1/3 yellow) and mix until color is even.
  • Place one layer of the cake on a platter and frost the top. Top with second layer of cake and frost the entire cake, reserving about 1 1/2 c. for extra frosting garnishes.
  • To get the look pictured, use a cake decorating tip like Wilton 1M to pipe swirls around the outer edge of the cake's surface. Insert whole Andes mints into the swirls, press them into the base of the cake, or garnish however you like!

Notes

Adapted from Life, Love, and Sugar.

Mediterranean Baked Eggs With Croutons and Tomatoes

Do you eat eggs at dinner?

Though I almost never eat eggs at breakfast–I’m more of a grains gal to start my day–I am weirdly, unaccountably loyal to them at dinner. I suppose it’s partly because I grew up eating dinner quiches on a regular basis, but partly because eggs have so much going for them. They’re cheap, first of all, and relatively easy to purchase locally. Then there are all their nutrition benefits. With 6 grams of protein, a sizable dose of vitamins D and B12, and only around 70 calories, a single egg packs plenty of nutrition.

Also, the health concerns that used to plague most consumers about eating too many eggs have been shown to be largely unfounded. Whereas in decades gone by, the medical establishment believed that high intake of dietary cholesterol led to high blood cholesterol, we now know that saturated fat and fiber play a far more important role in blood cholesterol levels. So the days of avoiding eggs for the sake of your HDL and LDL are past.

Which is really good news for this amazing Mediterranean Baked Eggs with Croutons and Tomatoes.

This delightful breakfast-lunch-or-dinner dish comes from America’s Test Kitchen’s Complete Mediterranean Cookbook, a fabulous resource I’ve been working my way through since receiving it for my last birthday. If you like Mediterranean flavors (or dig the health perks of a Mediterranean diet), you’re going to love this unique combination of crunchy croutons, garlic-herb roasted tomatoes, tangy feta, and baked eggs. Something about the match of blistered, tender tomatoes against the crunch of croutons and the heft of the eggs has made this one of my new favorite meals.

Made step-wise by baking the croutons and tomatoes at the same time, assembling, and baking again, this recipe may look slightly daunting at first, but ultimately is quite simple once you get the hang of it. Plus, the baking time involved gives you a few extra minutes to toss a light salad–True Food Kitchen’s Kale Salad, perhaps?–to complete the picture of an unforgettable Mediterranean-style meal.

Bring on the eggs for dinner!

Mediterranean Baked Eggs With Croutons and Tomatoes

A breakfast-lunch-or-dinner standout full of Mediterranean flavor: crunchy croutons, garlic-herb roasted tomatoes, tangy feta, and baked eggs--yum!
Prep Time20 mins
Cook Time35 mins
Total Time55 mins
Course: Main Dish, vegetarian
Servings: 4

Ingredients

  • 5 c. French or Italian bread, sliced into 1/2-inch chunks--preferably a savory loaf like rosemary or garlic-infused
  • 4 1/2 Tbsp. extra virgin olive oil, divided
  • salt and pepper, to taste
  • 5 cloves garlic, minced
  • 2 tsp. dried oregano
  • 2 tsp. tomato paste
  • 1 tsp. sugar
  • 1 1/2 tsp. salt
  • 1/4 tsp. black pepper
  • 20 oz. cherry tomatoes
  • 6 large eggs
  • 4 oz. crumbled feta cheese

Instructions

  • Preheat oven to 450 degrees. In a large bowl, toss the bread chunks with 2 Tbsp. olive oil and salt and pepper to taste. Grease a 9 x 13 inch baking dish and spread the bread into it in an even layer. Set aside.
  • In the same large bowl, whisk together 1 1/2 Tbsp. olive oil, minced garlic, oregano, tomato paste, sugar, salt, and pepper. Add cherry tomatoes and stir to coat. Spread evenly on a baking sheet lined with parchment paper, pouring any additional olive oil mixture over tomatoes.
  • Place both the dish of croutons and the baking sheet of tomatoes in the oven. Bake the croutons for 10 minutes and the tomatoes for 20 minutes.
  • Once both tomatoes and croutons have baked, pour tomatoes over the croutons and gently stir together, adding an additional 1 Tbsp. olive oil. Using a large spoon, make six shallow indentations in the mixture. Crack one egg into each indentation. Season with salt and pepper. Return the baking dish to the oven for another 12 minutes or until eggs are just set.
  • Let cool for about 5 minutes, then sprinkle crumbled feta over the top and serve.

Cauliflower Steak Sandwiches with Garlic-Lime Aioli

Cauliflower is, as they say, “having a moment.” More accurately, it’s having a decade. Everywhere you look, cauliflower versions of food products have cropped up in the last few years, whether it’s cauliflower rice, cauliflower pizza crust, or cauliflower cake. (Yes, really.) Apparently our national fear of carbs and/or gluten has driven us to conclude that cauliflower is the miracle vegetable that will save our dietary souls. I’d say this tweet I saw this morning pretty well sums it up:


I haven’t jumped on the cauliflower bandwagon (I still think bread and potatoes have their own nutritional benefits), but cauliflower does boast plenty of nutrients of its own, including fiber, potassium, and vitamin C. So bear with me as I add to the Cauliflower Conversation with these Cauliflower Steak Sandwiches with Garlic-Lime Aioli. I think you’ll forgive me when you taste them.

Cauliflower steak sandwiches have actually been on my mind for about six months. Back in February, our family took a trip to Disneyland. At the Red Rose Taverne in Fantasyland (formerly the Village Haus pizza restaurant) I was trying to be healthy and ordered the Enchanted Cauliflower Sandwich.

And it ROCKED. MY. WORLD.

As described on the menu, it’s a “grilled cauliflower steak, spicy lime aioli, tempura-battered green beans, lettuce and tomato on a toasted roll.” But the description doesn’t do justice to the amazing combination of flavors and textures this plant-based dish had to offer. It was one of the best sandwiches I’ve ever eaten. Ever since, I’ve wanted to re-create it at home, but couldn’t find any copycat recipes online.

Sooooo I had to make my own. I started with roasted cauliflower steaks (I don’t grill; it’s my personal cooking Waterloo)…and seasoned them with lemon juice, olive oil, and red pepper. These cauliflower cross-sections emerge from the oven crispy and sandwich-ready.

From there, whipping together a chili-garlic-lime aioli wasn’t too complex. Added to a toasted ciabatta bun with lettuce, it totally fulfills my Fantasyland-inspired craving. (I will admit, though, that I haven’t gone to the trouble of making tempura-battered green beans like the Red Rose Taverne. I do enjoy putting Snapea crisps on top, however!) Now I don’t have to go all the way to Disney for my favorite sandwich.

But I think I’ll keep going anyway. 😉

Cauliflower Steak Sandwiches with Garlic-Lime Aioli

Inspired by the Enchanted Cauliflower Sandwich at Disneyland's Red Rose Taverne, this copycat makes a tasty plant-based lunch or dinner.
Prep Time10 mins
Cook Time35 mins
Total Time45 mins
Servings: 4

Ingredients

For the cauliflower steaks:

  • 1 large head cauliflower
  • 1/4 c. olive oil
  • 1 Tbsp. fresh lemon juice
  • 1/4 tsp. garlic powder
  • 1/4 tsp. red pepper flakes
  • salt and pepper, to taste

For the aioli:

  • 1/2 c. mayonnaise
  • juice of 1/2 a lime
  • 1 garlic clove, minced
  • 1/4 tsp. chili powder

For assembling the sandwiches:

  • 4 ciabatta rolls, sliced in half and toasted
  • 4 large leaves romaine lettuce
  • 1 tomato, sliced

Instructions

Make the cauliflower steaks.

  • Preheat oven to 400 degrees. Slice cauliflower head lengthwise through the core into 4 slabs. (It helps to leave a bit of the core on to hold them together.) Place on greased baking sheet.
  • In a small bowl, whisk together olive oil, lemon juice, garlic powder, red pepper flakes, and salt and pepper. Brush this mixture on the upward-facing side of the cauliflower. Roast for 15 minutes.
  • Flip cauliflower steaks and brush the other side with remaining olive oil mixture. Continue roasting another 20 minutes or until browned around the edges.

Meanwhile, make the aioli.

  • In a measuring cup, combine all aioli ingredients and mix with an immersion blender (or whisk vigorously) until well combined.

Assemble the sandwiches.

  • Assemble to your liking with cauliflower steaks, aioli, lettuce, and tomato on the toasted ciabatta rolls.

Notes

A Love Letter to Food original recipe, cauliflower steaks adapted from Allrecipes.com.

Red, White, and Blueberry French Toast Casserole

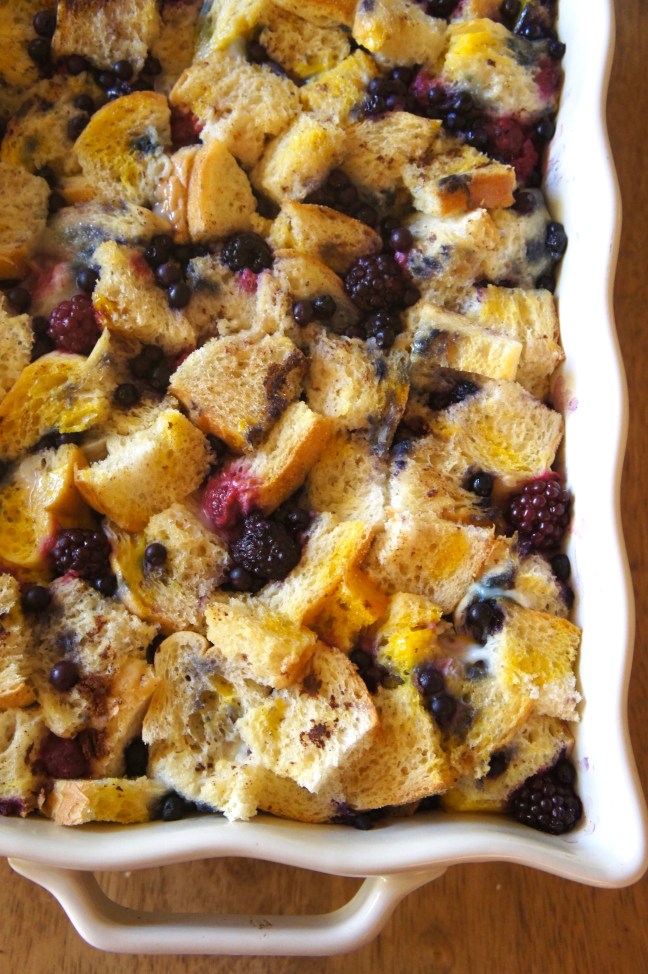
As far as food goes on the Fourth of July, it’s always the cookouts and barbecues that get all the glory. We think of char-grilled hot dogs and hamburgers, bright yellow corn on the cob, and wiggly-jiggly Jello salads served at lunch or dinner. Rarely do we think of breakfast as an opportunity to make (and eat) something patriotically themed. Well, it’s time to change that! This Red, White, Blueberry Overnight French Toast features a mix of raspberries, blueberries, and blackberries in a sweet-but-not-too-sweet custard that will start your Independence Day off right.

I served this up yesterday at a fun pajama party breakfast (soon to be blogged) that my kids and I hosted for a group of friends. As one item on a menu of several breakfast dishes, it was so nice to know that I could put this French toast casserole together quickly the night before and not stress on the morning of our event. All it really takes is a loaf of French bread, cubed and layered with frozen berries in a baking dish like so…

Then, whisk together a quick milk-and-egg mixture with a bit of brown sugar and a hint of cinnamon, stash in the fridge, and pull out to bake when you’re ready!

Our young guests–a dozen or so elementary-aged kids–certainly approved. And with just a half cup of sugar in the whole 9 x 13-inch pan, I felt pretty good about feeding it to them, too. For a special occasion breakfast treat, this comes in at a surprisingly modest 240 calories per serving (before maple syrup, anyway).

So if you’d like to spruce up your Fourth of July festivities by starting early in the day, don’t forget to whip up your Red, White, and Blueberry French Toast Casserole the night of the Third.

Have a wonderful Independence Day!

Check out these other Fourth of July recipes from A Love Letter to Food!

Red, White, and Blue Berry Cheesecake Parfaits

Dysfunctional Family Recipe Salsa

Fresh Blueberry Ice Cream

Garlic Herb Potato Wedges

Mexican Street Corn Dip

Pavlova with Fresh Berries

Mediterranean 7-Layer Dip

Red, White, and Blueberry French Toast Casserole

Bursting with berries, this French toast casserole is a special occasion breakfast that takes next to no time to prepare!
Prep Time15 mins
Cook Time55 mins
Total Time4 hrs 10 mins
Course: Breakfast
Servings: 8

Ingredients

  • 1 loaf French bread
  • 1 1/2 c. frozen mixed berries (raspberries, blueberries, and blackberries)
  • 2 1/4 c. whole milk, or a mix of 2% and half and half
  • 8 eggs
  • 1/2 tsp. cinnamon
  • 2 tsp. vanilla
  • 1/2 c. brown sugar, packed
  • maple syrup for serving

Instructions

  • Grease a 9 x 13 inch baking pan with cooking spray. Slice French bread into 1-inch chunks and spread half of them in the pan. Sprinkle half the berries on top. Repeat with the remaining half of bread chunks and berries.
  • In a medium bowl, whisk together milk, eggs, cinnamon, vanilla, and brown sugar until smooth. Pour over bread, pressing down the top with a spatula to help bread soak up the milk mixture.
  • Cover and refrigerate at least 3 hours (overnight is preferable). Bake in a 350 degree oven for 50-55 minutes. Serve with maple syrup.

Notes