Smoked Salmon and Cream Cheese Frittata

For fans of smoked salmon, this Smoked Salmon and Cream Cheese Frittata is a delightful brunch or lunch!


I remember the first time I heard of smoked salmon. I was in junior high, and a bagel place had just opened up at the intersection nearest my house. That summer between seventh and eighth grade, my mom and I would walk over to Bagel Nosh and grab bagel sandwiches, then come home and watch movies to stay out of the punishing Arizona heat. Good memories.

What always seemed weird to me, though, was this bagel topping called “lox.” I had never encountered the concept of cured fish, and it definitely seemed bizarre that anyone would want to eat it on a bagel…with cream cheese…and something called capers? No, thanks. I stuck solidly to my tuna salad or turkey and cheese.

As I’ve become more open-minded about food through the years, however, I’ve come around to smoked salmon as one of my favorite proteins. I now love its smoky flavor and tender texture in dips (like this Creamy Smoked Salmon Dip), on sandwiches, or just with crackers and cheese. So a smoked salmon and cream cheese frittata? A big YES from me!

This frittata is a modification of a recipe in a cookbook I’ve especially been enjoying lately: Ellie Krieger’s Whole in One: Complete, Healthy Meals, which features meals you can make in a single pot, skillet, or sheet pan. (This also gets a big YES from me, for obvious reasons.)


This cookbook has so far been a total winner, and I’m sure you could cook anything in it exactly as written for a fabulous finished product. But to make this particular frittata, I took some substantial liberties! Like most egg dishes, this is one you can play with to tailor to your tastes–but the basic ingredients of smoked salmon, cream cheese, fresh dill, and chives are the primary non-negotiables. (Oh, and eggs, I guess.)

I made this for a quick lunch on a Lenten Friday and it was just perfect–light, herby, and fluffy. At least thought so. My preteen, non-smoked salmon-loving son was less convinced. So note to junior highers everywhere (my former self included): Get on the smoked salmon train ASAP. You won’t be sorry.

Print Recipe
5 from 1 vote

Smoked Salmon and Cream Cheese Frittata

Smoky, creamy, and herb-y, this frittata is an ideal meatless brunch or lunch.
Prep Time5 mins
Cook Time10 mins
Servings: 4 people

Ingredients

  • 7 large eggs
  • 1/4 c. milk
  • scant 1/2 tsp. salt
  • 1/8 tsp. black pepper
  • 1 tbsp. olive oil
  • 1/4 c. green onions or scallions, sliced
  • 4 oz. smoked salmon, chopped
  • 2 Tbsp. fresh dill (or 2 tsp. dried)
  • 2 oz. cream cheese (I used light, which tends to be easier to spread)

Instructions

  • In a small bowl, whisk together the eggs, milk, salt and pepper. Set aside.
  • In a large oven-proof skillet, heat 1 tbsp. olive oil over medium-low heat. Add green onions and cook about 1 minute. Add smoked salmon and dill and stir to distribute evenly across the skillet. Pour whisked egg mixture on top and cook (without stirring) about 8 minutes over medium-low heat. The eggs should be set around the edges but a bit jiggly in the center.
  • Preheat broiler. Dollop the cream cheese by teaspoonfuls on the surface of the frittata, then broil for 1 1/2 to 2 minutes until the surface turns golden brown. Let sit a few minutes, then dig in!

Notes

Inspired by a recipe in Ellie Krieger's Whole in One.

Espresso Sugar Cookies

Espresso Sugar Cookies are light and chewy, loaded with espresso flavor!

Nowhere is the phrase “necessity is the mother of invention” truer than in recipe development. And, for me, at no time is it truer than during Lent. These Espresso Sugar Cookies were born out of a little bit of culinary and spiritual necessity.

Let me explain.

In the 40 days of fasting, prayer, and almsgiving that we Catholics observe this time of year, it’s customary to make sacrifices that unite us with the sufferings of Jesus in some small way. It may sound lame or insignificant, but this year one of my sacrifices is giving up chocolate.

But mannnnn I want chocolate so. bad. every. day. I’ve had a few Reese’s pieces, which technically don’t contain any chocolate, but my husband claims that’s cheating. And hey, maybe having any sweets might be considered cheating, but for me, relinquishing chocolate for six weeks is sacrifice enough. I’m okay continuing to eat other, non-chocolatey dessert foods here and there.

That said, it’s kinda tough to find desserts I actually like that aren’t chocolate. In my efforts to scare up something a little bit like chocolate, but not chocolate, in the last nine days since Ash Wednesday, I thought I might turn to the flavor of coffee. After all, chocolate and coffee often pair together, and according to The Flavor Bible, they’re complementary tastes.

Plus, I happened to have some espresso powder hanging around from when I recently made this totally indulgent, craaaaazzy layer cake for a friend’s husband’s birthday. Why not give espresso powder a spin in non-chocolatey cookies?

Trouble is, almost every baked goods recipe on the internet that uses coffee also calls for chocolate. I mean, mocha is KING in cookies, pies, cakes, cheesecakes, and more. So it was up to me to create my own espresso sugar cookies! I’m so glad I did!

These cookies are chewy and light, with just a hint of crispiness around the edges. They taste like coffee, of course, but not in an overpowering way. They’re the perfect accompaniment to an afternoon or after-dinner cup of joe. Leaving chocolate out of the equation actually allows the espresso flavor to shine through all on its own.

So, believe it or not, I kinda love that these cookies don’t include any chocolate! Who’da thunk?

Espresso Sugar Cookies

Chewy and light, these espresso sugar cookies are perfect with a cup of coffee!
Prep Time15 mins
Servings: 18 cookies

Ingredients

  • 1/2 c. butter, softened
  • 1 1/4 c. white sugar
  • 1 egg
  • 1 tsp. vanilla extract
  • 2 c. all-purpose flour
  • 1 1/2 tsp. espresso powder
  • 2 tsp. baking powder
  • 1/4 tsp. salt
  • 3-4 Tbsp. milk

Instructions

  • Preheat oven to 375 degrees. Grease two cookie sheets.
  • In a large bowl, cream together the butter and sugar. Add vanilla and egg and mix.
  • Mix in flour, espresso powder, baking powder, and salt. Slowly add milk, t tablespoon at a time, and mix until the batter holds together but isn't visibly wet.
  • Drop cookies by the tablespoonful onto the greased cookie sheets. Bake 12-14 minutes or until set. Store in an airtight container.

Notes

A Love Letter to Food original recipe.


Sausage, Sweet Potato, and Brussels Sprout Hash

Is it a breakfast? A lunch? Or a dinner? This Sausage, Sweet Potato, and Brussels Sprout Hash is perfect for any meal.


Foodie trivia: Is it Brussel sprouts or Brussels sprouts? It’s okay, take your time, I’ll wait.

Got your answer? Did you say Brussels like the smarty pants you are? Well, you’re correct. Although three-fourths of English speakers get it wrong, this veggie is, in fact, named after the city of Brussels. The compact little green balls were cultivated in Belgium in the 16th century. And here’s a really deep dive fun fact: In Belgium, they’re not called Brussels sprouts at all. (Because in Belgium they don’t speak-a the English.) Instead, the Dutch word for these veggies is spruitjes.

I didn’t grow up eating Brussels sprouts, so they’ve been kind of a fun discovery for me as an adult. Although I know many people seem to think they’re the stuff of hideous vegetable nightmares, I find them delicious, especially roasted or pan-sautéed…and particularly in this Sausage, Sweet Potato, and Brussels Sprout Hash. When the sprouts’ exterior leaves sear to crispy brownness, it turns them into irresistible bites of veggie candy, if you ask me. Add to that the soft-on-the-inside, crispy-on-the-outside texture of the sweet potatoes, onions, and sausage slices and you’ve got a tasty no-brainer of a meal any time of day.

I’ve made this hash twice now and both times it’s been the easy, satisfying one-dish dinner I’ve needed on a weeknight. With just six ingredients and minimal prep, it doesn’t get much simpler than chopping a few veggies and meat, sautéing, and topping the whole thing with fried eggs. (DON’T skip the fried eggs. They bring an extra richness that makes the hash feel downright indulgent.)

The other bonuses of this tasty, all-purpose meal? It’s gluten-free, dairy-free, and Paleo-friendly, if you’re into that kind of thing.

Still, for me, the biggest draws of this hash are its delicious taste and easy-peasy prep. Who couldn’t use more of that in their life?

Print Recipe
5 from 1 vote

Sausage, Sweet Potato, and Brussels Sprout Hash

A hearty meal for breakfast, lunch, or dinner with plenty of flavor from simple ingredients!
Prep Time10 mins
Cook Time15 mins
Servings: 4

Ingredients

  • 1 tbsp. olive oil (or more as needed)
  • 1 medium yellow onion, diced
  • 2 medium sweet potatoes, diced 1/2-inch thick
  • 3 c. Brussels sprouts, halved and/or quartered
  • 1 12-oz. package smoked sausage links, cut into 1/2-inch slices
  • 4 large eggs
  • salt and pepper, to taste

Instructions

  • In your largest nonstick skillet, heat olive oil over medium heat. Add diced onions and sweet potatoes and sauté about 5 minutes, or until the potatoes begin to soften.
  • Make room in the skillet and add the halved Brussels sprouts and sausage slices. (You can add more olive oil, if needed.) Sauté another 3 to 5 minutes or until the sprouts and sausage slices begin to brown.
  • With a large spoon, press four divots into the sausage-veggie mixture. Crack an egg into each divot and reduce heat to medium-low. Cover the skillet and cook until eggs have just set, about 4 minutes. Season with salt and pepper to taste and serve.

Notes

A Love Letter to Food original recipe.

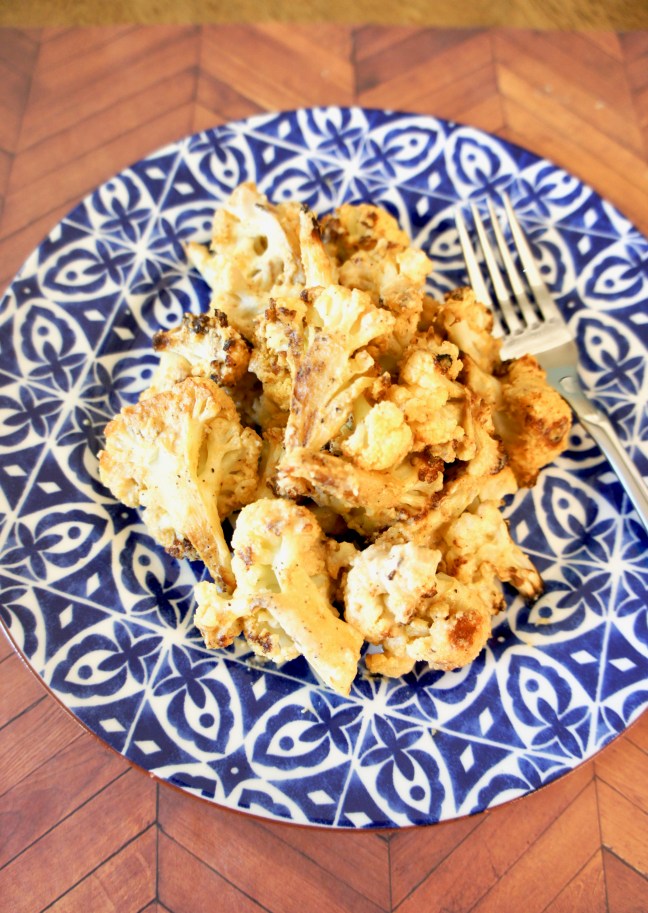
Tahini Roasted Cauliflower

This tahini roasted cauliflower is my absolute favorite! It’s the perfect crispy, slightly spicy side dish.

You know you’re really a grown-up when you get excited that your whole family is leaving the house so you can stay behind and clean. I recall the first time I shooed my family out of the house to go do something legitimately fun–roller skating, maybe?–to let me scrub counters and mop floors in peace.

In a similar way, the other night when two of my kids were eating dinner at a friend’s and my husband took my other son out for dinner, I kinda couldn’t contain my excitement. It meant I got to stay home and make myself an entire freaking head of tahini roasted cauliflower.

And this is how I know I’m a grown-up…or how I know I’m a nutritionist…or maybe just how I know I love really good food. Because, friends, this cauliflower is ahhhh-mazing. Over the next two days, I proceeded to eat the entire head myself.


If you’ve ever thought cauliflower was bland, this is the recipe for you. It starts with an Amazing All-Purpose Tahini Sauce–a flavorful blend of tahini, lemon juice, garlic, and spices. For a vegan sauce, this recipe is delightfully, surprisingly creamy. (It gets its silky texture from ground sesame seeds.) Once you’ve whipped up a batch, simply slather it atop perfectly crisped roasted florets…and voila, uber-flavorful veggies!

Not only will you get healthy fats from tahini’s sesame seed base, you’ll add even more of them by roasting cauliflower in olive oil. Meanwhile, cauliflower’s status as a cruciferous veggie makes it a nutrient-dense choice that even may have cancer-fighting properties.

So there you have it–roasted tahini cauliflower, a deliciously creamy, healthy veggie to add to your repertoire. Try it as a side dish with meat, in a grain bowl, or, like me, eat it straight off the pan as a main dish in its own right.

Tahini Roasted Cauliflower

Roasted cauliflower gets a boost from a creamy, vegan tahini sauce!
Prep Time10 mins
Cook Time25 mins
Servings: 4 as a side dish

Ingredients

For the cauliflower:

  • 1 large head cauliflower, diced into florets
  • 2 Tbsp. olive oil
  • 1 tsp. paprika
  • salt and pepper, to taste

For the tahini sauce:

  • 1/3 c. tahini
  • 1/3 c. water
  • 1/4 c. lemon juice
  • 2 cloves garlic, minced
  • 1/2 tsp. cumin
  • 1/4 tsp. cayenne pepper
  • 1/4 tsp. salt

Instructions

Roast the cauliflower:

  • Preheat oven to 425 degrees F. Toss cauliflower florets with olive oil, paprika, and salt and pepper. Spread evenly on a baking sheet. Bake 25-28 minutes, stirring once halfway through.

Make the tahini sauce:

  • While cauliflower roasts, prepare the sauce by combining all ingredients thoroughly in a measuring cup.

Dress the cauliflower:

  • When cauliflower comes out of the oven, dress with tahini sauce to taste. Save extra tahini sauce covered in the refrigerator.

Notes

A Love Letter to Food original recipe.

Flourless Chocolate Hazelnut Cake

Even if you’re not gluten-free, you’ll love the rich, chocolatey flavor of this Flourless Chocolate Hazelnut Torte. Serve with fresh whipped cream! 

Ready for Christmas yet? I’ll admit, even though it’s only three days away, I’m not exactly prepped for the big day. I still have a couple of gifts to buy and wrap and I’m still not 100% sure of my Christmas dinner menu. What can I say, it’s been a crazy year, right? (If there’s one upside to the Covid-19 pandemic, it’s the fact that we can all point to it as an excuse for just about anything…including not being ready for Christmas. At least that’s the story I’m sticking to.)

Even in the midst of this surreal year, I’m fortunate that my family’s Christmas won’t look too much different from our norm. We’ll celebrate Mass the afternoon of Christmas Eve, where I’ll be singing soprano in the choir (in the parking lot because #socialdistancing). Then we’ll go out to dinner at our favorite seafood restaurant, come home, and snuggle by a fire watching A Muppet Christmas Carol. Singing Muppets never get old.

However you’re celebrating the holidays this year, it’s entirely possible you’ll be eating with folks with food restrictions. (Or perhaps you have some yourself.) Among my own family and friends, I can count dozens of people who don’t eat one thing or another–and the most common no-no seems to be gluten. Fortunately, for those living the GF life, there are plenty of tasty ways to get around gluten, even when it comes to my favorite course of the holiday meal: dessert.

I made this gluten-free flourless chocolate hazelnut cake back at Thanksgiving for my GF sister-in-law–and, who am I kidding, for myself because it’s DELISH. It was definitely a hit among all the eaters gathered at my husband’s family’s holiday dinner. With 12 ounces of bittersweet chocolate, it’s super dense and rich, meaning a little bit goes a long way. I also love that it’s flavored with liqueur (chocolate liqueur or hazelnut, like Frangelico, does the job). Fresh whipped cream on the side is optional, but I’d say more or less necessary, as its fluffiness helps cut the cake’s rich texture.


Regardless of your food allergy or sensitivity status, this dessert is sure to please. Hazelnuts are, in my opinion, a totally underrated nut with plenty of fiber, magnesium, and vitamin B-6, plus a little iron. (And, yeah, ok, quite a bit of fat…but at least it’s mostly the healthy monounsaturated kind!) Besides, they’re always an excellent flavor match with chocolate. Check out their full nutrition facts here.

Wishing you a very merry Christmas filled with delicious food! Tell me if you make this Flourless Chocolate Hazelnut Cake as a last-minute dessert!

Flourless Chocolate Hazelnut Cake

This gluten-free dessert is nutty, chocolatey, and super rich! Serve with fresh whipped cream.

Ingredients

  • 12 oz. 60% cacao bittersweet chocolate, chopped or chocolate chips
  • 3/4 c. butter, cut into chunks
  • 6 large eggs
  • 1 c. packed light brown sugar
  • 1/2 c. hazelnut or chocolate liqueur
  • 1 c. hazelnuts, ground in the food processor
  • 1 tsp. kosher salt
  • Optional: Fresh whipped cream, for topping

Instructions

  • Preheat to 350°F. Spray a 9-inch-diameter springform pan with cooking spray, then line bottom with a parchment paper round. Wrap the outside of pan tightly with 2 layers of heavy-duty foil.
  • Combine chocolate and butter in a medium metal bowl or double boiler. Bring a small saucepan of water to a simmer and place the bowl on top. Whisk until the mixture is melted. Set aside.
  • In a large bowl, whisk together eggs, brown sugar, chocolate or hazelnut liqueur. Whisk in the chocolate mixture until smooth, then stir in ground hazelnuts and salt.
  • Pour the batter into the prepared springform pan. Fill a roasting pan halfway with boiling water and carefully place the pan in the center (so that water reaches about halfway up the sides of the springform pan). Tent the top of the springform pan loosely with foil and bake about 90 minutes. The top will still look shiny but should be dry to the touch.
  • Remove the springform pan from the roasting pan and cool. Refrigerate about 3 hours before serving, then enjoy with fresh whipped cream!

Notes

Adapted from Epicurious.